D115P/DE115P on Elastix User Manual
Contents
Chapter 3 Software Installation and Configuration
3.2 Configure on Elastix Webpage
General Safety Instructions
CAUTION
- 1. The computers that have DE115P/DE115E card installed must comply with the country’s specific safety regulations.
- Only service personnel should go to install DE115P/DE115E card.
- Before installing DE115P/DE115E card, please unplug the power cord and remove the cover from your PC.
- For avoiding personal injuries and damages to your machine and
DE115P/DE115E card, make sure bracket of the card is secured to the PC’s chassis ground by fastening the card with a screw.
- Electrical Surges, ESD are very destructive to the equipment. To avoid it, make sure there is a low impedance discharge path from your computer to chassis ground.
- To reduce the risk of damage or injury, please follow all steps or procedures as instructed.
Test Environments
CentOS-5.5
Kernel version: 2.6.18-194. el5
Elastix: 2.0.3-i386
Dahdi Version: 2.3.0.1
Asterisk Version:1.6.2.13
Hardware: OpenVox DE115P/DE115E
Chapter 1 Overview
1.1 What is Asterisk
The Definition of Asterisk is described as follows:
Asterisk is a complete PBX in software. It runs on Linux, BSD, Windows (emulated) and provides all of the features you would expect from a PBX and more. Asterisk does voice over IP in four protocols, and can interoperate with almost all standard-based telephony equipment using relatively cost-effective hardware. Asterisk provides Voicemail services with Directory, Call Conferencing, Interactive Voice Response, Call Queuing. It supports three-way calling, caller ID services, ADSI, IAX, SIP, H323 (as both client and gateway), MGCP (call manager only) and SCCP/Skinny (voip-info.org).
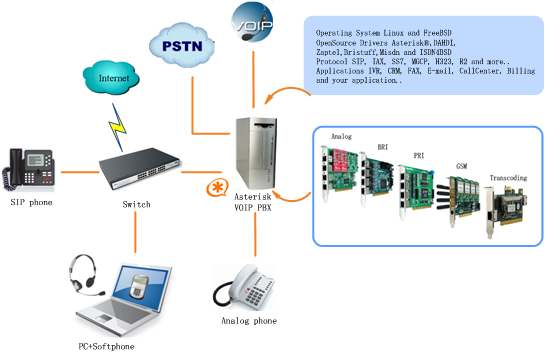
Figure 1 Topology
1.2 What is DE115P/DE115E
The DE115P/DE115E offers an on-board Octasic® DSP-based echo cancellation module. They support T1, E1, and J1 environments and is selectable on a per-card or per-port basis. The Octasic® DSP-based EC module enables users to eliminate echo tails up to 128ms or 1024 taps across all 32 channels in E1 mode or 24 channels in T1/J1 modes. Further, this module takes advantage of the Octasic® Voice Quality Enhancement to provide superior sound quality on all calls.
DE115P/DE115E supports industry standard telephony and data protocols, including Primary Rate ISDN (both N. American and Standard Euro) protocol families for voice, PPP, Cisco, HDLC, and Frame Relay data modes. Both line-side and trunk-side interfaces are supported.
DE115P works with Asterisk®, Elastix®, FreeSWITCH™, PBX in a Flash, trixbox®, Yate™ and IPPBX/IVR projects as well as other Open Source and proprietary PBX, Switch, IVR, and VoIP gateway applications.
Target Applications
- Voice-over Internet Protocol (VoIP) Services
- Complex IVR Trees
- "Meet-Me" Bridge Conferencing
- Calling Card Platforms
- VoIP Gateways (support SIP, H.323, and IAX)
- Legacy PBX/IVR Services
- Voice/Data Router (replace expensive routers)
- PRI/Switch Compatibility - Network or CPE
Chapter 2 Hardware Setup
There are some points that should be paid attention to when setting up DE115P/DE115E.
2.1 Span type setup
Each DIP switch controls one span configuration for E1 or T1.Setting DIP1 to ON means SPAN1 will be E1.Setting DIP1 to OFF means SPAN1 will be T1.
2.2 CardID switch setup
If want to install more than one card of DE115P/DE115E in a PC, you should take care of the card ID switch. There are two pieces of rules you must obey:
- The first card must be set to 0, which is a card that will be initialized (i.e. installing driver) firstly when the system boot up. And the second should be set to 1, and so forth.
- At most cases, Linux will initialize PCI devices according to their slot order. The slot nearest to the CPU will be initialized firstly and the far end slot will be initialized at last. That is to say, the card which is nearest to the CPU ID should be set to 0 if there is more than one D410P/DE410P on your machine.
2.3 Slot compatibility
DE115P is compatible with 32-bit 5.0V PCI slot, 64-bit 3.3V PCI slot or 64-bit 5.0V PCI slot, but DE115E is compatible with PCI-E×1, ×2, ×4, ×8, ×16 slot; you should confirm your slot type and insert into a PCI slot or PCI-E slot as previously described.
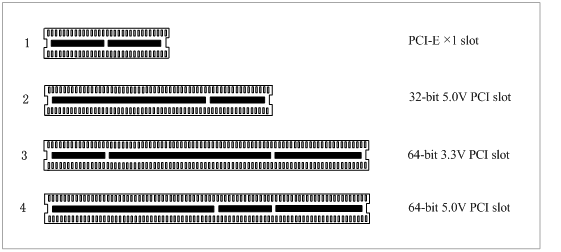
Figure 2 PCI-E and PCI slot
2.4 Timing cable
If you have just one card in the system, all channels on that card have already run under the same clock source, so timing cable is unnecessary. But if there are more than one card, using timing cable has some advantages. Before using the clock line, each card works on its own clock, therefore precision of the clock is limited; each card will send /receive voice data at different speeds. In voice usage, this small issue can be omitted, but in data communication such as Fax/Modem, it will cause big problems. Data loss will cause communication broken or fax broken. Timing cable will force all cards to work at the same clock source, send data at the same speed, as a result no data will lost.
If you found J914 (input) and J915 (output) interfaces on the card, it means the card supports clock line, for details, please refer to HERE.
Chapter 3 Software Installation and Configuration
DE115P/DE115E supports DAHDI software driver on Linux. To make full use of DE115P, you should install Elastix firstly.
3.1 Installation
1. Install Elastix-2.0.3
2. Hardware detection
# lspci –vvvv
Check the outcome and confirm your system has recognized DE115P/DE115E. If it has been recognized, "communication controller" will be displayed in the output information like that:
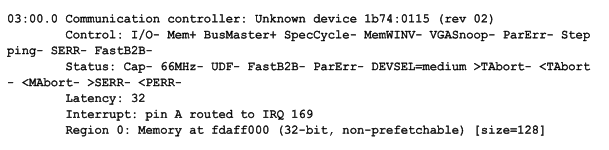
Figure 3 Hardware detection
If DE115P/DE115E is not recognized by the system, you have to power off and take out the card, then try to insert it into other PCI or PCI-E slot.
3.2 Configure on Elastix Webpage
1. Log into Elastix Webpage
Please open your browser and enter the PBX IP address, then type Username and Password, then click on "Submit" button in the following screen.
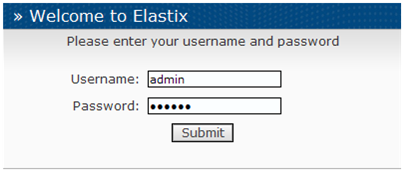
Figure 4 log into elastix webpage
2. Detect Hardware
Please click System, then click "Hardware Detector", chose Replace file chan_dahdi.conf, click "Detect New Hardware" as follows:
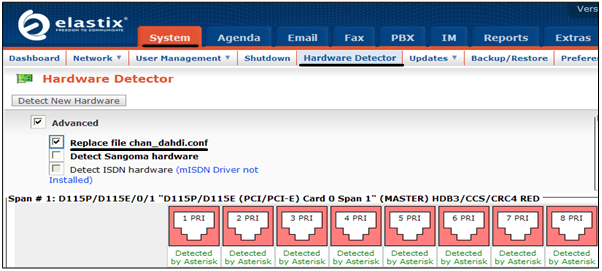
Figure 4 Hardware detection
Then a part of system.conf which is one of the basic channel configuration files is displayed.
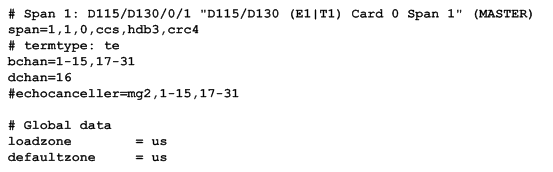
Figure 4 A part of system.conf
In order to match your country pattern, you need to change parameters loadzone and defaultzone to your country. For example, your system is in CHINA, you would like them change to:
loadzone = cn
defaultzone = cn
Some zonedata is available in the file
.. /dahdi-XX/tools/zonedata.c, you can refer to it to match your country mode. Meanwhile, you also need to modify another parameter which is in file /etc/asterisk/indications.conf.
country=cn
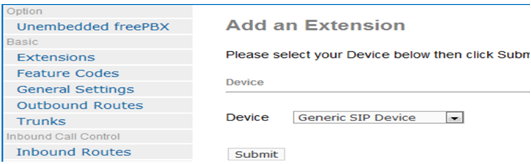
3. Create Extensions
1) Click "PBX" button in the following figure

2) Click on Extensions bar in the following illustration
3) Set "User Extension" to 111, "Display Name" to 111 in the following illustration
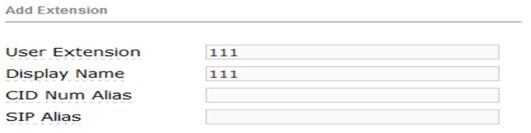
4) Then click on "Submit" button:
5) Click the "Apply Configuration Changes Here" bar in the top of the screen.:

4. Add Incoming Route
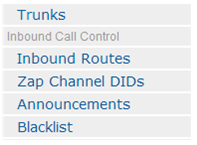
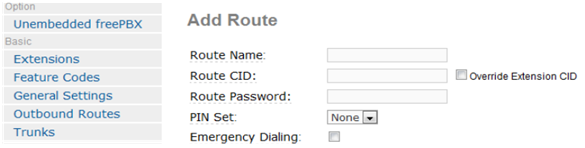
1) Click on "Inbound Routes" bar.
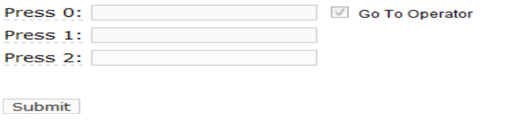
2) Input incoming1 in the textbox of "Description" as the following screen

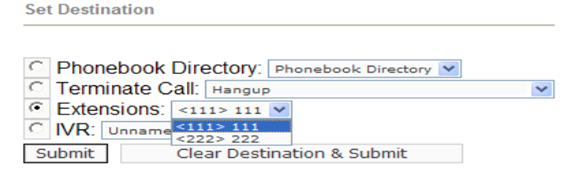
3) Click the "Extensions" textbox to choose an extension number from the drop down selection box. Then click submit. Please refer to the following illustration
4) Click the "Apply Configuration Changes Here" bar in the top of the screen

5. Create Trunk
To dial out, you have to create a trunk.
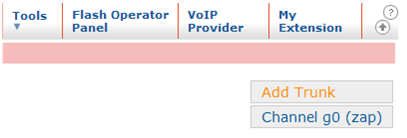
1) Click on "Trunks" bar as the following illustration
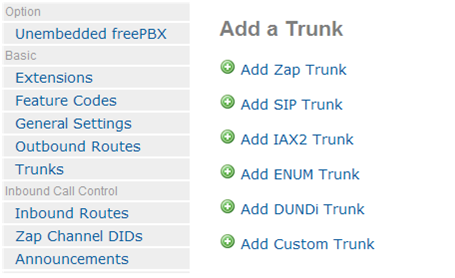
2) Click on "Trunk ZAP/g0" button on the up right corner of the page. Please refer to the following illustration
3) Input trunk1 in the textbox of "Outbound Caller ID". Please refer to the following illustration
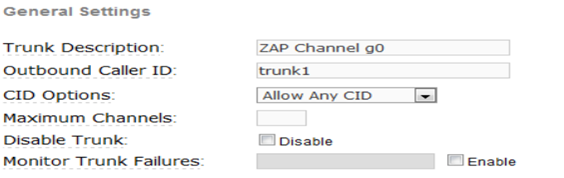
4) Click on "Submit Changes" button in the following screen
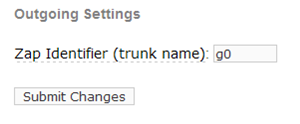
5) Click the "Apply Configuration Changes Here" bar in the top of the screen:

6. Set up Outbound Route
1) Please click on the "Outbound Routes" as the following illustration
2) Please click "09_outside button" and keep default parameters in the following screen. Please refer to the following illustration
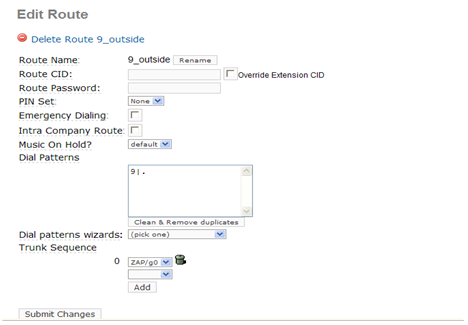
Here we use the default "Dial Pattern" as 9|., so we have to add prefix 9, when dial out. For example, if you want to call 123456, then you have to press 9123456 on your phone.
3) Click the "Apply Configuration Changes Here" bar in the top of the screen. Until now, it has complete a simple extension and you can make calls.

Additional function
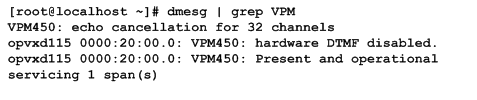
Users should run command "cat /proc/interrupts" to check DE130P has independent interrupt. If it shares interrupt with other device, it may cause some problems even cannot work normally. While DE130P allows users to modify interrupt pin during firmware upgrade for avoiding conflict. Or you can see if the EC module is working as follows:
# dmesg | grep VPM
Chapter 4 Reference
Tips
Any questions during installation, please consult in our forum or look up for answers from the following websites:
Appendix A Specifications
• Weight and size
Weight: DE115P /DE115E 76g
Size: DE115P 12.9×10.3×1.8cm3
DE115E 13×10.8×1.8cm3
• Interfaces
PCI Bus: 3.3V or 5V bus slot, PCI 2.2 or above (DE115P)
Any type of PCI-E ×1, ×2, ×4, ×8, ×16 slot
• Environments
Temperature Operation: 0 ~50°C
Temperature Storage: -65~125°C
Humidity: 10 ~90% NON-CONDENSING
• Power consumption
Voltage: 3.3V, 5V
• Hardware and software requirements
RAM 128 + MB
Linux kernel 2.4.X or 2.6.X
CPU 800+ MHZ