iCallDroid User Manual
Chapter 1 Overview
1.1 What is iCallDroid
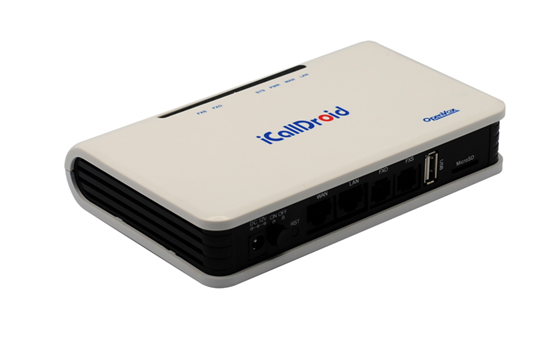
OpenVox iCallDroid is a small, smart and open source IP-PBX designed for home
use. With the analog ports integrated, the legacy telecom equipments would be able toconnect to the modern unified communication world. The smart phones and other
mobile devices can be one part of it. Suppoting SIP and G.729 protocal and codec,
expansibility is strongly enhanced. The Asterisk GUI interface tremendously reduces
the difficulty to enter the VoIP communications. Easy-to-use and ready-to-work are
features shown to you when you open the package.
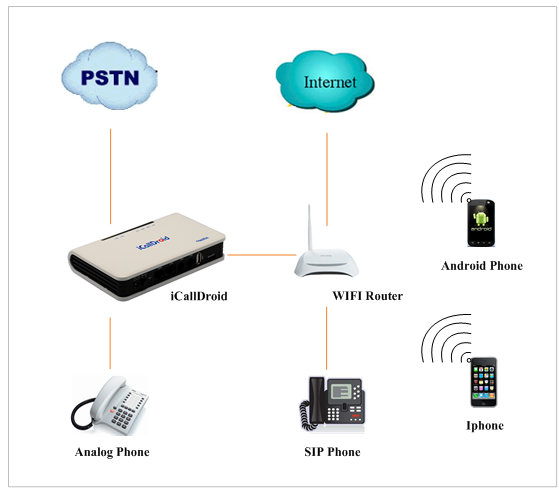
Sample applications
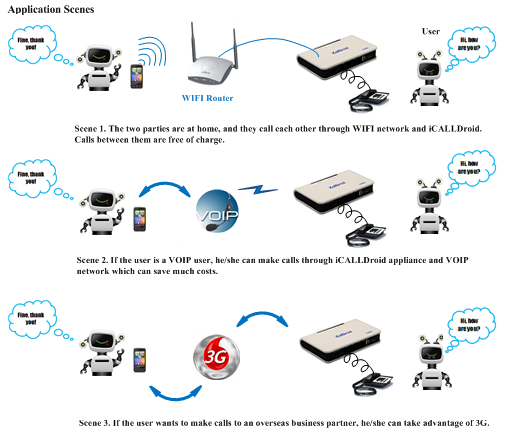
Figure 2 Sample applications
Features
- Access via: telnet/web
- Call conference
- Call Detail Record(CDR)
- Call forward, Call waiting, Call transfer
- Call queues, Ring group
- Configurable IVR menu
- Music on Hold
- PSTN analog /SIP /IAX trunk
- Voice Mail
- Open Source Asterisk IP PBX
- Firmware upgradable via web page
- 10+ available SIP/IAX2 extensions
Applications
- SOHO/SMB telephony system
- Hosted service
- FAX terminal
- IVR system
1.2 Physical Connection
DC 12V à 12V Power Supply Adapter
WAN Port à Network Switch
FXO Port à PSTN Analog Line
FXS Port à Analog Telephone
And please attention that LAN port is unavailable.
Chapter 2 Access iCallDroid
There are two ways to access iCallDroid, and a PC is needed to access it.
- 1. Web page access by browser (Firefox and Google chrome are recommended).
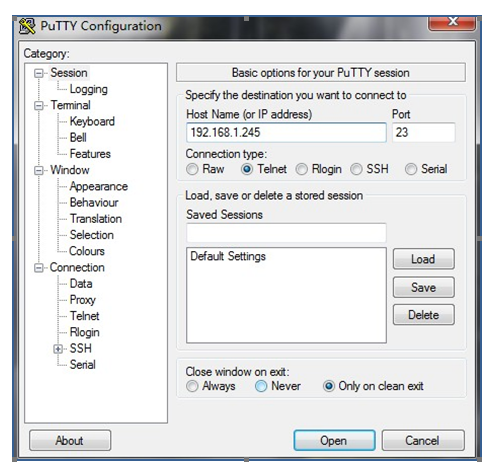
- 2. Telnet access (192.168.1.254:23) by putty.
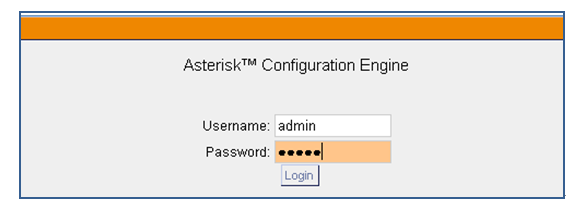
2.1 Web Page Access by Browser
Default IP address: 192.168.1.254:8088
Username: admin
Password: admin
It is very convenient to access by inputting the IP address in your web browser, and because of compatible issues, I recommend Firefox and Google chrome. Before access, please make sure that your PC is in the same network segment with iCallDroid. For example, you set 192.168.1.253 as your PC’s IP and 255.255.255.0 as subnet mask.
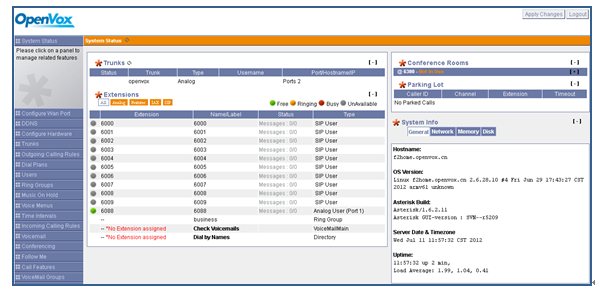
After login successfully, you can get the configuration web page as bellow:
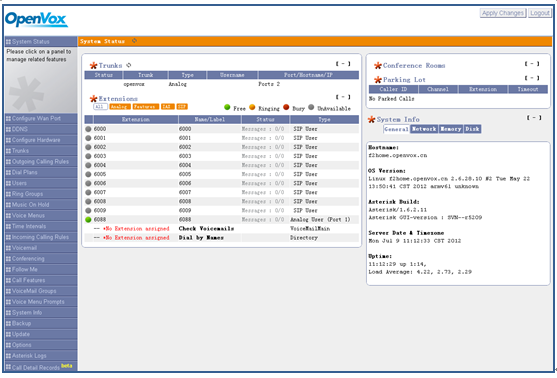
As you can see, there are ten default SIP extensions and one analog, and if connect your telephone with iCallDroid, the status of analog extension 6088 is free which means you can make calls. After registered a SIP user successfully by SIP software such as 3CXPhone on your PC, the SIP status will change to free, and then you are able to make inbound and outbound calls.
2.2 Telnet access by putty
- Please run your putty software, and input the iCallDroid IP address like the following figure:
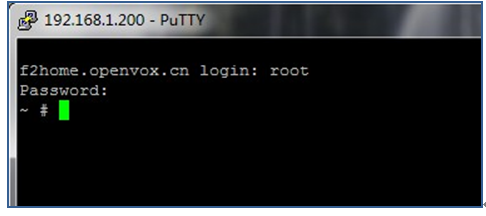
2.Login by your putty:
Chapter 3 Configure iCallDroid By Web GUI
3.1 System Status
In the system status screen, it shows the functions you configured, such as trunks, extensions, system info and so on like that:
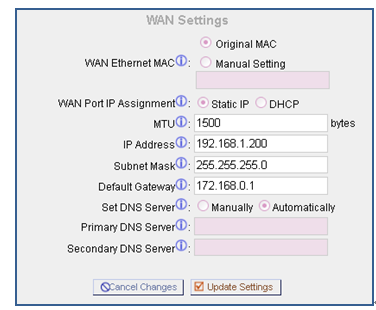
3.2 Configure Wan Port
In the web GUI, you are able to configure WAN port by your needs. There is an example in the following figure for WAN port settings.
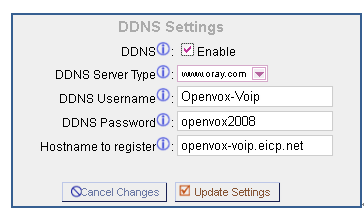
3.3 DDNS
DDNS is for your dynamic Domain Name Service configuration. If necessary, please set DDNS like the following figure. Finally, do not forget to update and apply your changes.
3.4 Configure Hardware

There are three items which are “Analog Hardware”, “Tone Region” and “Advanced Settings”.
Analog hardware --- When you boot iCallDroid, FXS and FXO ports will be detected automatically. And also you are able to choose and update their signaling type when click edit button. Kewl Start and Loop Start are available for each port.
Tone Region --- You should select your tone region and software echo canceller according to your situation, if your country name is not in the dropdown list, please ask your service operator which kind of tone region is used in your area.
Advanced Settings --- Please set every option by your fact. For example, if you would like a-law override is able, please tick off and select configuration like that
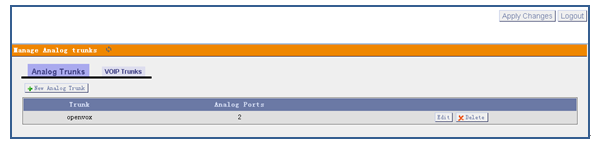
3.5 Trunks
Trunks are outbound lines used to allow the system to make calls to the real world. Trunks can be VoIP lines or traditional telephony lines. Please select “Trunks” from the vertical list on the left of the main page, and then the following screen will be displayed. There is a default analog trunk named “openvox” for iCallDroid.
3.5.1 Create Analog Trunks
There is a default analog trunk, if you wouldn’t like it, you can delete or edit it to set a new one.
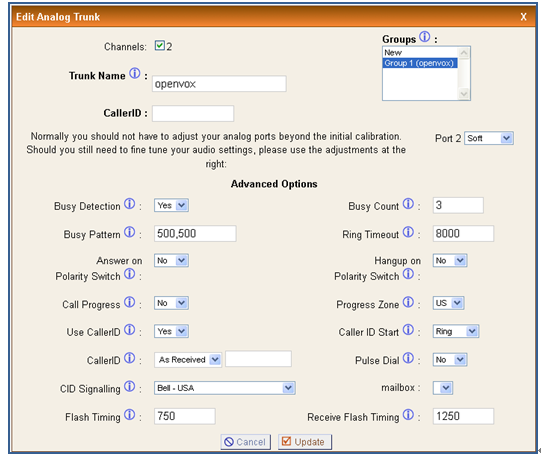
There are many parameters to set an analog trunk, and here I just configure two parameters.
Channels --- Please tick off before 2 means channel 2 is able for the analog trunk.
Trunk Name --- Please give a unique label to identify the trunk name, and I name it openvox.
Advanced Options --- Parameters in advanced options are optional. If you don’t know what they mean, you can put your cursor on the label to get detailed information about the parameter. Please set these parameters according to your requirements and service provider.
3.5.2 VOIP Trunks
A VoIP service provider (VSP) that you have signed up with is also a trunk. Via the VoIP trunk, you can make calls by VoIP service to save much cost or even free of charge for internal calls.
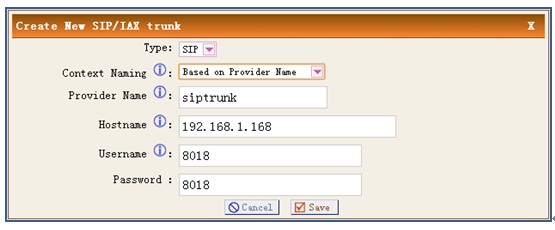
Type --- You can select SIP or IAX type to meet your need.
Context Naming --- This parameter means how Asterisk GUI should determine the context name in Asterisk’s .conf files.
Provider Name --- It is a unique label to help you identify the trunk when listed in outgoing calling rules and incoming.
Hostname --- It is the IP address or domain name of your service provider’s server.
Username --- It is your service provider configured.
Password --- Password is your service provider configured for the user.
Configuration in the above figure is an example of SIP trunk named 8018, whose password is 8018 and hostname is 192.168.1.168.
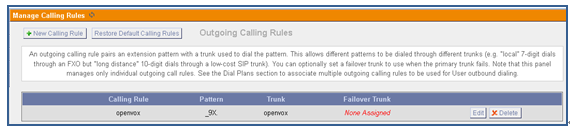
3.6 Outgoing Calling Rules
“Outgoing calling rules” is used to identify an outgoing call route, when make external calls, which trunk and what dial-pattern calls use. So an outgoing calling rule pairs an extension pattern with a trunk used to dial the pattern. In default settings, all outgoing calls pass through FXO port that is “openvox” trunk to the external PSTN network.、
Please click “Outgoing Calling Rules” from the vertical menu on the left of the main page, and then click “New Calling Rules” to define a new outgoing calling rule.
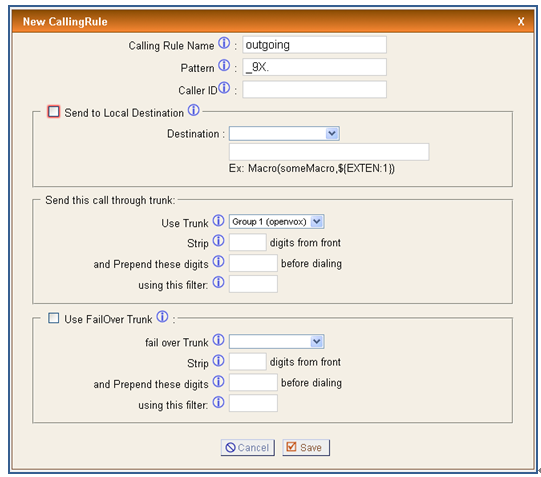
There are three basic parameters you should configure:
Calling Rule Name --- It is unique to identify the outgoing calling rule when listed in dial plans. Here I name it outgoing.
Pattern --- It acts as a filter for numbers’ pass-through, it means any number you dial out with prefix 9 will use this outgoing call rule. In default settings, outgoing calling rule pattern is _9X. which means you make outbound calls with 9 as prefix.
Use Trunk --- Assign a trunk to carry traffic for outgoing calling rules.
Please put your cursor on the label to get information about other parameters. Finally, do not forget and .
3.7 Dial Plans
A Dial Plan is a collection of Outgoing Call Rules that can be assigned to one or more users. Please click Dialplans then you will get the following figure. As you can see from the figure, there is a default dialplan named DialPlan 1, you can edit or delete it.

Click “New DialPlan” button to add a new dialplan:

You should input a name for the “DialPlan Name” and select outgoing call rule and local context that you want to use.
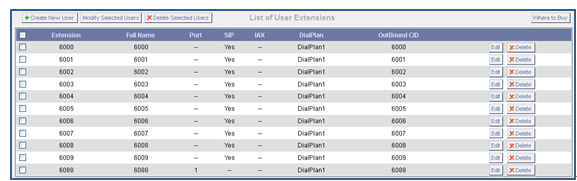
3.8 Users
“Users” is a shortcut for quickly adding and removing all the necessary configuration components for any new phone. In default, there are 10 SIP and 1 analog extensions, SIP extensions are from 6000 to 6009 whose password are all 8088, analog extension is 6088. Please attention that all extension number is limited and should be between 6000 and 6299 in factory settings.
If you want to creat other users, please click button.
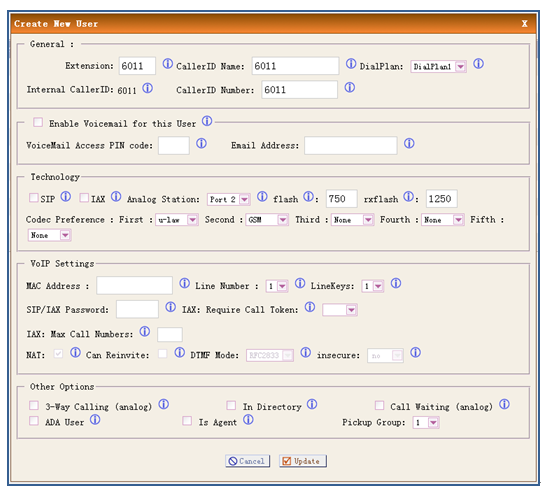
3.8.1 Create SIP Users
When create a SIP user, you should fill in “extension”, “CallerID Name”, “DialPlan” in “General” component and choose SIP in “Technology”. To get more information about other parameters, please put your cursor on label and configure them. Create an IAX user is similar to SIP, and just remember to choose IAX instead of SIP. The following figure shows an example of SIP extension 6010 settings.

3.8.2 Create Analog Users
Creating an analog user is similar with SIP user. Please fill in ”Extension”, “CallerID Name”, “DialPlan” and “CallerID Number” in general item, and choose port 2 for “Analog Station” in technology component. Also there are other optional settings for you, please configure them based on your fact. After setting, please remember to update and apply your changes.
3.9 Ring Groups
Define RingGroups to dial more than one extension simultaneously, or to ring more than one phone sequentially. This feature may also be called Huntgroups.

Please fill in “RingGroup Name”, “Extension for this ring group”, and select from “Available Users” to “Ring Group Members”. Decide what kind of strategy for this ring group:
Ring all simultaneously --- When someone calls the ring group, all members of the ring group will ring at the same time.
Ring in order --- When someone calls the ring group, the member will ring in order.
If not answered Goto --- Choose a destination from the drop-down list if no one in the ring group answers the call.
If you want your ringgroup to work, you should set your destination is ring group in incoming calling rules. After setting, please  and
and  .
.
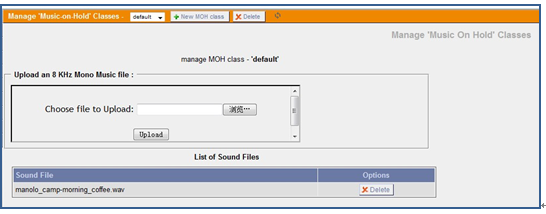
3.10 Music On Hold
“Music On Hold” lets you customize audio tracks for different queues, parked calls etc. As you see, it is able to upload files what you want.
3.11 Voice Menus
Menus allow for more efficient routing of calls from incoming callers. It also is known as IVR (Interactive Voice Response) menus or Digital Receptionist.
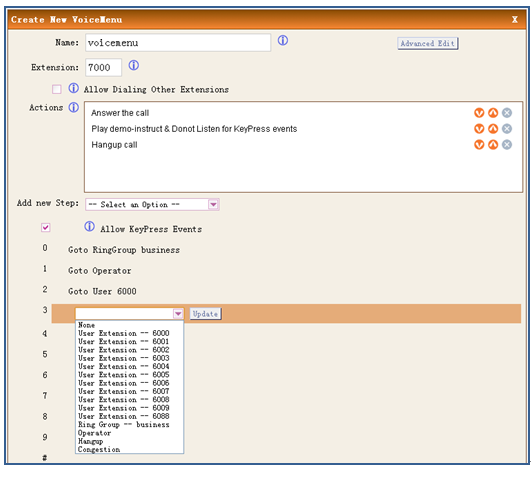
Name --- A name for the voice menu.
Extension --- (Optional) if you want this voice menu to be accessible by dialing an extension, and then enter that extension number.
Actions --- Show the actions you select from “Add new Step”, after you choose an action from “Add new Step” drop-list options, please click button, then it will show at “Actions” frame.
KeyPress --- Including digital 0 to 9 and other characters. When you put your cursor after the digital, there will be an orange frame, and you can click at here to choose the caller in the drop-down list, and then update it.
After setting, please save and apply your changes. The above example “KeyPress Events” settings mean the call will goto ringgroup you have configured before if press 0, goto operator if press 1 and goto the extension 6000 if press 2.
3.12 Time Intervals
Time Intervals are defined ranges of time that will be used by call routing features. When you click button, the following figure will display.
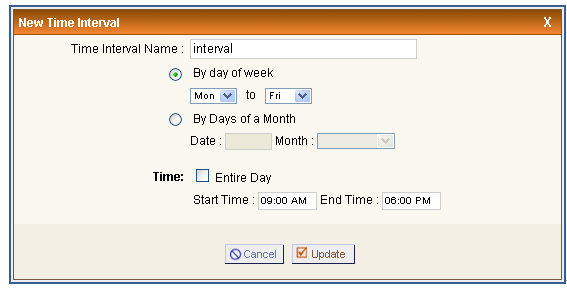
Settings in the above picture mean that incoming calls from 09:00 AM to 06:00 PM of every Monday to Friday work normally and calls not in this time segment will not work.
3.13 Incoming Calling Rules
In factory settings, all incoming calls route to FXS port. You can create, modify, prioritize and delete incoming call rules by setting this option.
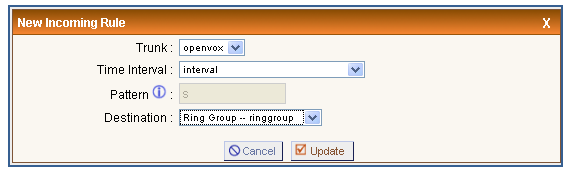
Trunk --- Select a trunk created before from the drop-down list for incoming call use.
Time Interval --- Determine the time when the incoming call rule works.
Destination --- Set a destination extension or group to response the incoming calls.
Finally, please click on “Update” and “Apply Changes” button at the up right corner of the main page to make settings effective.
3.14 Voicemail
When you call someone who does not answer the call, you can leave a voice message for the called party if the called party supports voice mail.
Extension for checking messages --- When you dial the number, here I set it as 6600, you will hear the message other people left for you.
Max greeting --- Set the maximum number of seconds for voicemail greetings.
Maximum message per folder --- This select box sets the maximum number of messages that a user may have in any of their folders.
Max message time --- This select box sets the maximum duration of a voicemail message in seconds. Message recording will not occur for times greater than this amount.
Min message time --- This select box sets the minimum duration of a voicemail message in seconds. Messages below this threshold will be automatically deleted.
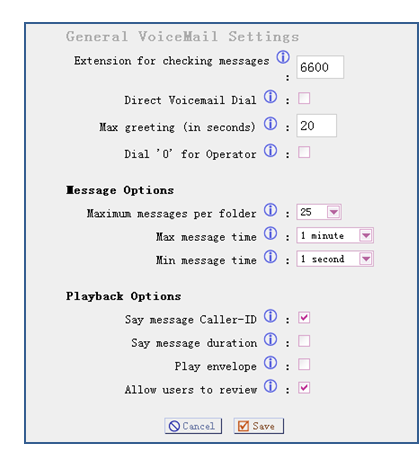
About other options, please put your cursor on the label to get detail information. Example in the above figure means that when you dial “6600”, you will hear the message anyone else left for you, but the message duration should less than 20 seconds.
3.15 Conferencing
The conferencing function of Asterisk is similar to a Tele-conference call where multiple callers can call in and participate in a two-way conference like in a party room where everyone can talk and listen to one another or just to listen to a Tele-presentation. Please select conferencing option and then create a new conferencing bridge.
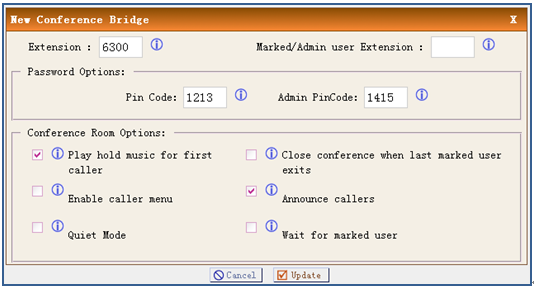
The example in the above figure achieves that the conference number is 6300; common members type the pin code 1213 to enter conference and administrator types 1415 to enter the conference. Enabling “play hold music for first caller” option and “announce callers” option, so the first member who enter the conference will hear music and the online members will be informed when someone enter the conference. At last, please click on Update button, and click on Apply Changes button in up right corner of the main page.
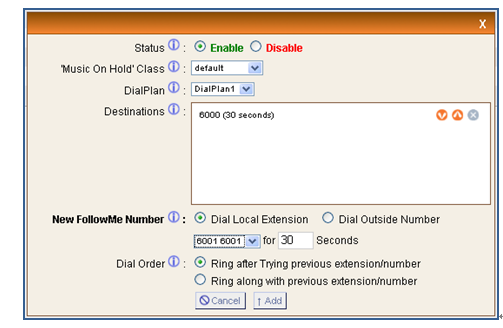
3.16 Follow Me
If A calls B, B does not answer, the call will be transferred to C who is set up in follow me.
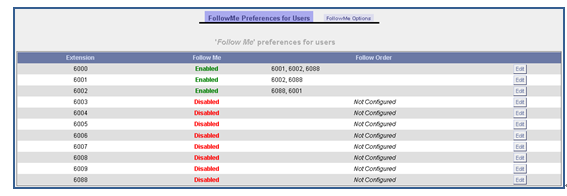
The follow me extension 6001 in the above figure means when someone dials 6001, if 6001 responses anything, the call will forward to extension 6002, and if 6002 also doesn’t answer the call, it will forward to 6088. Finally, if all extensions in the Follow Me do not answer the call, it will hang up.
Let’s take 6003 for an example to illustrate how to create a follow me.
- Click “Edit” button after 6003 in the above screen;
- Make “Status” enable, select a type for “Music On Hold ” Class and choose a dialplan you have set before;
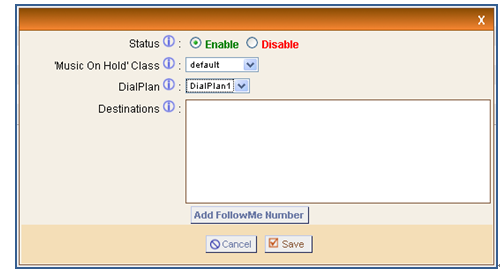
- Please click “Add FollowMe Number” button, select new follow me numbers from the drop-down list, then click button to add it, add all numbers you need by the aforementioned way. Finally, do not forget and .
3.17 Call Features
By call features, you are able to set some functions such as “Call Parking”, “Feature Map”. The following are example settings.
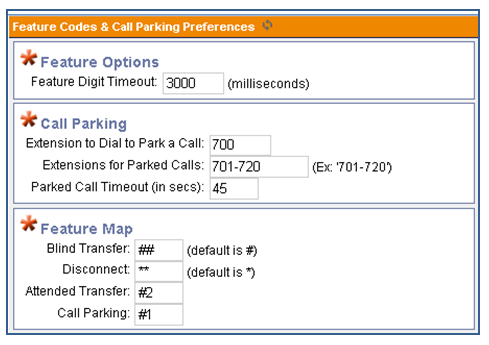
Feature Digital Timeout --- when timeout the time you set between two feature digital, it is unable to go on making this call and should dialed again.
Call Parking --- When you are busy or inconvenient to answer calls, you can hold on calls for a period of time. After finishing works, you go to answer the call.
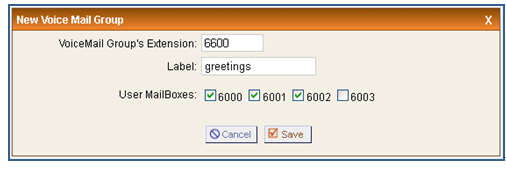
3.18 VoiceMail Groups
Define “VoiceMail Groups” to leave a voicemail message for a group of users by dialing extension number. The following figure realizes that dialing 6600 to leave messages for user 6000, 6001, 6002.
3.19 Voice Menu Prompts
This component is used for recording custom voice menu. There is a default Voice Menu prompts named chinese_ivr.wav. Now, please follow me to record a new voice menu prompt.
First, please select “Voice Menu Prompts” option from the vertical menu on the left of the main page, then click button, you can get the a screen to set.

Here I set OpenVox as the file name and dial extension 6000 to record the format .gsm new voice prompt. Once click  button, your software SIP will show like that:
You answer the call and speak to the microphone to record. After you finish the record, please hang up the call. You can refresh your webpage to see that there is a sound like

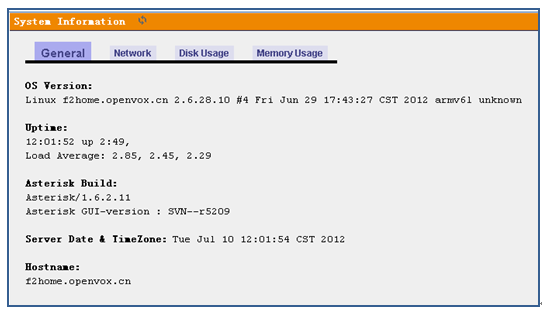
3.20 System Info
Click “System Info” to get general, network, disk usage and memory usage information.
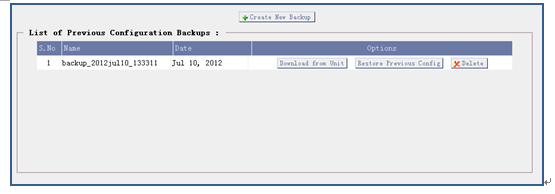
3.21 Backup
Backup and Restore are two of the mandatory functions of any application, and iCallDroid is not an exception. You can backup all the files under the /etc/asterisk/ directory and restore them. Click , then you will get the following screen:
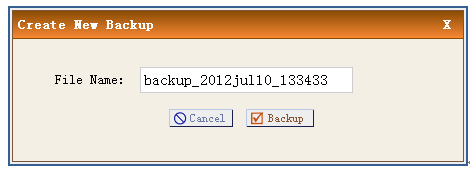
Enter a file name and click backup button once backup process is completed. After backup, the following screen will display.
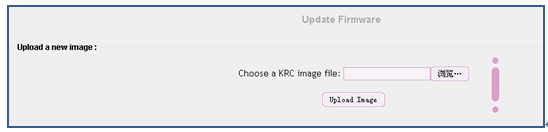
3.22 Update
This function enables to update firmware installed on the appliance. Please click  to choose firmware file to upload.
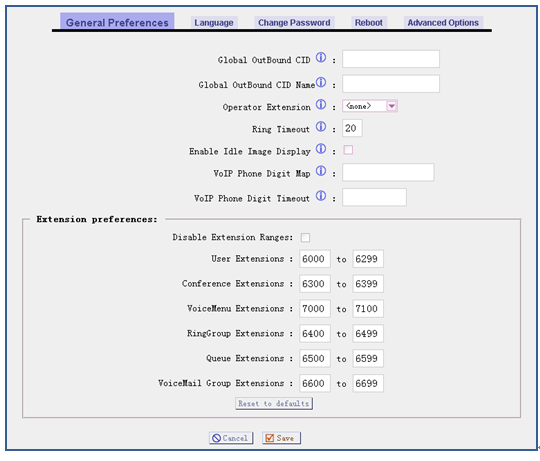
3.23 Options
This component is composed of “General Preferences”, “Language”, “Change Password”, “Reboot” and “Advanced Options”. Please attention “Extension preferences” in “General Preferences”, there are default ranges when you create any kind of extensions, also you are able to disable these ranges.
Advanced Options
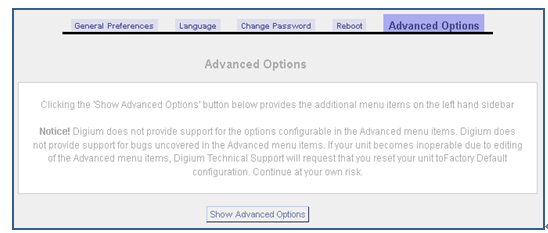
After clicking  button, there will be advanced options in the vertical menu on the left of the main page like the following:

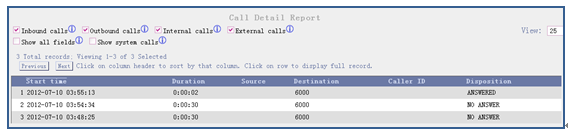
3.23.1 Call Detail Records
This component provides the record of all incoming and outgoing calls including the channels used and duration of calls. After click on options àAdvanced Options àShow Advanced Options, please select the “Call Detail Records” option from the vertical menu on the left, then you will get the following screen:
3.23.2 Active Channels
It displays current active channels on the PBX, with the options to hangup or transfer.

There are other advanced options, such as “SIP Settings”, “IAX settings”, “Asterisk CLI”.
Chapter 4 Typical Application Cases
4.1 Make Internal Calls
4.1.1 SIP to SIP Calls
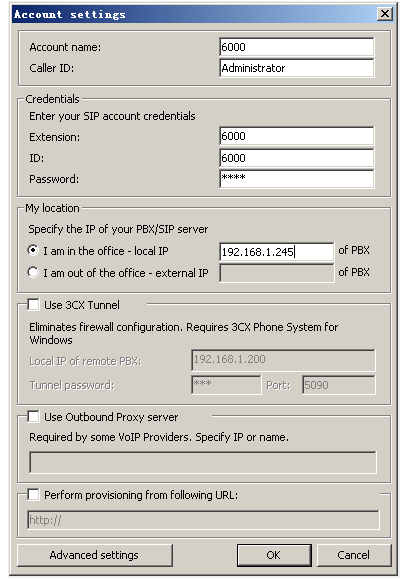
Step 1. Run your SIP software to create two SIP users
Step 2. Register a SIP user (6000) like that:
Sep 3. Register another SIP user (6001) by the same way before.
Then the two SIP users can call each other. There are ten default SIP extensions (6000--6009), so you just need to register one or more SIP users of these ten. While if want to use other SIP number, you have to create SIP users, and please refer to Create SIP Users for creating method.
4.1.2 SIP to Analog Phone
Step 1. Register a SIP user like aforementioned way
Step 2. Connect your analog telephone with FXS port
Then the two users can call each other. In default settings, FXS port has been set as analog extension 6088. If you want this port working, please just plug your telephone on iCallDroid’s FXS port. Also you can change this analog extension number, please refer to Create Analog Users for creating information.
4.2 Make External Calls
Step 1. Register one or more SIP extensions, please refer to SIP to SIP Calls for how to create a SIP user
Step 2. Plug your telephone to FXS port
Step 3. Plug PSTN line to FXO port
Step 4. Create an outgoing calling rule, about it, please refer to Outgoing Calling Rules
Step 5. Create dial plans, about it, please refer to Dial Plans for how to create dialplans
Then you can make internal and external calls. In default settings, FXS port has been set as analog extension 6088. If you want this port working, please just plug your telephone on iCallDroid’s FXS port. Also you can change this analog extension number, please refer to Create Analog Users for creating information.
Appendix A Default settings and Specifications
• Access
Browser | Putty | |
IP | 192.168.1.254:8088 | 192.168.1.254:23(telnet) |
Username | admin | root |
Password | admin | OpenVox |
• Recommended Browser
- Firefox
- Chrome
• SIP/Analog Extensions (Limited: 6000—6299)
- Ten SIP Extensions: 6000—6009(Password: 8088)
- One Analog Extension: 6088
• Calling Rules
- Outgoing: FXO Dial Out With Prefix 9
- Incoming: Goto FXS Port
• Spec
- Extensions: 1 Analog Phone
10~300 SIP/IAX2 Extensions
- CPU: 700MHz
- ROM Flash: 32MB (64MB Available for OEM)
- RAM: 128MB DDR2 SDRAM (Up to 256MB Available for OEM)
- Power: DC 12V
- FXS/FXO: 1 * FXS + 1 * FXO
- LED: 4
- OS: Linux
- Kernel Version: 2.6.28.10
- Size: 160(L) *100(W) * 31.8(H) mm
- Weight: 236g
- Operation Temperature: 0 ~ 70℃
- Operation Humidity: 10 ~ 95%
- Power Dissipation: ≤5W (1*FXS, No USB Device)
Appendix B Typical Application
• Recommended Software
- Android sip client:Bria
- iphone sip client:Bria、is-phone lite、zoiper
- iphone iax client:zoiper
OpenVox Communication Co.Ltd
OpenVox-Best Cost Effective Asterisk Cards
Address: F/3, Building No.127, Jindi Industrial Zone,
Shazui Road, Futian District, Shenzhen, Guangdong 518048, China
Tel:+86-755-82535461, 82535095, 82535362, Fax:+86-755-83823074
Business Contact: sales@openvox.com.cn
Technical Support: support@openvox.com.cn
Business Hours: 09:00-18:00(GMT+8) from Monday to Friday
URL: www.openvox.cn
Thank You for Choosing OpenVox Products!