V100 User Manual
General Safety Instructions
 CAUTION
1. The computers that have V100 card installed must comply with the country’s specific safety regulations.
2.Only service personnel should go to install V100 card.
3.Before installing V100 card, please unplug the power cord and remove the cover from your PC.
4.For avoiding personal injuries and damages to your machine and
V100 card, make sure bracket of the card is secured to the PC’s chassis ground by fastening the card with a screw.
5.Electrical Surges, ESD are very destructive to the equipment. To avoid it, make sure there is a low impedance discharge path from your computer to chassis ground.
6. To reduce the risk of damage or injury, please follow all steps or procedures as instructed.
Test Environments
CentOS-5.5
Kernel version: 2.6.18-194.el5
V100: opvx_tc_linux_x86-1.1.0
Asterisk: 1.6.2.11
DAHDI: dahdi-linux-complete-current
Hardware: Openvox V100
Chapter 1 Overview
1.1 What is Asterisk
The Definition of Asterisk is described as follows:
Asterisk is a complete PBX in software. It runs on Linux, BSD, Windows (emulated) and provides all of the features you would expect from a PBX and more. Asterisk does voice over IP in four protocols, and can interoperate with almost all standards-based telephony equipment using relatively inexpensive hardware. Asterisk provides Voicemail services with Directory, Call Conferencing, Interactive Voice Response, Call Queuing. It has support for three-way calling, caller ID services, ADSI, IAX, SIP, H323 (as both client and gateway), MGCP(call manager only) and SCCP/Skinny(voip-info.org).
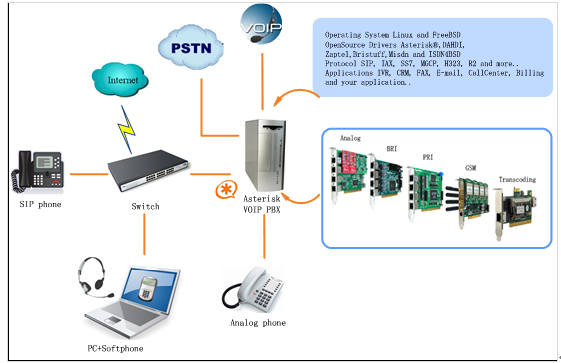
Figure 1 Topology
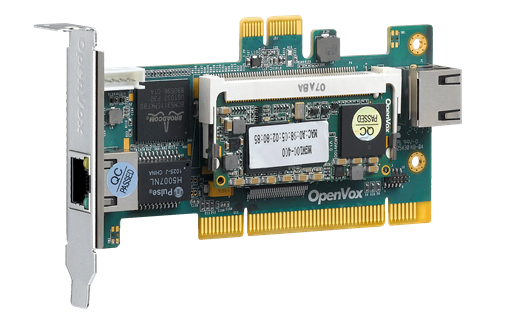
1.2 What is V100
V100 is a high density voice transcoding device. Because of low bandwidth requirements, the voice data compression codecs, such as G.729, G.726, iLBC, are commonly used in VoIP applications, the G.711 codecs are widespread in legacy telephone network. The voice signal must be converted in real-time when a call passes through two different networks and each supports its own codec. Compared with transformation in software, V100 makes full use of multicore-DSP, which is able to convert more sessions of different codec modes such as gsm,ilbc, g729, g726, g723, g722, g711, amr, siren14. It also reduces bandwidth occupation ratio and relieves system resources.
Target Applications
- Hosted VoIP GateWay
- Conferencing Server
- IVR Server
- IP Network Peering
- Distributed Office PBX
- Call Centers
- SIP Trunking
Chapter 2 Software installation and configuration
There are three different interface types of V100, which are PCI, PCI-E and RJ45. V100 implements aggregation and distribution mode codec transcoding, so users are able to select a type according to the specific environment. Figures are stated as below.
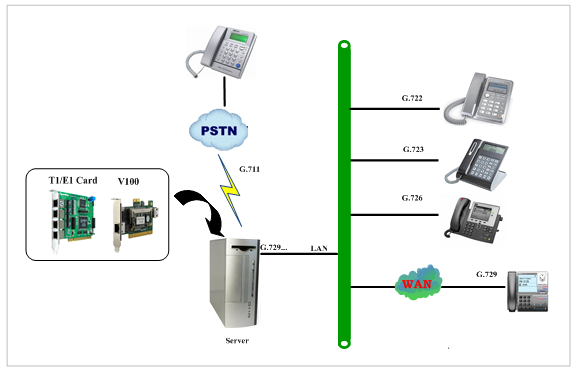
Figure 2 Aggregation Transcoding
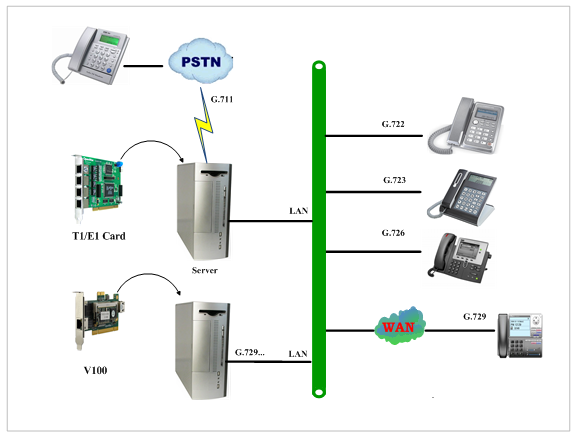
Figure 3 Distribution Transcoding
2.1 Download
Download V100 package by command below:
#_wget_http://downloads.openvox.cn/pub/drivers/transcoding_cards/opvx_tc_linux_x86-current.tar.gz
2.2 Installtion
1. Hardware detection
Check the V100 hardware by command: lspci -vvvv
If V100 Ethernet controller is found, outputs are as follows:
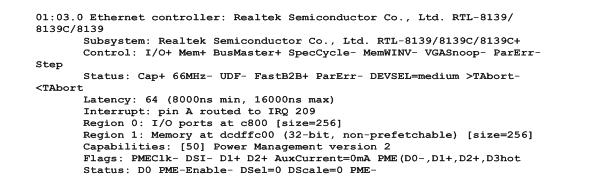
Figure 4 PCI hardware detection

Figure 5 PCI-E hardware detection
If V100 is not able to be detected, then you need to install the corresponding NIC driver. We offer the V100 NIC driver of PCI-E interface in the directory of
../opvx_tc_linux_x86-xxx/eth_drivers/tg3
Once you finish the network driver, perform "ifconfig" to check NIC details and ascertain V100 NIC device number according to Hwaddr address, details are showed as following.
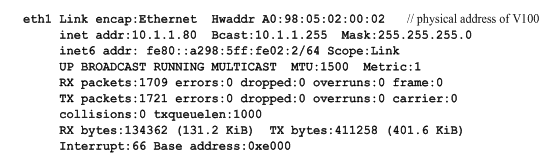
Figure 6 V100 NIC information
Caution: Remember to disable SELinux service. Perform "vim /etc/selinux/config", change the value of parameter SELINUX to disabled, and then reboot your computer please.
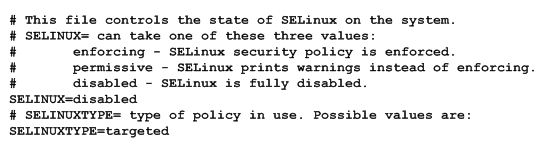
Figure 7 SELinux configuration file
2. Software installation
Some dependencies are crucial. If any of them is absent, the software installation process would not go through successfully. Let’s run "yum install XX" (XX stands for the dependency’s name) to check the availability of dependencies.
# yum install bison
# yum install bison-devel
# yum install ncurses
# yum install ncurses-devel
# yum install zlib
# yum install zlib-devel
# yum install openssl
# yum install openssl-devel
# yum install gnutls-devel
# yum install gcc
# yum install gcc-c++
# yum install libxml2
If there is no kernel source in the system, users should also install it by running like:
# yum install kernel-devel
If the dependency has been installed, system indicates that nothing to do which means you could go to next one directly. Otherwise, the system will keep on installing it.
Among DAHDI, Asterisk and V100, let’s install DAHDI firstly. Please execute those commands under the directory of /usr/src/ in generally:
# cd /usr/src
# tar –xzvf openvox_dahdi- linux-complete-XX
# cd dahdi-linux-complete-XX
# make
# make install
# make config
Caution: If there is something wrong after "make", please refer to HERE. In the url link, the moderator introduces you a method how to patch. After patching, save your changes and exit. Then run "make" again, if successfully done, it is time for you to install Asterisk.
Please operate those commands to install Asterisk.
# cd /usr/src/
# tar –xzvf astersik-XX.tar.gz
# cd asterisk-XX
# ./configure
# make
# make install
# make samples
Please operate those commands to install V100
# cd /usr/src
# tar –xzvf opvx_tc_linux_x86-current.tar.gz
# cd opvx_tc_linux_x86-1.1.0/libopxtc/
# make install
# cd /usr/src/opvx_tc_linux_x86-1.1.0/codec/asterisk
# make install
3. Configuration
3.1 Modify openvox_codec.conf
# vim /etc/asterisk/openvox_codec.conf
A. If using PCI or PCI-E as communication interface, in this situation, please simultaneously plugging V100 and asterisk cards to the same server. Sample configuration file openvox_codec.conf is as follows.

If your V100 is recognized as eth1 by the system, then you need to change the ethX to eth1. One thing you need to note is place V100 NIC IP and vocalloaddr IP to same network segment, and make these two IPs are different.
B. If using RJ45 as communication interface, please directly ignore step
3.2 below. In this case, you will need another PC to provide power to V100. Plug V100 to the PC, and then connect the Asterisk server with the PC over cable or other network devices. Sample of configuration file openvox_codec.conf are as follows.

The X in ethX means the network device that connects with Asterisk server. For example, if your server has two network interface cards, one is eth0, and the other is eth1, and suppose to connect eth1 with V100, then you will need to modify vocalloaddr to the same network segment as eth1.
3.2 Setting V100 NIC IP by running the below command. Right here, let’s take eth1 for an example.
# vim /etc/sysconfig/network-scripts/ifcfg-eth1
set BOOTPROTO =static
add two line: IPADDR=10.1.1.80
NETMASK=255.255.255.0
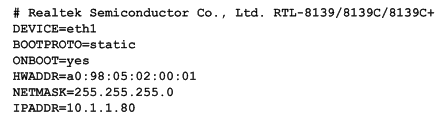
Figure 8 ifcfg-eth1 configurations
After the network settings, remember to perform "service network restart" to restart the network and activate V100 NIC. See more V100 details by "ifconfig".
3.3 Before starting Asterisk, please run "vim /etc/asterisk/modules.conf", and add a line "noload => res_timing_pthread.so" at the end of modules.conf, it will disable the timing module. Otherwise, it’s going to display many errors from asterisk.
3.4 Enable asterisk by running "asterisk –vvvvvvvgc", if it has been started before, run "asterisk -r" instead. In the CLI, perform "module load codec_openvox.so" to load V100 driver.
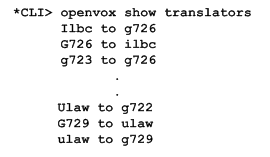
After entering into CLI, type "op" and press Tab. If it displays openvox, which means installation finished elementarily. Please also perform other commands to check related information, for instance, run "openvox show translators" to show supportive code conversion mode.
It will show license information as below after run "openvox show license".
2.3 Call test
Run command below to register two SIP phone, and add configuration at the end of sip.conf.
# vim /etc/asterisk/sip.conf
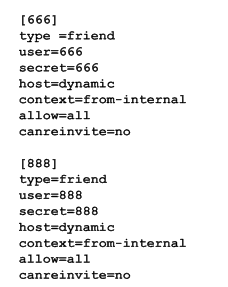
Figure 9 SIP phone register
Add dial plan at the end of extensions.conf.
# vim /etc/asterisk/extensions.conf
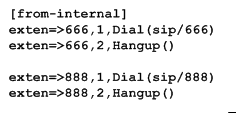
Figure 10 dialplan
Follow the above dialplan to configure two SIP phones, one chooses G711 alaw/ulaw as audio encoding pattern, and the other choose G729. If call normally, it means installation is successful.
Chapter 3 Reference
Tips
Any questions during installation, please consult in our forum or look up for answers from the following websites:
Appendix A Specifications
Dimension
•Includes Low Profile PCI Short Form Factor in 2U Chassis
• 64.1 × 119 × 8mm (PCB)
Interfaces
•PCI : 32bit/33MHz
•PCIe: ×1
•10/100/1000 BASE-T RJ45
Power Requirements
•PCI: 2.5A, 3.3V
Or
•PCIe: 0.3A, 3.3V; 0.6A, 12V
Operating Temperature Range
•0 to 50 °C
Humidity
•10 to 90% NON-CONDENSING
Hardware and Software Requirements
•PC with PCI/PCIe Slot
•Windows/Linux in Host
Appendix B Transcoding
Codec Support
•G.711 •G.729 •iLBC
•G.722 •GSM •AMR
•G.723 •G.726 •SIREN14
Transcoding Table
Source code
| ilbc | g722 | g723 | g726 | g729 | alaw | ulaw | gsm | amr | siren14 | |
ilbc |
| √ | √ | √ | √ | √ | √ | √ | √ | √ | |
g722 | √ |
| √ | √ | √ | √ | √ | √ | √ | √ | |
g723 | √ | √ |
| √ | √ | √ | √ | √ | √ | √ | |
g726 | √ | √ | √ |
| √ | √ | √ | √ | √ | √ | |
g729 | √ | √ | √ | √ |
| √ | √ | √ | √ | √ | |
alaw | √ | √ | √ | √ | √ |
| √ | √ | √ | √ | |
ulaw | √ | √ | √ | √ | √ | √ |
| √ | √ | √ | |
gsm | √ | √ | √ | √ | √ | √ | √ |
| √ | √ | |
amr | √ | √ | √ | √ | √ | √ | √ | √ |
| √ | |
siren14 | √ | √ | √ | √ | √ | √ | √ | √ | √ |
|
“√” means the two codes are able to be transcoded.