B800P on DAHDI User Manual
Contents
2.4 Adjusting Termination of S/T Interface (100 ohm)
Chapter 3 Software Installation and Configuration
General Safety Instructions
CAUTION
1. The computers that have B800P card installed must comply with
the country’s specific safety regulations.
- Only service personnel should install B800P card.
- Before you install B800P card, please unplug the power cord from the computer and remove the cover from your PC.
- For avoiding personal injuries and damage to your computer and
B800P card, make sure bracket of the card is secured to the PC’s chassis ground by fastening the card with screws.
- Electrical Surges, ESD are very destructive to the equipment. To avoid it, make sure there is a low impedance discharge path from your computer to chassis ground.
- To reduce the risk of damage or injury, please follow all steps or procedures as instructed.
Test Environments
CentOS-5.6
Kernel version: 2.6.18-238.12.1.el5
DAHDI: dahdi-linux-complete-2.4.1.2+2.4.1
Asterisk: 1.8.5.0
Libpri: 1.4.11.5
Hardware: OpenVox B800P
Chapter 1 Overview
1.1 What is Asterisk
The Definition of Asterisk is described as follows:
Asterisk is a complete PBX in software. It runs on Linux, BSD, Windows (emulated) and provides all of the features you would expect from a PBX and more. Asterisk does voice over IP in four protocols, and can interoperate with almost all standard-based telephony equipments using relatively cost-effective hardware. Asterisk provides Voicemail services with Directory, Call Conferencing, Interactive Voice Response, and Call Queuing. It supports three-way calling, caller ID services, ADSI, IAX, SIP, H323 (as both client and gateway), MGCP (call manager only) and SCCP/Skinny (voip-info.org).
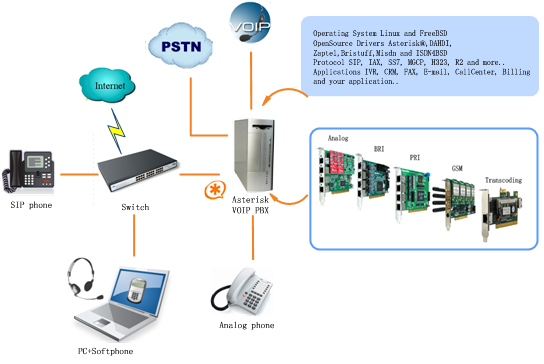
Figure 1 Topology
1.2 What is B800P
OpenVox B800P is a PCI 2.2 compliant card which supports 8 BRI S/T interface. The BRI port can be set to TE or NT mode by jumpers. This port configuration is detected automatically by the driver.
B800P S/T BRI interface card delivers great voice quality in the telephony systems. It can provide 16 simultaneous voices calls over 8 ISDN BRI line, turns your legacy ISDN BRI equipments into powerful Voice over IP devices and provides a soft migration path from ISDN technology to the new Voice over IP world. B800P is designed for building Open Source systems based on Asterisk such as ISDN PBX and VoIP gateway.
The B800P and drivers comply with fully GPLed for the Linux kernel bring powerful ISDN BRI connectivity to your Linux machine.
B800P works well with Asterisk®, Elastix®, FreeSWITCH™, PBX in a Flash, trixbox®, Yate™ and IPPBX/IVR projects as well as other Open Source and proprietary PBX, Switch, IVR, and VoIP gateway applications.
Target applications
- High Performance ISDN PC Cards
- ISDN PABX for BRI
- VoIP Gateways
- ISDN LAN Routers for BRI
- ISDN Least Cost Routers for BRI
- ISDN Test Equipment for BRI
Main features
- Up to 8 ports of S/T interfaces
- Supports PCI 2.2 or above, 3.3 V and 5 V PCI slot
- 4 RJ-45 8 pin interfaces on a single PCI bracket
- ITU-T I.430 and TBR 3 certified and S/T ISDN supporting TE/NT mode
- Industry standard full size length PCI card
- 32 bit bus master DMA data exchanges across PCI interface at
132Mbytes/sec for minimum host processor intervention
- DTMF detection on all B-channels
- Multiparty audio conferences bridge
- Full software and hardware compatible with Junghanns.NET ISDN, mISDN driver, DADHI and so on.
- RoHS compliant
- Certificates: CE, FCC, A-Tick
- trixbox TM Officially Certified
- Elastix® Officially Certified
Chapter 2 Hardware Setup
There are some points should be paid attention to when setting up B800P.
2.1 Power supply
The board is powered by PCI slot, but some newest model PCs do not provide +5V on PCI slots, in such cases, you have to set the jumper to 3.3V.
2.2 Slot compatibility
B800P is compatible with 32-bit 3.3V PCI slot, 32-bit 5.0V PCI slot, 64-bit 3.3V PCI slot or 64-bit 5.0V PCI slot except PCI-E slot; you should confirm your slot type firstly and then insert B800P into any type of PCI slot as previously described. Some slots are described like that.
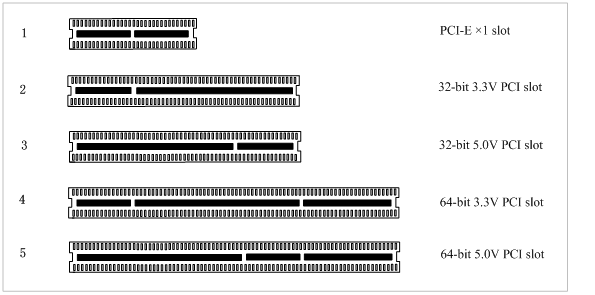
Figure 2 PCI-E and PCI slots
2.3 Setting Card ID
If want to install more than one card of B800P in a PC, you should take care of the card ID switch. There are two pieces of rules you must obey:
- The ID of the first card must be set to 0, and the second should be set to 1, and so forth.
- The first Card is a card that will be initialized (i.e. installing driver) firstly when the system boot up. At most cases, Linux will initialize PCI devices according to their slot order. The slot nearest to the CPU will be initialized firstly and the far end slot will be initialized at last. That is to say, the card which is nearest to the CPU ID should be set to 0 if there are more than one B800P on your machine.
2.4 Adjusting Termination of S/T Interface (100 ohm)
You are able to set a port to NT or TE mode, please refer to figure 3 for visualized information.
- If a port works on NT mode, you should set the jumper to CONNECT (ON).
- If a port works on TE mode, theoretically it should be set to OPEN (OFF), but it might connect to some non-standard ISDN terminal equipments that do not have terminal resistors, for such equipments, you should set it to CONNECT(ON).
2.5 Power Feeding Connector
These jumpers control whether supply power for the external ISDN terminals. Users should adjust accordingly from the following:
- If the port works on TE mode, users MUST set the jumper to OPEN(OFF)
- If this port works on NT mode, and the ISDN terminal requires ISDN power supply, users should set the jumper to CONNECT (ON).
While ISDN terminal does not require ISDN power supply, users should set the jumper to OPEN (OFF).
2.6 Power Supply
- Power Feeding Input
If one of the eight power feeding connectors is CONNECT (ON), users should connect a D-type connector from PC power supply to this jack, the D-type connector is used to provide power to CDROM and 3.5”HDD.
- Power Supply Selection
Some latest model PCs do not provide +5V on the PCI slots. If use those kinds of PCs, users have to set the jumper to 3.3V.
- PCM IN/PCM OUT
This feature is applied to connect two BRI cards.
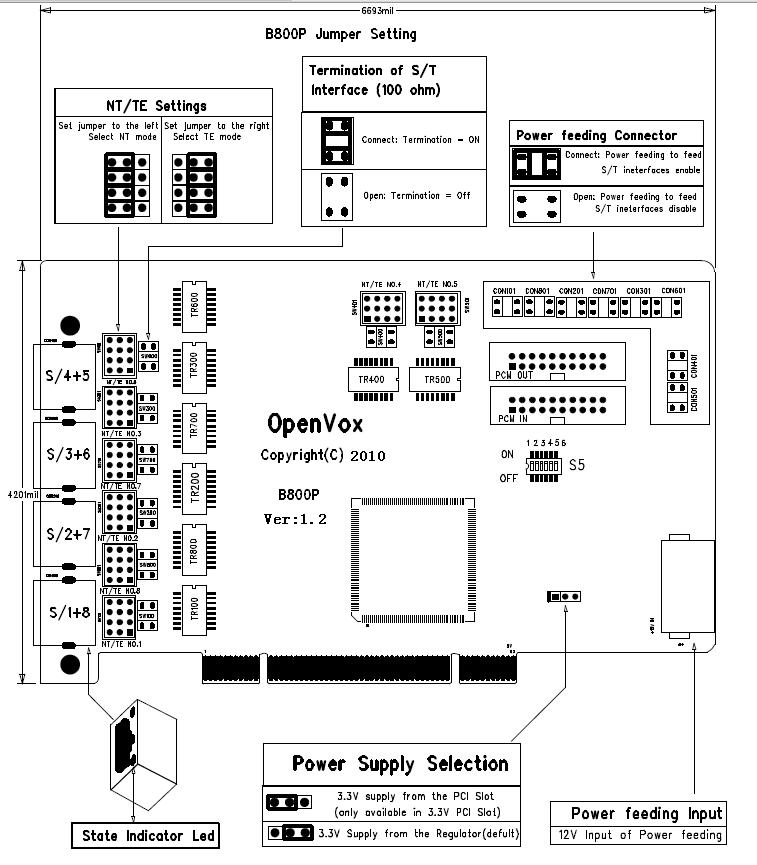
Figure 3 Jumper settings
2.7 Hardware setup procedure
- Power off your PC, remember to unplug the AC power cable
- Set card ID as previously stated if there are more than one BRI card and set the jumpers on right.
- Insert B800P into a 3.3V or 5.0V PCI slot vertically
- Plug the hard disk power supply cable (D style) to input jack if need power for external equipments, please refer to the jumper setting section for more details.
- Plug in SP124 splitter into each port. Then plug ISDN lines into RJ-45 interfaces which set as TE mode and ISDN phone lines into RJ-45 interface which set as NT mode
- Fix the board by a screw
- Plug back the AC power cable, and power on PC
Caution: During the above processes, an ESD wrist strap is needed. Once power is on, you must not attempt to install or take down the board. After hardware setup appropriately, it is time to install software.
Chapter 3 Software Installation and Configuration
B800P supports DAHDI software driver on Linux. To make full use of B800P, you should download, compile, install and configure DAHDI, Libpri and Asterisk. Let’s make specific versions for an example to state how to install software.
3.1 Download
DAHDI software packages are available on OpenVox official website or Digium. Some patches should be applied when the driver source is from Digium. Therefore, it is recommended that downloading the DAHDI driver package from OpenVox official website.
Gain DAHDI source package from OpenVox:
Get Libpri and Asterisk software packages from Digium official website:
http://downloads.asterisk.org/pub/telephony/libpri/releases/libpri-1.4.11.5.tar.gz
http://downloads.asterisk.org/pub/telephony/asterisk/releases/asterisk-1.8.5.0.tar.gz
Execute the following commands under the directory of /usr/src/ in generally to download and decompress these packages:
#_wget_http://downloads.asterisk.org/pub/telephony/libpri/releases/libpri-1.4.11.5.tar.gz
# tar -zxvf libpri-1.4.11.5.tar.gz
# tar -zxvf dahdi-linux-complete-current.tar.gz
#_wget_http://downloads.asterisk.org/pub/telephony/asterisk/releases/asterisk-1.8.5.0.tar.gz
# tar -zxvf asterisk-1.8.5.0.tar.gz
If you just want to get the DAHDI source code from Digium, then you need to get a patch from OpenVox official website:
# wget http://downloads.openvox.cn/pub/drivers/dahdi-patches/b200p_b400p/wcb4xxp.tar.gz
# tar -zxvf wcb4xxp.tar.gz
# tar -zxvf dahdi-linux-complete-2.4.1.2+2.4.1.tar.gz
Use the files decompressed from wcb4xxp.tar.gz to replace the original files in /dahdi-linux-complete-xx/linux/drivers/dahdi/wcb4xxp before you compile DAHDI.
- If using Asterisk 1.8, it is not need to make any patches more.
- If using Asterisk 1.6, please modify the file asterisk-1.6.xx/channels/chan_dahdi.c as the following introduction.
Please comment out the following line:

Then add the following two lines after the above action:

3.2 Installation
1. Hardware detection
# lspci –vvvv
Check the outcome and confirm your system has recognized B800P. If it has been recognized, "ISDN controller" will be displayed in the output information like that:
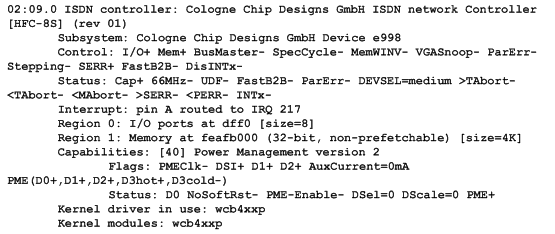
Figure 4 Hardware detection
If B800P is not recognized by the system, you have to power off and take out the card to insert it into another PCI slot.
2. Software installation
Some dependencies are crucial. If any of them is absent, the software installation process would not go through successfully. Let’s run "yum install XX" (XX stands for the dependency’s name) to check the availability of dependencies.
# yum install bison
# yum install bison-devel
# yum install ncurses
# yum install ncurses-devel
# yum install zlib
# yum install zlib-devel
# yum install openssl
# yum install openssl-devel
# yum install gnutls-devel
# yum install gcc
# yum install gcc-c++
# yum install libxml2
# yum install libxml2-devel
If there is no kernel source in the system, you should also install it by running like:
# yum install kernel-devel
If the dependency has been installed, system will indicate that nothing to do, which means you could go to next one directly. Otherwise, the system will keep on installing it.
Change to the directory dahdi-linux-complete-XX (XX represents DAHDI version), then perform commands one by one to install DAHDI.
# cd /usr/src/dahdi-linux-complete-2.4.1.2+2.4.1
# make
# make install
# make config
Caution: If there is something wrong after "make", please refer to HERE. In the url link, the moderator introduces you a method how to patch. After patching, save your changes and exit. Then run "make" again, if successfully done, it is time for you to install Libpri and Asterisk.
Please execute those commands to install Libpri and Asterisk:
# cd libpri-1.4.11.5
# make
# make install
# cd asterisk-1.8.5.0
# ./configure
# make
# make install
# make samples
" make samples" will install the standard sample configuration file in the directory /etc/asterisk. As a freshman, you should perform "make samples", that is to say, it is unnecessary to perform "make samples" every time. Because once performed, it will cover the old sample configuration files you have installed.
3.3 Configuration
1. Driver loading
After compiling and installing DAHDI, Libpri and Asterisk, please load the driver by running commands:
# modprobe dahdi
# modprobe -r wcb4xxp (Must do this )
# modprobe wcb4xxp te_nt_override=0x03
# dahdi_genconf
# dahdi_cfg -vvv
Here are some issues for B800P NT mode:
The default value of parameter te_nt_override=0xFF set all ports as TE mode. "1" stands for TE,"0" stands for NT. For example, if user wants to set port 1-2 to TE mode, port 3-8 to NT mode, te_nt_override should be 0x03 (it is 0000 0011 in binary notation).
The system runs "modprobe wcb4xxp" with value 0xFF in default, but it will set all ports as TE mode , so it is necessary to run "modprobe wcb4xxp te_nt_override=0x03" for NT mode when the machine restarts. After reboot, please run commands:
# modprobe -r wcb4xxp
# modprobe wcb4xxp te_nt_override=0x03
Or add the following line in the file /etc/modprobe.conf:
options modprobe wcb4xxp te_nt_override=0x03
After this modification, the computer will load the specific value 0x03 automatically and the B800P card will work fine in NT mode after reboot.
After running "modprobe dahdi" or "modprobe wcb4xxp te_nt_override=0x03", there is not any information displayed if loaded normally and successfully. "wcb4xxp" is the driver module name of B800P.
If there is any error, please trace the cause. Until all errors are clear up, you could execute "dahdi_genconf" again, and then go to the next step. By running "dahdi_genconf", it will generate /etc/dahdi/system.conf and etc/asterisk/dahdi-channels.conf automatically. Checking whether the generated files information agrees with your hardware setup, if not, you should modify to your specific requirements. Do not forget to confirm that dahdi-channels.conf is included in chan_dahdi.conf, if not, run command:
# echo "#include dahdi-channels.conf" >> /etc/asterisk/chan_dahdi.conf
A part of system.conf which is one of the basic configuration files is displayed as follows:
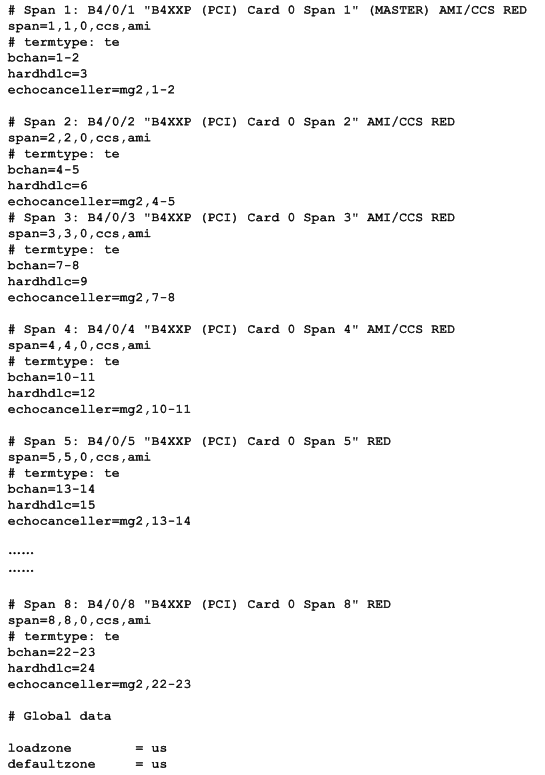
Figure 5 A part of system.conf
2. Country mode modification
In order to match your country mode, it is need to change parameters loadzone and defaultzone to your country. For example, your system is inCHINA, you would like them change to:
loadzone = cn
defaultzone = cn
Some zonedata is available in the file
../dahdi-XX/tools/zonedata.c, you can refer to it to match your country mode. Meanwhile, you also need to modify another parameter which is in file /etc/asterisk/indications.conf.
country=cn
A part of file /etc/asterisk/dahdi-channels.conf is showed as below. (Modification, if it is not agree with the hardware setup)
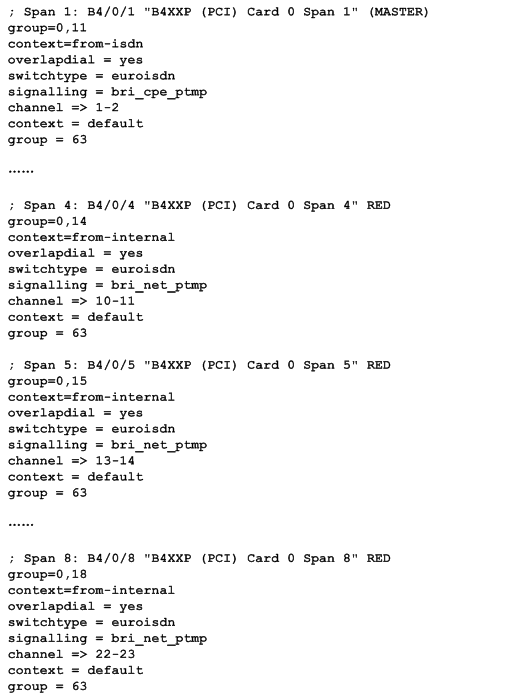
Figure 6 A part of dahdi-channels.conf
3. Asterisk initiation
Execute a command to start Asterisk:
# asterisk -vvvvvvgc
If Asterisk is already activate, run "asterisk –r" instead.
In the CLI, please run the following commands
"dahdi show channels" and "pri show spans":
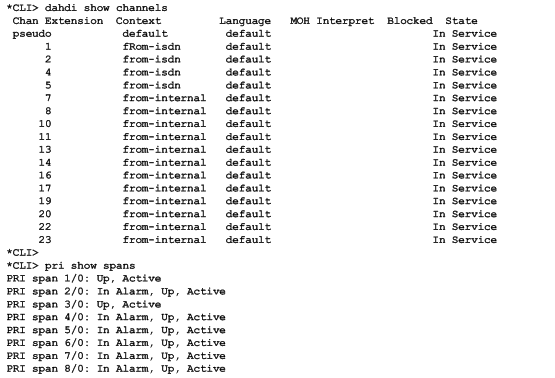
Figure 7 channels and spans show
If you can see the span is up and active and not "In Alarm”, it means successful installation. Otherwise, please check the configuration files and physical connections.
4. Dialplan edit
You should make sure that the context "from-isdn" and "from-internal" are in extensions.conf. Here a simple example is given:
# vim /etc/asterisk/extensions.conf

Figure 8 dialplan
After saving your dialplan, please run "asterisk –r", then execute "reload" in the CLI. Now you are able to make calls. The above dialplan achieves that:
- If there is a call from the ISDN line, Asterisk will transfer to SIP extension 100, then the SIP phone rings;
- If SIP extension 100 dials any phone number, Asterisk will transfer to the destination phone through the first channel.
- If SIP extension 100 dials any channel number, Asterisk will transfer to the destination ISDN phone which connects to the channel.
Chapter 4 Reference
Tips
Any questions during installation please consult in our forum or look up for answers from the following websites:
Appendix A Specifications
• Weight and size
Weight: 137g (4.83oz)
Size: 17.1×10.7×1.8cm (6.73×4.21×0.71 inch)
• Interfaces
PCI Bus: 3.3V or 5V bus slot, PCI 2.2 or above
LocalLoopAccess: RJ-45 ports used on certain ISDN S/T/U interfaces
• Environment
Temperature: 0 ~ 50°C (Operation)
- 40 ~ 125°C (Storage)
Humidity: 10 ~ 90% NON-CONDENSING
• Power consumption
Voltage: 3.3V, 5V, 38V (NT only)
Power Dissipation: 1.22W Minimum, 1.85W/17.6W Maximum
• Hardware and software requirements
RAM 128 + MB
Linux kernel 2.4.X or 2.6.X
CPU 800+ MHZ
Appendix B PIN Assignments
Basic Rate ISDN lines can use straight ("flat") modular cable if necessary. However, twisted-pair are more often used.
l ISDN U-interface
8-pin RJ45 port | PIN | Color | Description |
1 | White/Orange | N/A | |
2 | Orange | N/A | |
3 | White/Green | N/A | |
4 | Blue | U interface | |
5 | White/Blue | U interface | |
6 | Green | N/A | |
7 | White/Brown | -48VDC Power (optional) | |
8 | Brown | -48VDC Return (optional) |
The U-Interface is most commonly used in North American Basic Rate ISDN systems. The U-Interface is an 8-conductor, modular, RJ-45 jack. The center two pins (pin 4 and 5) are used for the 2-wire loop. The wiring of pin 4 and pin 5 are not polarity sensitive (e.g. 4 and 5 may be crossed).
Optional -48 VDC power may be utilized on RJ-45 pins 7 and 8. This can be used to power the NT-1 and TE equipments if sufficient power is available. In most cases, power is not provided from the telephone company.
l BRI S-Interface
8-pin RJ45 port | PIN | Color | Description |
1 | White/Orange | N/A | |
2 | Orange | N/A | |
3 | White/Green | Receive+ | |
4 | Blue | Transmit + | |
5 | White/Blue | Transmit - | |
6 | Green | Receive - | |
7 | White/Brown | -48VDC Power(optional) | |
8 | Brown | -48VDC Return (optional) |
The BRI S-Interface is a 4-wire interface, with separate Transmit and Receive pairs. It can be operated in four modes:
- Point-to-Point Mode allows one logical terminal that may be up to 1 KM from the NT-1
- Short Passive Bus Mode allows connection of up to 8 terminals in parallel on the S/T bus. The terminals can be within 100 to 200 meters from the NT-1.
- Extended Passive Bus Mode allows connection to 8 terminals at distances of up to 500 meters from the NT-1.
- Star Bus Mode allows interconnection of up to 8 terminals to a central NT-1. Each terminal can be up to 1 KM from the NT-1.
² The NT-1 unit has configurable jumpers to apply a 100-ohm termination to the S-Interface signal pairs. Usually, these jumpers will be in. Rules of termination is similar to that of the SCSI-bus: the NT-1 will have 100-ohm terminators applied, and the farthest TE1/TA device will have 100-ohm terminators.
² Optional power to the NT-1 can be applied from pins 7 and 8 of the S-Interface RJ-45 jack. This is usually not used.
² Many NT-1 units provide "phantom-power" (sealing current) between the transmit (4,5) and receive (3,6) leads. In these cases, the Transmit (4,5) leads will be negative with respect to the Receive (3,6) leads. This is often selectable in the NT-1. Whenever possible, it is recommended that this option be disabled. As a general rule-of-thumb, most PC cards, routers, and other data communications equipment do not require power from the S/T interface. ISDN telephones usually require power from the S/T interface.
² Most NT-1 units will ship with a wall-mount transformer power supply for the NT-1.