UC Series Function Manual
1 Extension
1.1 Create SIP/IAX2 Extensions
To create extensions, type of trunk e.g. SIP, IAX2, DAHDI or Custom, is done from the Create Extension menu illustrated below:
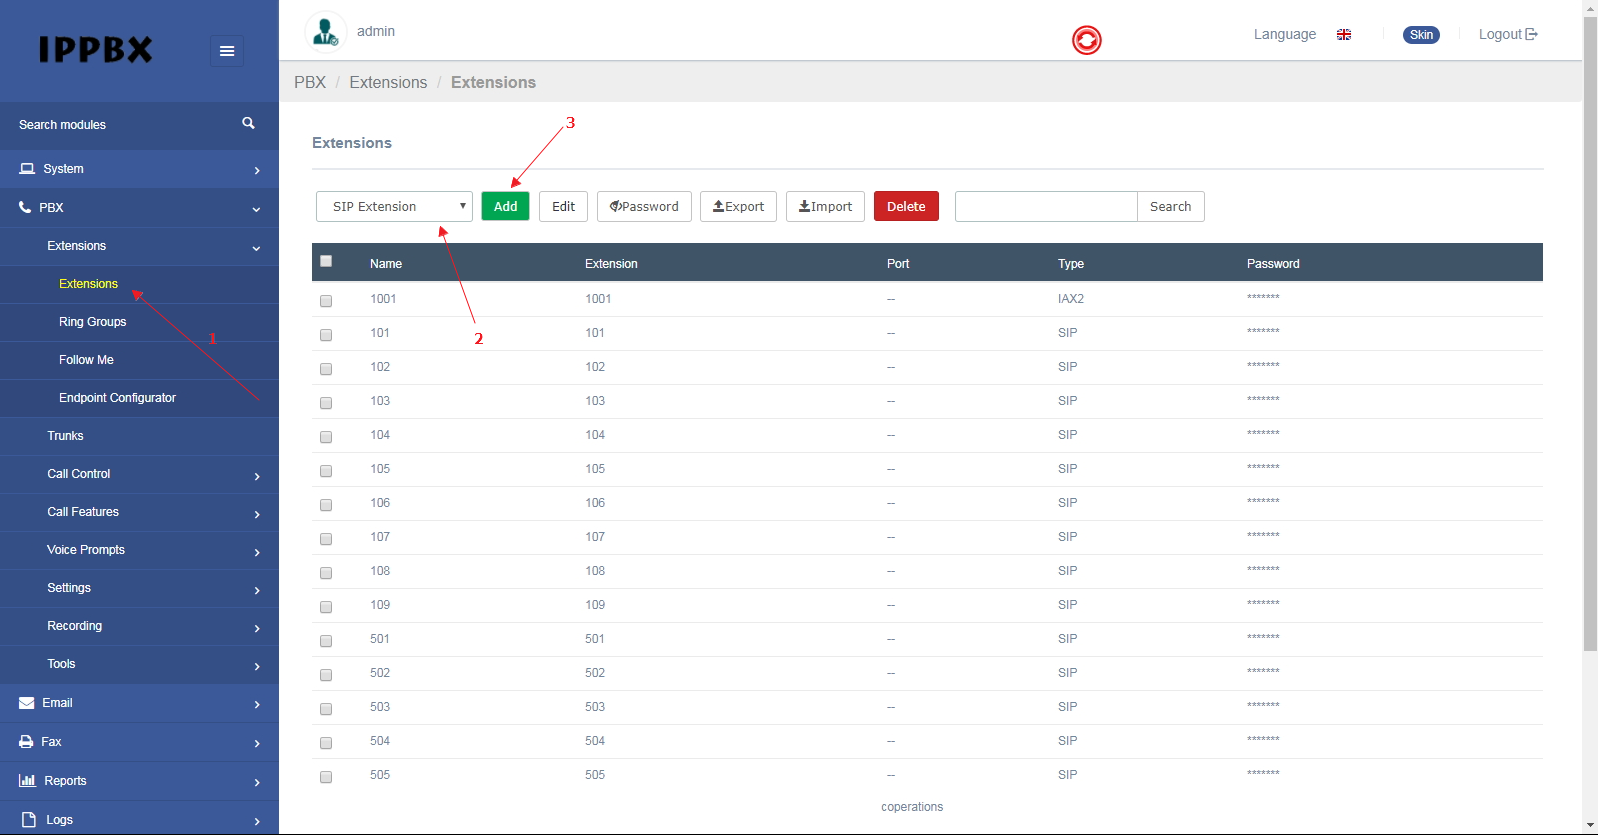
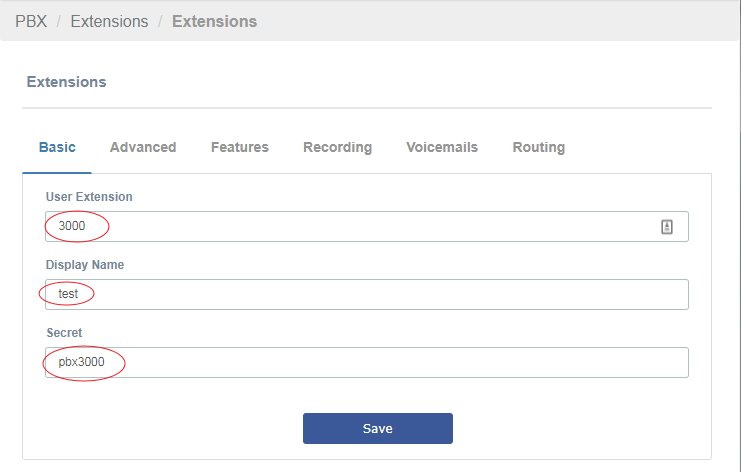
The following are step of how to create SIP extension: you might choose Generic SIP Device or Generic iax2 Device from the drop-down list, then click the button “submit”. The following options are required:
User Extension: 3000 (extension number)
Display name: test
Secret: pbx3000
For simplicity, the voicemail mailbox is enabled, and the other options remain the default.
The Screenshots of add a SIP extension :
It is recommended to set the number of simultaneous calls to 1 or 2 to improve account security. When we are done and click "Save", please do not forget to click the red circle at the top to apply config.
1.2 FXS Extension
To create a FXS extension, you need to pick “FXS Extension” from the drop-down list.
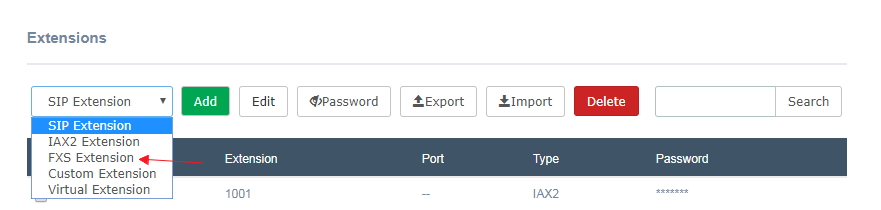
You will find there are several options are required:
User Extension: 2000 (extension number)
Display name: FXS
Channel: FXS-2(the FXS port must be consistent with the port number of the FXS port of the device you are using. For example, the FXS port number of UC300-A14EM1 is 5)
The voicemail should be enable, and the other options remain default.
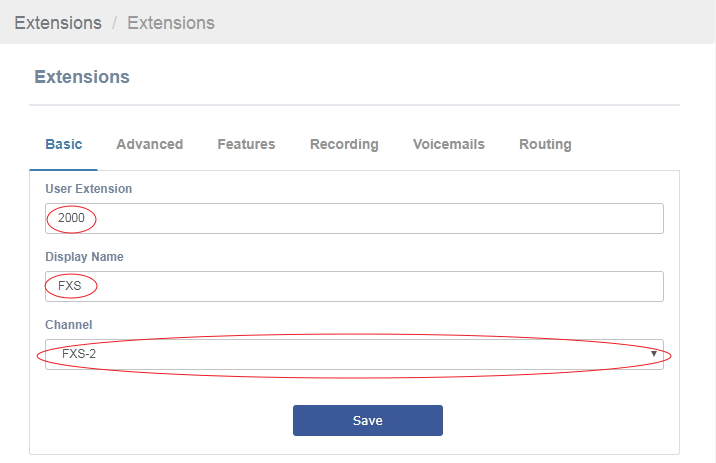
When finished click the button “Save”, please don’t forget to click the red circle to apply config. When the account is generated, you can click on the new FXS / 2000 extension in the list on the left, and more configurations for the FXS station can appear in the device options.
1.3 Extensions Batch
In this way, you can add a group of telephone extensions quickly:
Navigate to PBX /Extensions, click “Export”, you will download a csv file to your local disk (of course you can choose the position where to save the file), now you can open the file with your spreadsheet software.
You will see an electronic data table with the title, which contains all the extensions, as follows:
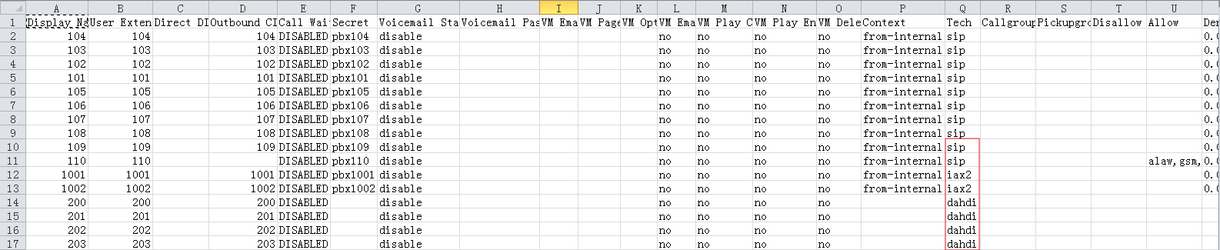
You can modify the attributes directly for the extension or add an extension in this format. After saving, you can click “Import” and upload to the UC Series system, the system will update or add the corresponding extension:
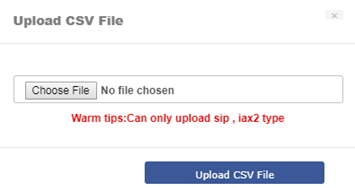
Notice: only SIP/IAX2 extensions can upload to the system, if there are DAHDI extensions in the csv file, you must remove them, or can’t upload normally. And the number of extensions won’t exceed the license limit.
You can add more extensions by bulk:
3001 Center
3002 Stan Roberts
3003 Susan Forbes
3004 Francis Wong
3005 Office
3006 Free VoIP

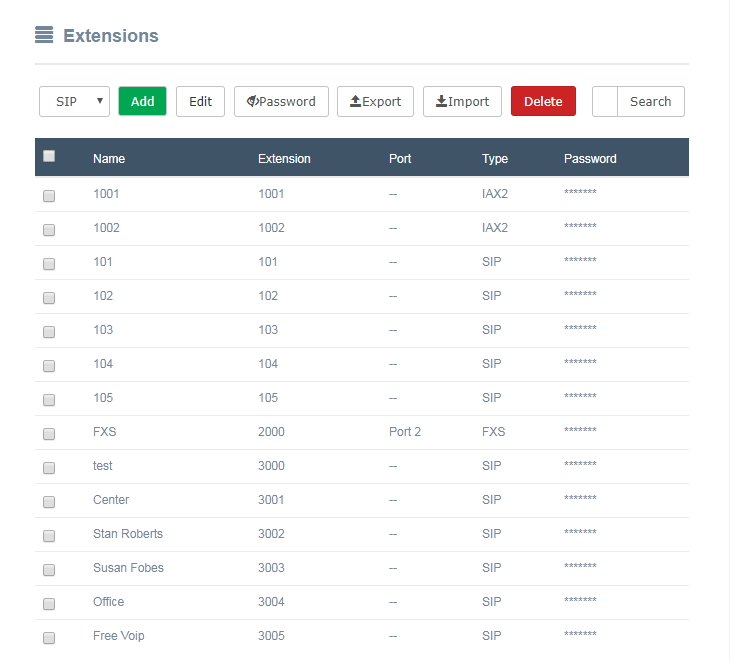
After finish adding extensions, you can check if add successfully in page of PBX/ Extensions.
1.4 Enable Voicemail
When you create an extension, enable voicemail at one extension, or add it later when the extension requires voice mail. If you need email notification for your voicemail, you can enter an email address in the email address field.
In this example, voicemail is enabled at the 3000 extension.
To return to UC Series Extension Option, click the 3000 Extension, in the Voicemail and Directory section, and make the selections as below:
Status: Enabled (pick it from the drop-down list)
Voicemail password: 3000 (easy for use)
Voicemail address: input one personal email address (which you want to receive notice)
Voicemail annex: yes
Play CID: yes
Play the envelope: yes
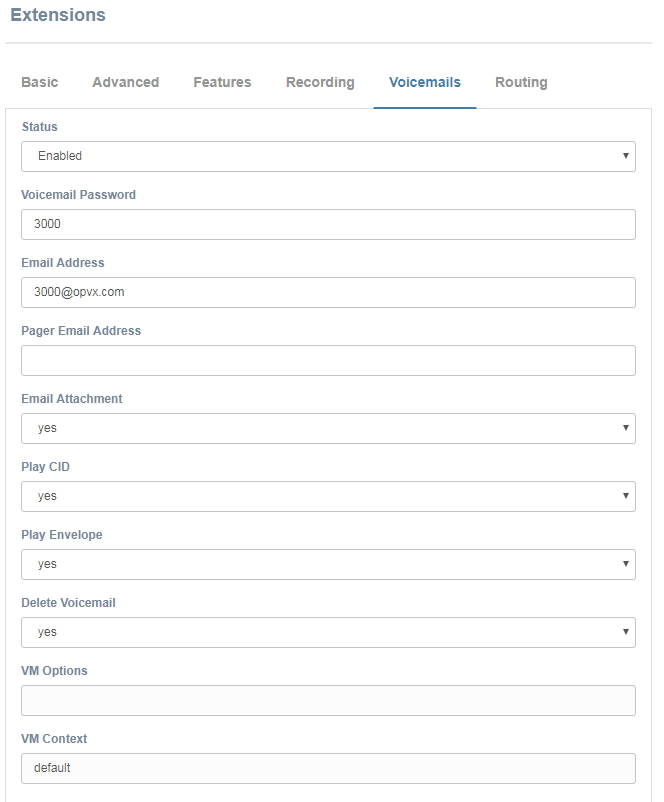
Click button “Save”, and click the red circle to apply config.
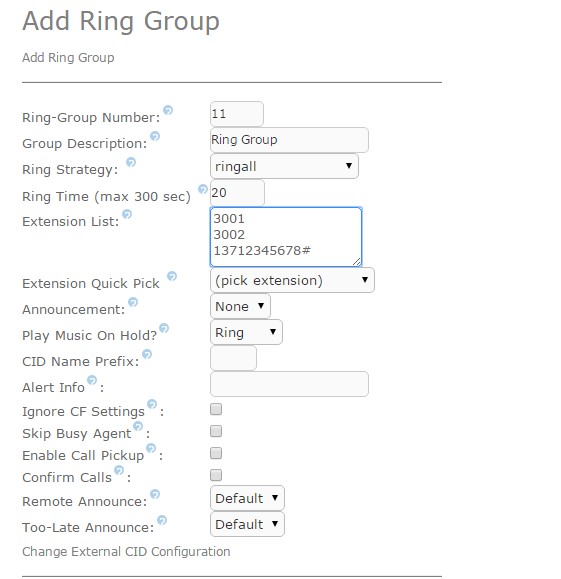
2 Ring Groups
A ring group is a group of extensions that will ring when there is an external incoming call. You can even put your Mobile Phone number in the ring group if you want to. Like 13712345678# is your phone number (see illustration below). For the mobile phone to work, you must have the appropriate route and trunk set up.
You may not want a ring group – it’s entirely up to you. If you don’t require a ring group, you may ignore this section.
When there is an incoming call to the ring group, the phones nominated in the selected group will ring. You may select different ring group for each of the incoming trunk or you may nominate the same group for all the trunks, in which case you will only need to define only one ring group.
For simplicity, we will only defined 1 ring group for all incoming calls from all trunks at this stage, let’s not get too fancy.
We will create a ring group 11 for this purpose. Let’s call it AdminGroup as it rings all the phones related to the Administration of the Medical Centre. A single digit ring group is not recommended.
Since the last number in the group is the Manager’s mobile phone, generally, the Mobile phone voicemail will take the message if the phone is not answered.
The ring group screen is illustrated below:
Next we will set up a group of softphones (softphone) to test what we do.
3 Set up Softphone
There are a number of softphones available for use. Some of them are free. Following are 2 examples of the free softphones.
X-Lite Softphones can be downloaded here:
http://www.counterpath.com/x-lite-download/


After set up the softphone (if users can set up the softphone), you need to deploy the softphone. Take the ZOIPER for example, click “setting” on softphone, pick “Create a new account”:

Select the type of account, select "SIP" and click "NEXT", enter the user name, password and proxy server (UC device IP) of SIP account, click "NEXT" until account create completely:
X-LITE soft phone to register another account such as 3001, X-LITE is similar to the operation. Of course, you can directly register multiple accounts in the same soft phone.
4 Call Forward
You can dial number directly with 2 soft phone, and then talk to the other one.
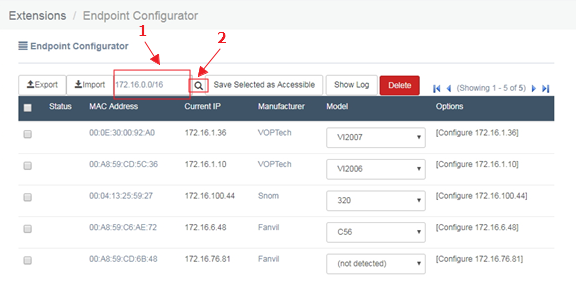
5 Endpoint manager
You can use the GUI interface to directly auto-provision and configure popular desk phones, wireless phones, door phones, overhead paging devices, gateways, and specialty devices.
Before you go to the endpoint manager, the extensions should be set up on your UC system, there is a drop-down list and you can specify each extension to one phone.
Navigate to PBX / Endpoint Configurator, in this page, We will enter the network segment of network, however, we may adopt slightly different from the address we enter in the UC device, please note the subnet mask using a different description. The subnet mask used here is written as /16, equivalent to 255.255.0.0; If your subnet mask is 255.255.255.0, you need to write as/ 24.
Click the “search” button, if there are a lot number device in the local network, it might be cost some time to search the device. If you want to shorten the search time, you can narrow down the range of the network segment you are searching for. When search is successful, you can see in the following figure out of the VoIP phone search:
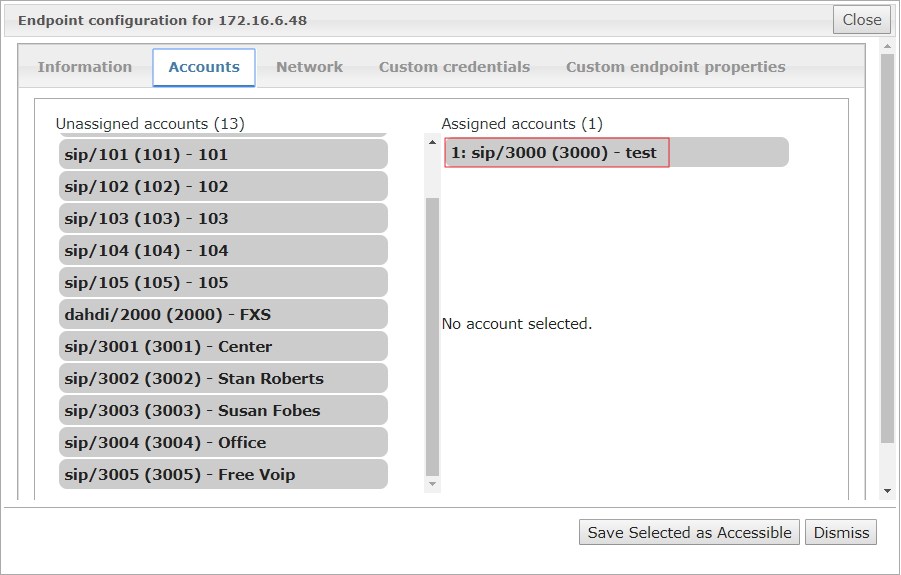
Then you can configure this options automatically, the phone model will be displayed below the “Type”, pick the correct model, click the phone you want to configure under "Options". In the dialog box, select the "account" menu, drag the extension which you want to set from the left to the right side, when completed click "Apply."
After setting, check the setting of the phone and make it work. Please note that some phones need to be rebooted to take efficient after the settings are completed.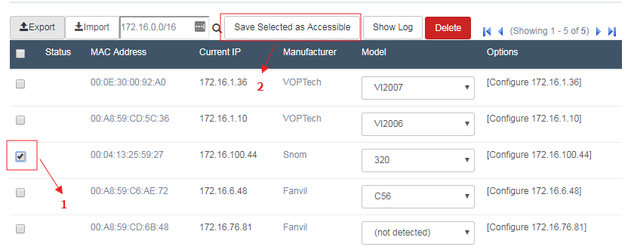
6 Outbound trunk
Create VoIP trunk
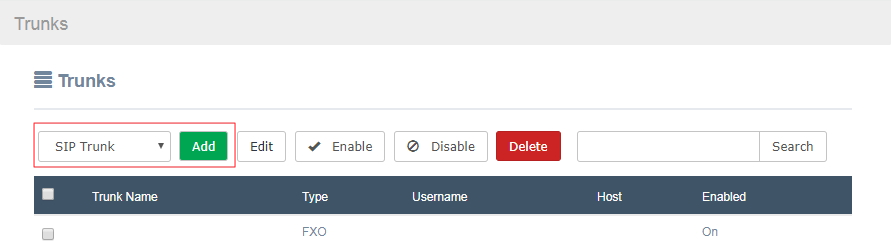
Navigate to PBX / PBX Configuration, then click the “trunks” option, docking 2 UC devices.
Click the “Add SIP Trunk” to create SIP trunk:
General Setting (Applies to all trunks)
Setting “Basic” and “Advanced”
Trunk name: 9001
Host = Remote Server IP / Domain Name
Username =9001
Secret =123456
Type =friend
Fromuser =9001
Insecure =invite, port
The docking UC devices is set like above , "host" have to fill in the remote IP or domain name.
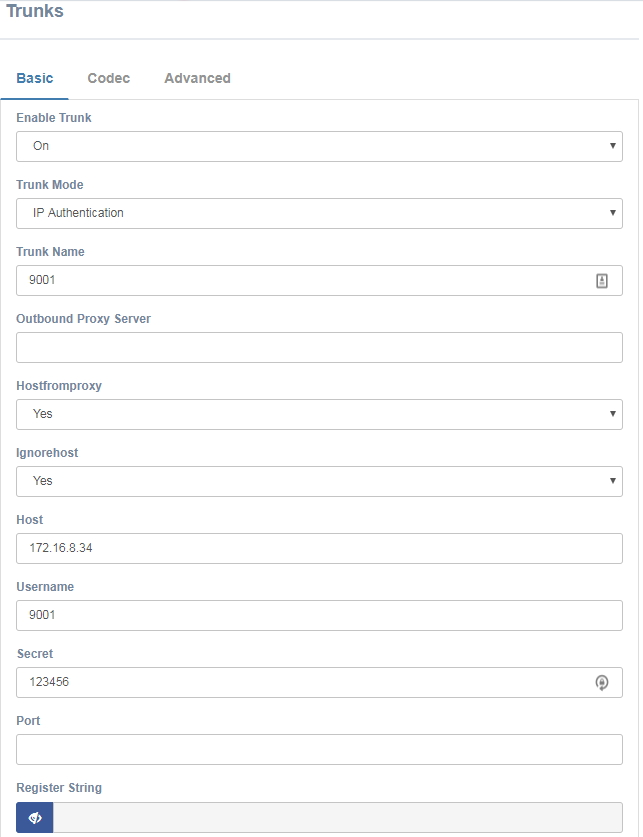

When completed, click “Save” to save to make it efficient.
Create a FXO Trunk
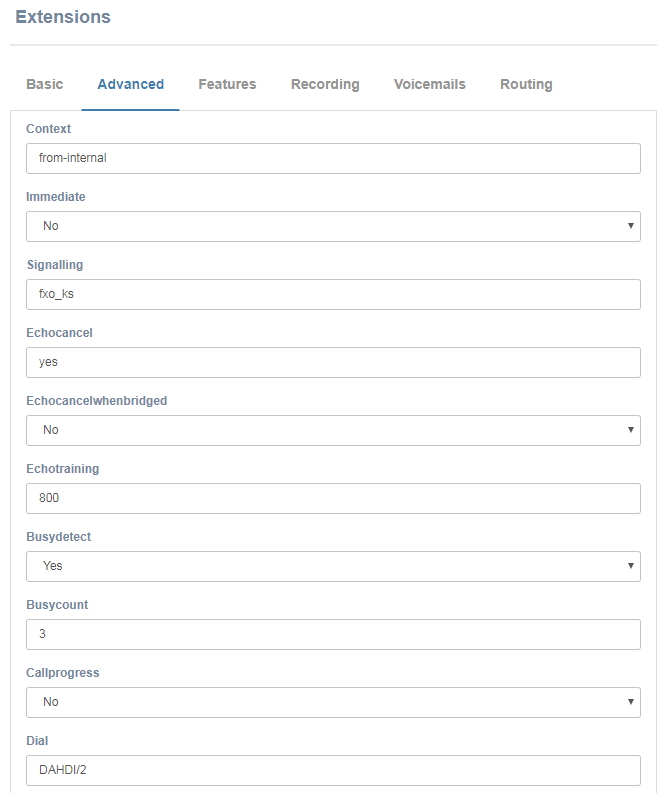
A FXO trunk is another type of trunk similar to IAX and SIP trunk, where incoming and outgoing calls are made through the PSTN line. There has exited a FXO Trunk in system, which you can modify or create a new FXO Trunk base on. The two parameters, "Trunk Name", "Group ID" and "Member of Groups" are required. You can customize a name for "Trunk Name", however, "Group ID" requires to be number and "Member of Groups" allows you to select members from the FXO port list.
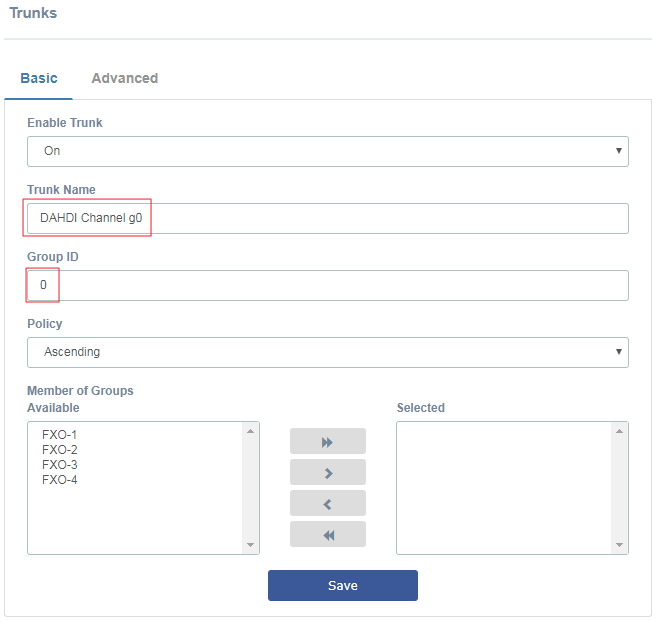
Click “Save” and “OK” in the pop-up dialog box.
7 Call Handing
7.1 Inbound Routes (Incoming calls)
This is where the behavior of incoming calls from all trunks is being handled. When an incoming call from PSTN or VoIP trunk is received, asterisk needs to know where to direct it. It can be directed to a ring group, an extension, Digital Receptionist (IVR) or Queue. For this purpose, Inbound Routes needs to be set up.
Select the Inbound Routes selection in the left bar of the screen.
Make all incoming calls to the extension 3000, which of course you can also make to a ring group, IVR or a queue if you have been set.
"Set unknown destination" is necessary, the other is optional. If you create multiple incoming routes, it is recommended that you set the following options to ensure that the correct destination is reached:
DID number
CallerID Number
If “DID number” and “CallerID number” are empty, that means all incoming calls will turn to the destination have been set. If you want this route to receipt fax, you might enable “Detecting fax” and pick the form in fax and the destination.
7.2 Time conditions
Time group
You can create various time conditions and use these time conditions in conjunction with your Inbound Route to individual each of the incoming trunk’s behavior. Of course, before you do this, it is best to set the UC to the correct local time.
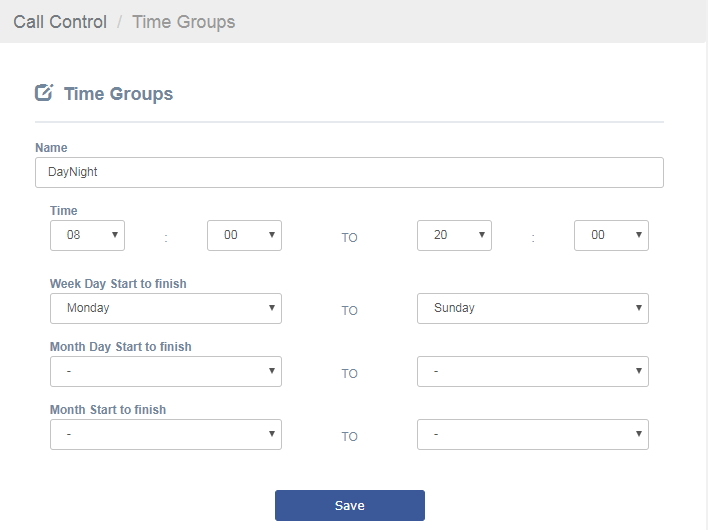
The time condition needs to be associated with a time group. Navigate to the page of "PBX / Call Control / Time Groups" , you can define the time group.
You may create several Time Groups and give each of the Time Group a Short Name to identify it. These time groups can then be assigned to each individual time condition that you have created (or will create) and use for the Inbound Route if you choose to do so.
7.2.1 Simple Time Condition
Unlike businesses, most private householders, ignore the time condition, instead would prefer to direct all calls to an extension or selected extensions regardless whether it is day or night. If this is the case, you may ignore time condition altogether, instead, use the inbound route to direct your incoming calls to individual extensions or to the digital receptionist. However, if you want to accept calls during the day but prefer callers to simply leave voice messages during the night, below is an example of a simple time condition that you can adopt where the time condition will send the calls to IVR during the hour of 8:00am and 8:00pm and anything outside the stipulated hours, the calls will be directed to your voicemail.
Create a Time Group:
- Name the Time Group DayNight
- Time to start: 08:00
- Time to finish: 20:00
- Week Day start: Monday
- Week Day finish: Sunday
- Submit the changes
Then let’s create a Time Condition
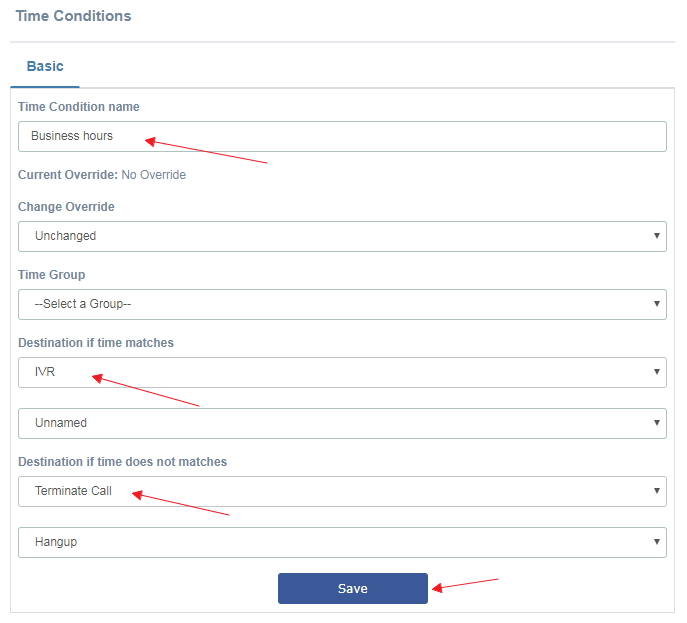
Add a new time condition by selecting PBX - > Time Condition - > Add time condition.
In the Time condition name field, give it a name eg: DayNight (same as the time group for simplicity)
Select DayNight for your time group
Under Destination if time matches, select IVR (or Core extension or ring group)
Under Destination if time does not match, select Core
mailbox: eg voicemail box 2001 (if you have voicemail enabled for ext. 2001).
Submit and click on the red bar on top of the page.
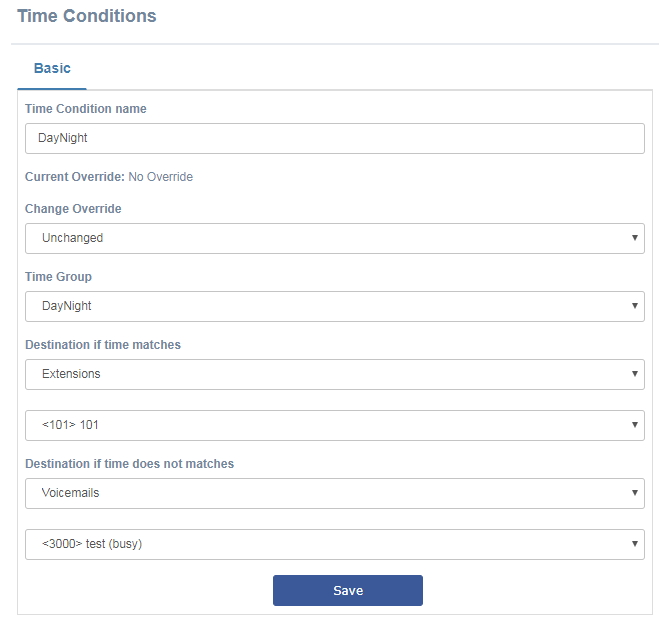
Once the above is done, go to Inbound Route, select the appropriate inbound route and under Set Destination, select Time Condition DayNight, submit and click the red bar on top of the screen.
What the inbound route will do is, as soon as an incoming call is accepted, it will be forwarded to the OfficeMorning time condition. If the time condition is met, it will then be forwarded to the IVR. On the other hand, if it does not match, it will be forwarded to time condition OfficeAfternoon. If it matches the OfficeAfternoon time condition, the call will be forwarded to IVR, if not; it will be forwarded to the voicemail box that you have determined.
Following the above example, time conditions can be nested to multiple levels deep allowing you to manage your time condition and make them as complex or as simple as the situation demands, now we achieve control incoming call by time conditions.
7.3 Outbound routes
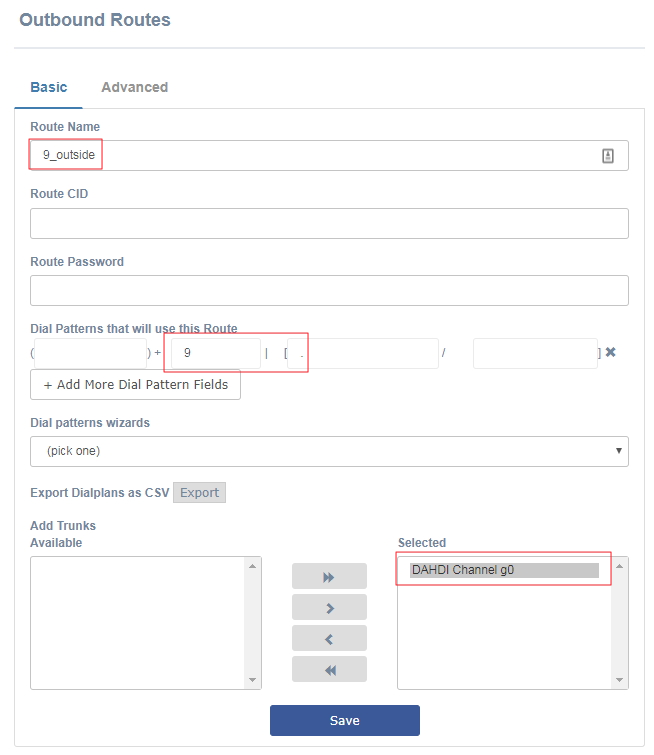
If you want to make a call out of the system, you have to set a n outbound route, which usually completed by trunk. To make an external call (except an internal extension call), you will need at least one trunk and one path.
To create a new path, navigate to PBX / Call Control / Outbound Routes. The system have carry a route “9_outside” by itself, which you can modify or recreate. Followings are required.
Route name
Dial Patterns that will use this Route( it will be explain for instance at section 7.3.1)
Trunk Sequence for Matched Routes
7.3.1 Match Pattern
Dial patterns are part of Outbound Routing. They act like a filter for matching numbers dialled with trunks.
The various patterns you can enter are similar to Asterisk's definition of them:
- X — Refers to any digit between 0 and 9
- N — Refers to any digit between 2 and 9
- Z — Any digit that is not zero. (E.g. 1 to 9)
- [Various] — Match only one character that matches any of the one in the square brackets. (E.g. [02-68*#] would match 0, any number between 2 and 6 inclusive, 8, * and #. Or, another way of saying this would be 'Match * or #, or a number that isn't 1, 7 or 9') –Avoid using this notation in your Trunk Dial Rule as it does not seem to work. Use this only in your Outgoing Route Dial Pattern.
- . — Wildcard. Match any number of anything. Must match *something*.
- | — This lets you use a '0 to dial out' (or '9' in the US) by matching anything before the line, but not sending it to the trunk.
Dial Patterns that will use this Route
Example 1:

At first the system will detect your callee ID, if it starts with “9”, it will delete the number “9”, then try to match “.” (that means any number).If it could match, the system will send out the call.
For example,I try to call “10086”, but I need to dial “910086”. The system finds the first num could match the num ”9”, and delete “9”, then match the “.”, it will match any numbers.So the system will try to call “10086”.
Example 2:

If I try to call “910086”,the system will found the number begin number “9”,it will delete the number “9”,and then try to match “910086”.But it can’t match, because the system have delete the number 9,so 10086 can’t match the 910086.So the system will not send the call.
Example 3:

I try to call “910086”. At first the system will detect the begin number, it can match “9”. So the system will delete the number “9”, now the number become “10086”, not 910086. Now the system will continue, it will add a prefix 0755 for the number. At last send the call “075510086”
Example 4:

Now I try to use my extension 1001 to call “910086”. At first the system will try to detect the begin number, it can match “9”, so it deletes the number, now the number become “10086” and caller ID is 1001. Then the system will continue to match if it is 10086 and caller ID is 1001. Last the system will add a prefix 0755, then send the call to “075510086”.
Example 5:

Now I use the extension 1001 to call “910086”. At first the system will try to match the first rule (lable 1). It can match “9”, so it will delete the number, the callee number become 10086. It will continue to match if the callee number is 10086 and the caller is 1001.The system finds the 1002 can’t match extension (caller) 1001. So it can’t match the rule 1.The system will try to match rule 2, it can match. At last call number is “02710086”.
Of course, if you try to use the extension 1002 to make a call to “910086”, it will send the number “075510086”.
The whole process is as follows:

The red label is the order of UC try to match.
8 Upload audio file
Navigate to the page of "PBX / Voice Prompts / System Recordings", you might upload a wav file to the system.
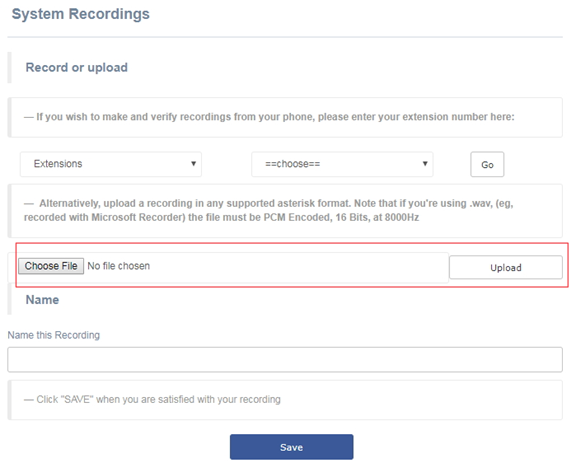
After the upload is complete, follow the indication from system, please name your file with description.
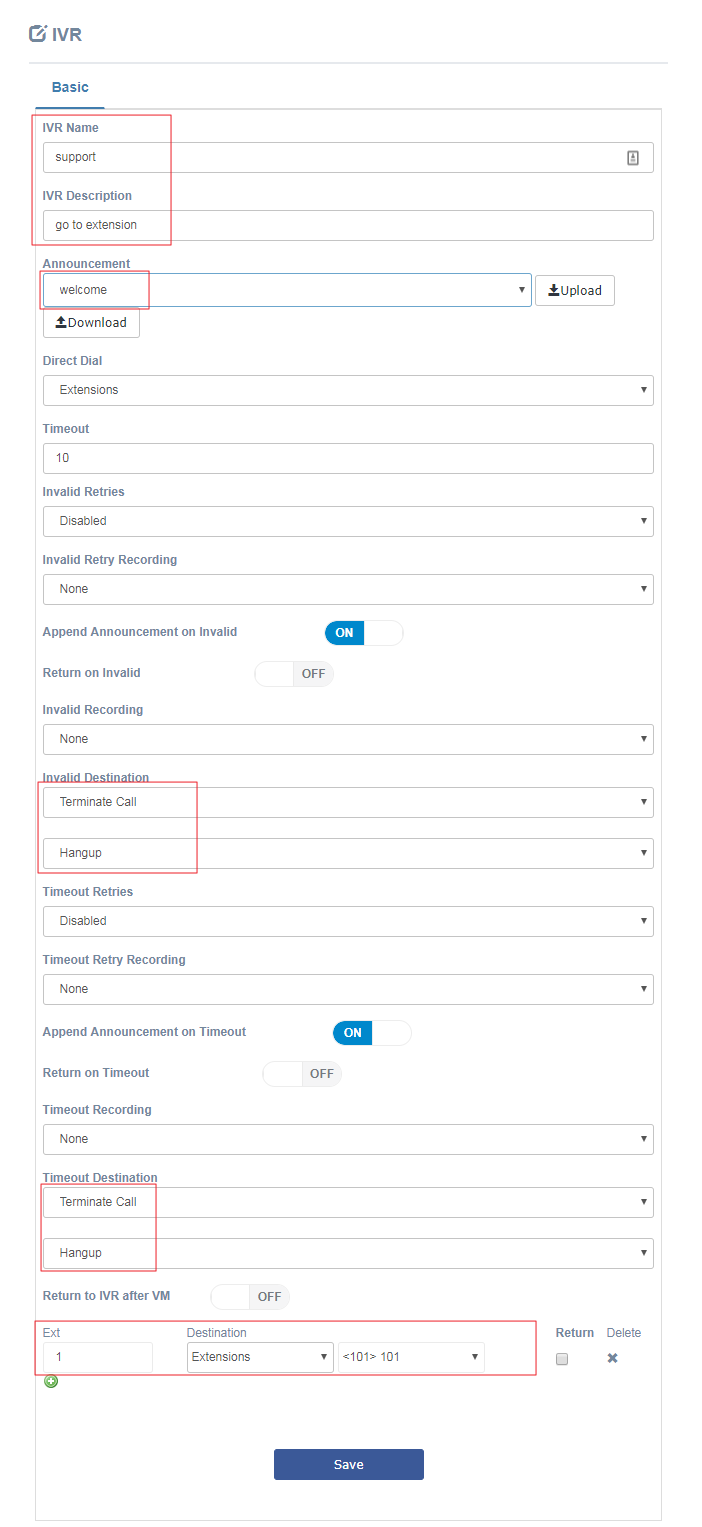
9 IVR
IVR can direct all incoming calls, which allow callers to choose which services or people to access.
Navigate to the page of "PBX / Call Features / IVR", then create a new IVR, there are some options are required as blow:
- IVR Name
- IVR Description
- Invalid Destination
- Timeout Destination
- IVR Entries
You can also set the play announcement, timeout, illegal number of times and so on. When finish complete, you can set the destination in the incoming route to this IVR. The following example implements the function: when there is incoming call to the IVR, play welcome audio at first, waiting for the caller to enter the number, if 10 seconds out there is no input or enter the illegal number, the system will hand up. If enter digit 1, the extension 101 will ring.
10 Conference
There two kinds of conference function: External conference and Internal conference.
10.1 Create External conference
Navigate to PBX / Call Features / Conference, select External Conference and click add, you can create one or more conference, the followings are required, the rest is optional:
- Conference Number
- Conference Name
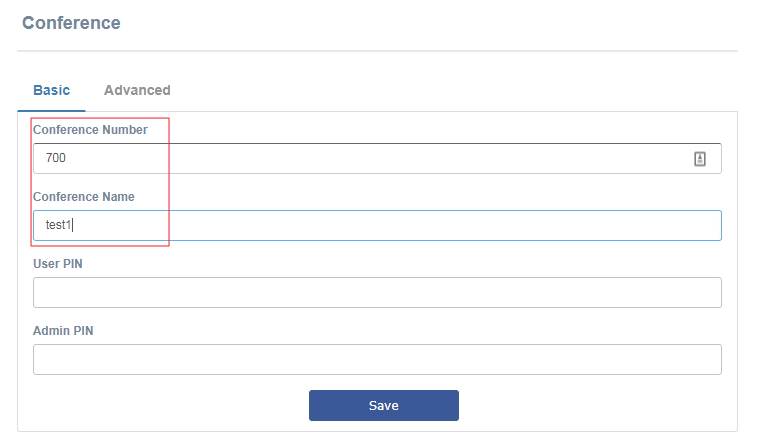
Conference number: 700
Conference name: test1
Users can join conference without PIN code
Admin PIN doesn’t require, waiting for leader to hold conference
When someone joining conference, no welcome information
There is no Leader Waiting option while the conference is waiting for the chair.
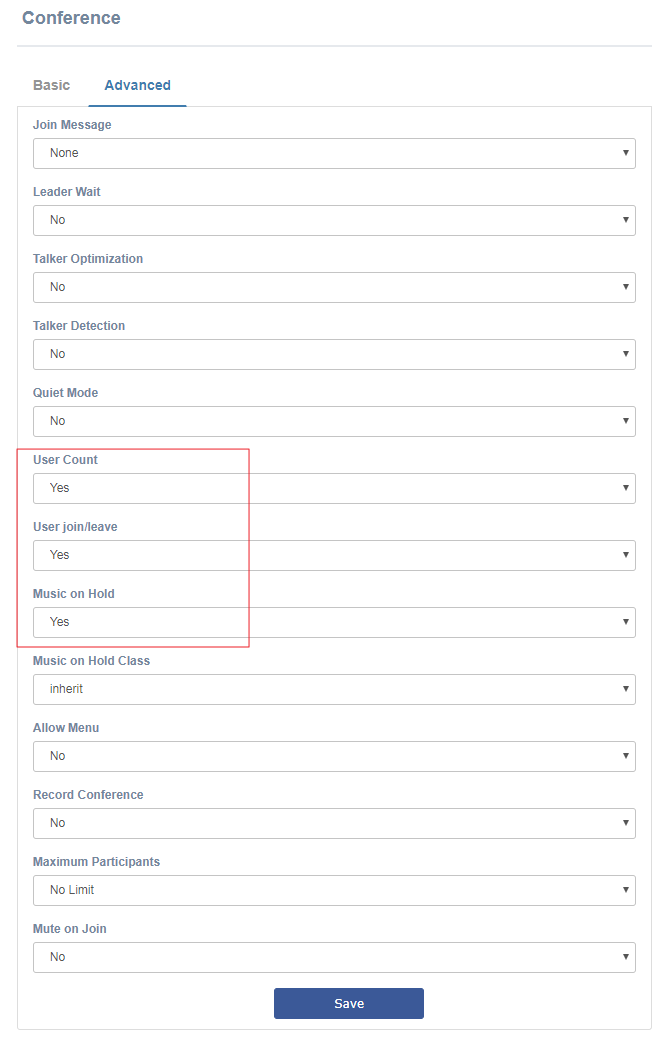
If user counting is required, in the User Count area option is YES
If you want to be notified when users join or leave the conference, select YES
Setting the waiting music (MOH) to YES, you can hear music while waiting.
When finish, using soft phone to dial 700, you can join the meeting, every time someone joined the meeting or leave the meeting, will be notified.
10.2 Internal conference
The internal conference participants have to be invited by internal to participate in the conference.
Because , just enter the followings:
On the PBX / Call Features / Conference page, click New Meeting to create a new conference. The options with * are required:
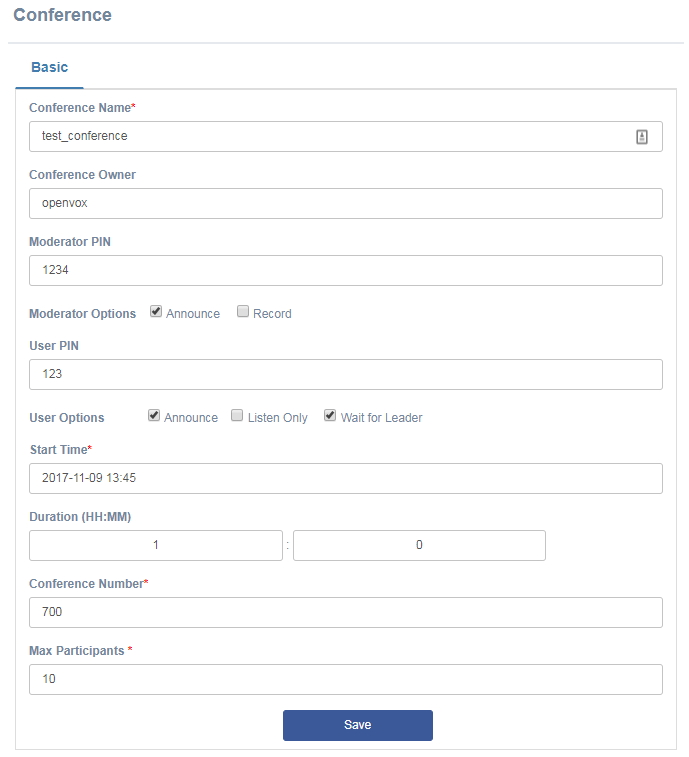
Conference Name: General Conference
Conference Owner: Your name
Conference Number: Number 700 or the pre-specified number
Moderator PIN:if needed,please enter here,such as 123
Moderator Option:Select the administrator operation privilege
User PIN: if you need an efficient PIN to join conference
User Option: pick the user options which you want
Start Time(PST/PDT): pick date and time from calendar
Duration(HH:MM): Duration of the meeting
Max Participation: the limit number of users to join conference
10.3 Controlling and moderating the conference
Now you can start hosting the meeting by click on the red box.

What you can do as following:
1. Invite people to the conference by the drop-down menu
2. Mute all participants by clicking the mute button
3. Kick-out any participant by using the kick-out button (Kick)
4. Abort the conference by using the Kick all button
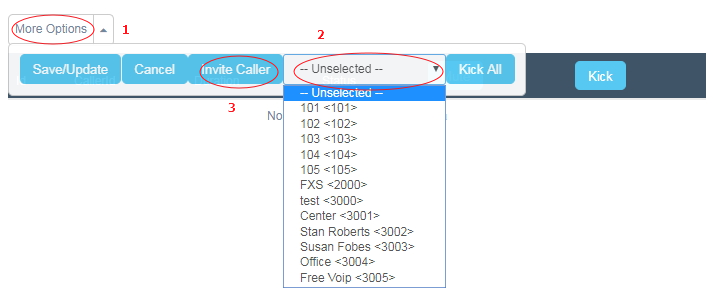
The conference will automatically reset time, and terminate at the end of the time.
11 Voicemail
Enable voicemail for extensions
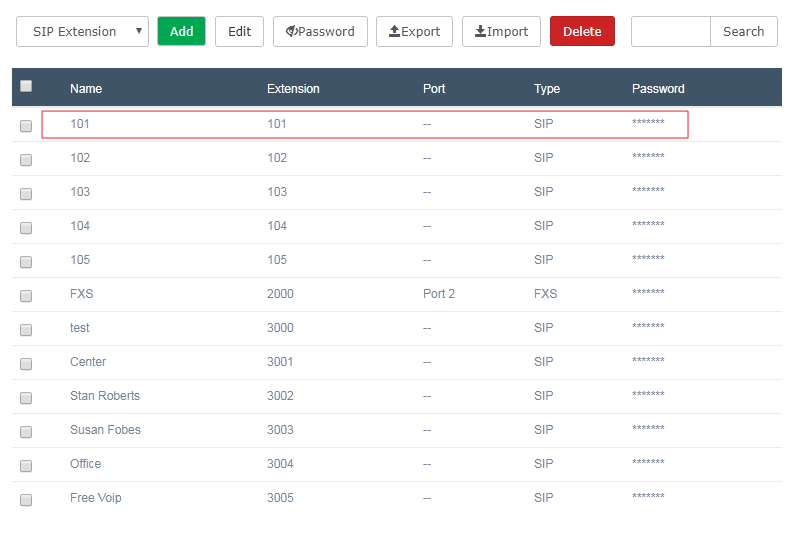
In the page of PBX / Extensions, click the extension which need to enable voicemail, take the extension 101 for example:
After entering the configuration details page, enable Voicemail in Voicemail category, and you can set to receive a voice message, the message will sent to your mailbox.
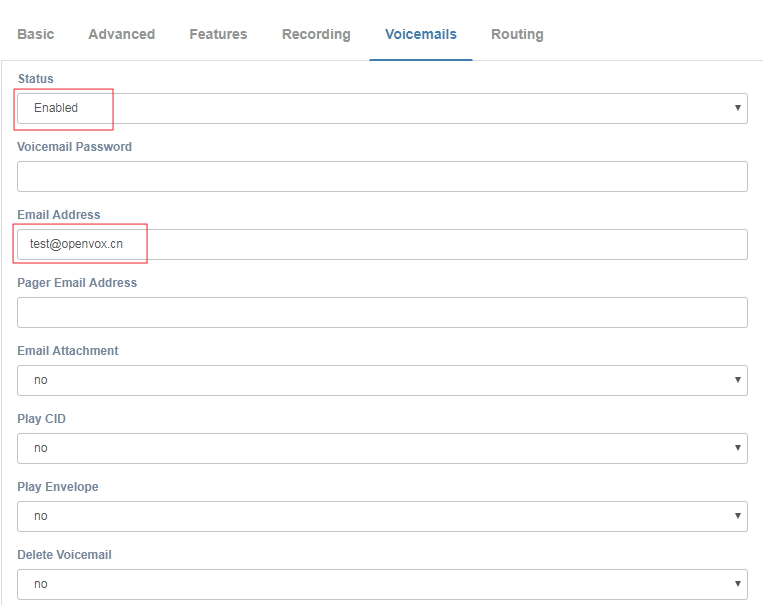
When 101 extension is called but not online, the other party will turn to the voice message, finally, in the PBX > Recording > Voicemail page you can view the details of the received voice message.