X204P/X204E Hybrid cards User Manual
Copyright
Copyright© 2013 OpenVox Inc. All rights reserved. No part of this document may be reproduced without prior written permission.
Confidentiality
Information contained herein is of a highly sensitive nature and is confidential and proprietary to OpenVox Inc. No part may be distributed, reproduced or disclosed orally or in written form to any party other than the direct recipients without the express written consent of OpenVox Inc.
Disclaimer
OpenVox Inc. reserves the right to modify the design, characteristics, and products at any time without notification or obligation and shall not be held liable for any error or damage of any kind resulting from the use of this document.
OpenVox has made every effort to ensure that the information contained in this document is accurate and complete; however, the contents of this document are subject to revision without notice. Please contact OpenVox to ensure you have the latest version of this document.
Trademarks
All other trademarks mentioned in this document are the property of their respective owners.
General Safety Instructions
CAUTION
1. The computers that have X204 card installed must comply with the country’s specific safety regulations.
2. Only service personnel should install X204 card.
3.Before you install X204 card, please unplug the power cord from the computer and remove the cover from your PC.
4.For avoiding personal injuries and damage to your computer andX204 card, make sure bracket of the card is secured to the PC’s chassis ground by fastening the card with screws.
5.Electrical Surges, ESD are very destructive to the equipment. To avoid it, make sure there is a low impedance discharge path from your computer to chassis ground.
6.To reduce the risk of damage or injury, please follow all steps or procedures as instructed.
Test Environment
Hardware Board: OpenVox X204
Operating System: CentOS-6.3
Kernel Version: 2.6.32-279.el6.x86_64
DAHDI: dahdi-linux-complete-current
Asterisk:11.15.0
Libpri:1.4.15
Chapter 1 Overview
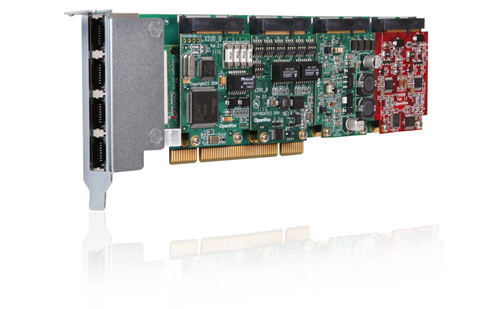
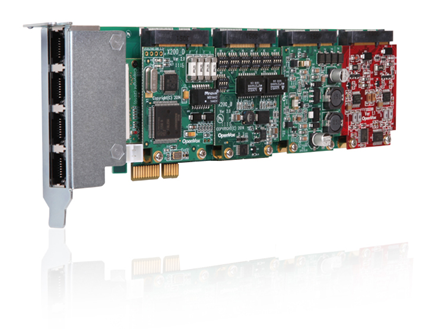
The X204 series cards are versatile devices used for connecting your phone network to the PSTN (Public Switched Telephone Network) world. This is accomplished through analog connected to the FXO (Foreign Exchange Office) port, phone handset connected to the FXS (Foreign Exchange Station) ports, digital lines connected to the BRI (Basic rate ISDN) ports, and E1(Basic Rate ISDN PRI) ports. The X204 series cards allow Asterisk to connect to your phone network, creating an office type telephony environment.
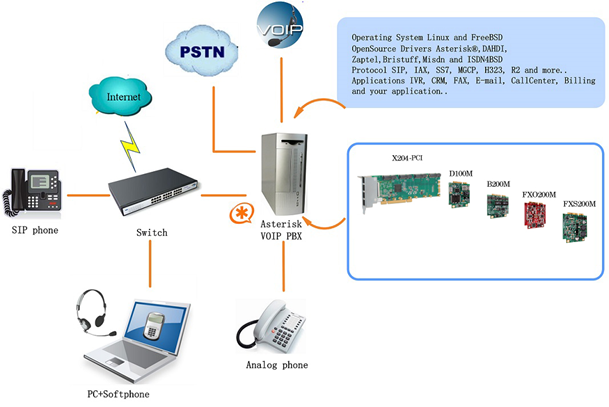
Figure 1 Topology

Figure2 Sample Card Application for FXO/FXS/BRI/E1
What is Asterisk
The Definition of Asterisk is described as follows:
Asterisk is a complete PBX in software. It runs on Linux, BSD, Windows (emulated) and provides all of the features you would expect from a PBX and more. Asterisk does voice over IP in four protocols, and can interoperate with almost all standard-based telephony equipments using relatively cost-effective hardware. Asterisk provides Voicemail services with Directory, Call Conferencing, Interactive Voice Response, and Call Queuing. It supports three-way calling, caller ID services, ADSI, IAX, SIP, H323 (as both client and gateway), MGCP (call manager only) and SCCP/Skinny (voip-info.org).
Asterisk as a Phone Switch (PBX)
Asterisk can be configured as the core of an IP or hybrid PBX, switching calls, managing routes, enabling features, and connecting callers with the outside world over IP, analog (POST), and digital (T1/E1/J1/BRI) connections.
Asterisk runs on a wide variety of operating systems including Linux, Mac OS X, OpenBSD, and Sun Solaris. It provides all of the features you would expect from a PBX including many advanced features that are often associated with high end (and high cost) proprietary PBXs. Asterisk’s architecture is designed for maximum flexibility and supports Voice over IP in many protocols, and can interoperate with almost all standards-based telephony equipment using relatively inexpensive hardware.
Asterisk as a Gateway
It can also be built out as the heart of a media gateway, bridging the legacy PSTN to the expanding world of IP telephony. Asterisk’s modular architecture allows it to convert between a wide range of communications protocols and media codecs.
What is X204 Series Hybrid telephony card?
OpenVox X204 hybrid telephony card is a PCI 2.2 compliant card which supports 3 types interface: FXO/FXS, BRI and E1. X204 Series card must be use FXO-400 or FXS-400 to formation of a viable system. And users can choice the number of FXO/FXS module according to individual needs. With no additional separate channel combiner and gateway access to products, each interface access 2 analog line via junction box. BRI ports can be configured for TE or NT mode individually by jumpers. It can provide 4 simultaneous voices calls over 2 ISDN BRI line, turns your legacy ISDN BRI equipments into powerful Voice over IP devices and provides a soft migration path from ISDN technology to the new Voice over IP world. E1 supports T1, E1, and J1 environments and is selectable on a per-card or per-port basis, and supports industry standard telephony and data protocols, including Primary Rate ISDN (both N. American and Standard Euro) protocol families for voice, PPP, Cisco, HDLC, and Frame Relay data modes. Both line-side and trunk-side interfaces are supported.
X204 series card works with Asterisk®, Elastix®, FreeSWITCH™, PBX in a Flash, trixbox®, Yate™ and IPPBX/IVR projects as well as other Open Source and proprietary PBX, Switch, IVR, and VoIP gateway applications.
Target applications
- Channel Bank Replacement / Alternative
- Small Office Home Office (SOHO) applications
- Small and Medium Business (SMB) applications
- Gateway Termination to analog telephones/lines
- High Performance ISDN PC Cards
- ISDN PABX for BRI
- VoIP Gateways
- ISDN LAN Routers for BRI
- ISDN Least Cost Routers for BRI
- ISDN Test Equipment for BRI
- Voice-over Internet Protocol (VoIP) Services
- Complex IVR Trees
- "Meet-Me" Bridge Conferencing
- Calling Card Platforms
- VoIP Gateways (support SIP and IAX)
- Legacy PBX/IVR Services
- Voice/Data Router (replace expensive routers)
- PRI/Switch Compatibility-Network or CPE
- Caller ID and Call Waiting Caller ID
- ADSI Telephones
- Loopstart Signaling Support
- Supports PCI Express 1.0 or above
- 4 RJ-45 interfaces on a single PCI bracket
- TE mode: BRI or PRI module can be used as transceiver synchronous clock, and the clock source line does not require link to the card
- Up to 4 ports of S/T interfaces
- ITU-T I.430 and TBR 3 certified and S/T ISDN supporting TE/NT mode
- Industry standard full size length PCI card
- DTMF detection on all B-channels
- Multiparty audio conferences bridge
- Full software and hardware compatible with Junghanns.NET ISDN, mISDN driver, DADHI and so on.
- RoHS compliant
- Certificates: CE, FCC, A-Tick
- Trixbox TM Officially Certified
- Elastix® Officially Certified
Main features
Card identification
There are multiple configurations in which an X204 series card may be purchased. Each configuration consists of a combination of single modules, quad modules, or according to your need in any combination.
Chapter 2 Hardware Setup
There are some points should be paid attention to when setting up X204 series card.
Slot compatibility
Check the slots on your motherboard to verify that you have a slot available which is compatible with the X204 series card. To determine which slots you have on your motherboard, identify them by comparing them to those shown in the following figure.
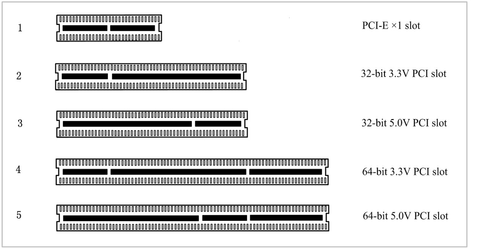
Figure3 PCI-E and PCI slots
Hardware Installation
- Now that you are acquainted with your card, power down your computer.
- Attach an anti-static strap to your wrist and open the case.
- Remove the bracket place holder and insert the card into a PCI or PCI Express slot. See the following figure3.

Figure4 Insert the card
- Replace the cover to your computer.
- Plug all analog telephone lines to the FXO ports (corresponding to the red modules) and all analog phones to the FXS ports (green modules) as needed using a patch panel, punch block, or the provided BRI RJ11-to-RJ45 cables.
Caution: This unit must be connected to the Telecommunications. Network in your country using an approved cord, e.g. :for Australia use only line cords complying with AS/CAS008:2010.
Caution: only connect regulatory equipment (approved for use in your specific country) to the telecommunications network voltage circuit port.
Connecting a Timing Cable
The timing port allows up to three X204 series card to share the same sync (timing) source from the BRI line provider, or provide a consistent sync source across multiple cards. This is a useful feature foe fax modes and some voice applications to prevent corruption due to timing slips on the second and third X204 series cards.
FXO/FXS, BRI and E1 Connection
The X204 series cards provide two RJ11 connectors for access to the FXO/ FXS and BRI modules installed in the available. Using a standard RJ45 telephone cable extend to two of the RJ11 connectors associated with an FXO/FXS module on the X204 series card. Using a standard RJ45 cable extend to two of the RJ45 connectors associated with a BRI module on the X204 series card. There is no extension with E1 on the X204 series card.
Chapter 3 Software Installation and Configuration
Software Installation
DAHDI software packages are available on OpenVox official website or Digium. Some patches should be applied when the driver source is from Digium. Therefore, it is recommended that downloading the DAHDI driver package from OpenVox official website.
Download
Gain DAHDI source package from OpenVox:
Get Libpri and Asterisk software packages from Digium official website:
http://downloads.asterisk.org/pub/telephony/libpri/libpri-1.4.14.tar.gz
http://downloads.asterisk.org/pub/telephony/asterisk/old-releases/asterisk-1.8.22.0.tar.gz
Execute the following commands under the directory of /usr/src/ in generally to download and decompress these packages:
#_wget_http://downloads.asterisk.org/pub/telephony/libpri/releases/libpri-1.4.14.tar.gz
# tar -zxvf libpri-1.4.14.tar.gz
#_tar_-xvzf_openvox_dahdi-linux-complete-current.tar.gz
#_wget_http://downloads.asterisk.org/pub/telephony/asterisk/releases/asterisk-1.8.22.0.tar.gz
# tar -zxvf asterisk-1.8.22.0.tar.gz
Hardware detection
# lspci -vvvv
Unassigned class [ff00]: Device 1b74:c200 (rev 01)
Control: I/O- Mem+ BusMaster+ SpecCycle- MemWINV- VGASnoop- ParErr- Stepping- SERR- FastB2B- DisINTx-
Status: Cap- 66MHz- UDF- FastB2B- ParErr- DEVSEL=slow >TAbort- <TAbort- <MAbort- >SERR- <PERR- INTx-
Latency: 32, Cache Line Size: 4 bytes
Interrupt: pin A routed to IRQ 19
Region 0: Memory at fdef8000 (32-bit, non-prefetchable) [size=32K]
Kernel driver in use: x200
Kernel modules: x200
If X204 is not recognized by the system, you have to power off and take out the card to insert it into another PCI slot.
Software installation
Some dependencies are crucial. If any of them is absent, the software installation process would not go through successfully. Let’s run "yum install XX" (XX stands for the dependency’s name) to check the availability of dependencies.
# yum install bison
# yum install bison-devel
# yum install ncurses
# yum install ncurses-devel
# yum install zlib
# yum install zlib-devel
# yum install openssl
# yum install openssl-devel
# yum install gnutls-devel
# yum install gcc
# yum install gcc-c++
# yum install libxml2
# yum install libxml2-devel
# yum install libxml2-devel
If there is no kernel-devel source in the system, users should run the following command to install the kerneldevel to peer current kernel:
# yum install kernel-devel-`uname –r`
While if there is no matched kernel-devel found, you should download matched RPM package to install it, or execute the following command to update to the latest and stable kernel version:
# yum install kernel kernel-devel
After installed, please reboot your machine to apply the new kernel and install the dependencies. If the dependency has been installed, system indicates that nothing to do which means you could go to next one directly. Otherwise, the system will keep on installing it.
Change to the directory dahdi-linux-complete-XX (XX represents DAHDI version), then perform commands one by one to install DAHDI.
# cd /usr/src/dahdi-linux-complete-2.11.1+2.11.1
# make
# make install
# make config
Caution: If there is something wrong after "make", please refer to HERE. In the url link, the moderator introduces you a method how to patch. After patching, save your changes and exit. Then run "make" again, if successfully done, it is time for you to install Libpri and Asterisk.
Please execute those commands to install Libpri and Asterisk:
# cd ../libpri-1.4.14
# make
# make install
# cd ../asterisk-1.8.22.0
# ./configure
# make
# make install
# make samples
"make samples" will install the standard sample configuration file in the directory /etc/asterisk. As a freshman, you should perform "make samples", that is to say, it is unnecessary to perform "make samples" every time. Because once performed, it will cover the old sample configuration files you have installed.
Driver Configuration
1. Driver loading
After compiling and installing DAHDI and Asterisk, please load the driver by running:
# modprobe dahdi
#modprobe x200
# modprobe d100m
#modprobe b200m
#modprobe fxs200m
#modprobe fxo200m
# dahdi_genconf
If there is any error, please trace the cause. Until all errors are clear up,you could execute "dahdi_genconf" again, and then go to the next step.By running "dahdi_genconf", it will generate /etc/dahdi/system.conf and etc/asterisk/dahdi-channels.conf automatically. Checking whether the generated files information agrees with your hardware setup, if not, you should modify to your specific requirements. Do not forget to confirm dahdi-channels.conf is included in chan_dahdi.conf, if not, run command:
# echo "#include dahdi-channels.conf" >> /etc/asterisk/chan_dahdi.conf
A part of system.conf which is one of the basic channel configuration files is displayed.
# Span 1: D100M1/0 "OpenVox D100M (E1|T1) Card 0/0" CCS/HDB3/CRC4 RED
span=1,1,0,ccs,hdb3,crc4
# termtype: te
bchan=1-15,17-31
dchan=16
echocanceller=mg2,1-15,17-31
# Span 2: B200M/1 "OpenVox B200M (NT|TE) Card 1 Span 1" AMI/CCS RED
span=2,2,0,ccs,ami
# termtype: te
bchan=32-33
hardhdlc=34
echocanceller=mg2,32-33
# Span 3: B200M/2 "OpenVox B200M (NT|TE) Card 1 Span 2" AMI/CCS RED
span=3,3,0,ccs,ami
# termtype: te
bchan=35-36
hardhdlc=37
echocanceller=mg2,35-36
# Span 4: FXO200M/3 "OpenVox FXO200M Card 3" (MASTER)
fxsks=38
echocanceller=mg2,38
fxsks=39
echocanceller=mg2,39
# Span 5: FXS200M/2 "OpenVox FXS200M Card 2"
fxoks=40
echocanceller=mg2,40
fxoks=41
echocanceller=mg2,41
# Global data
loadzone = us
defaultzone = us
2. Country mode modification
In order to match your country pattern, you need to change parameters loadzone and defaultzone to your country. For example, your system is in CHINA, you would like them change to:
loadzone = cn
defaultzone = cn
Some zonedata is available in the file
../dahdi-XX/tools/zonedata.c, you can refer to it to match your country mode. Meanwhile, you also need to modify another parameter which is in file /etc/asterisk/indications.conf.
country=cn
A part of file /etc/asterisk/dahdi-channels.conf is showed as below.
(Modification, if it is not agree with the hardware setup)
# Span 1: D100M1/0 "OpenVox D100M (E1|T1) Card 0/0" CCS/HDB3/CRC4 RED
group=0,11
context=from-pstn
switchtype = euroisdn
signalling = pri_cpe
channel => 1-15,17-31
context = default
group = 63
; Span 2: B200M/1 "OpenVox B200M (NT|TE) Card 1 Span 1" AMI/CCS RED
group=0,12
context=from-pstn
switchtype = euroisdn
signalling = bri_cpe_ptmp
channel => 32-33
context = default
group = 63
; Span 3: B200M/2 "OpenVox B200M (NT|TE) Card 1 Span 2" AMI/CCS RED
group=0,13
context=from-pstn
switchtype = euroisdn
signalling = bri_cpe_ptmp
channel => 35-36
context = default
group = 63
; Span 4: FXS200M/2 "OpenVox FXS200M Card 2" (MASTER)
;;; line="38 FXS200M FXOKS (EC: MG2 - INACTIVE)"
signalling=fxo_ks
callerid="Channel 38" <4038>
mailbox=4038
group=5
context=from-internal
channel => 38
callerid=
mailbox=
group=
context=default
;;; line="39 FXS200M FXOKS (EC: MG2 - INACTIVE)"
signalling=fxo_ks
callerid="Channel 39" <4039>
mailbox=4039
group=5
context=from-internal
channel => 39
callerid=
mailbox=
group=
context=default
; Span 5: FXO200M/3 "OpenVox FXO200M Card 3"
;;; line="40 FXO200M FXSKS (EC: MG2 - INACTIVE)"
signalling=fxs_ks
callerid=asreceived
group=0
context=from-pstn
channel => 40
callerid=
group=
context=default
;;; line="41 FXO200M FXSKS (EC: MG2 - INACTIVE)"
signalling=fxs_ks
callerid=asreceived
group=0
context=from-pstn
channel => 41
callerid=
group=
context=default
Figure 5 A part of dahdi-channels.conf
After modifying the country mode, please execute the following
command:
# dahdi_cfg –vvvvvv
The command is used for reading and loading parameters in the configuration file system.conf and writing to the hardware. A part ofoutputs are showed in the following figure.
[root@localhost ~]# dahdi_cfg -v
DAHDI Tools Version - 2.10.2
DAHDI Version: 2.10.2
Echo Canceller(s): MG2
Configuration
======================
SPAN 1: CCS/HDB3 Build-out: 0 db (CSU)/0-133 feet (DSX-1)
SPAN 2: CCS/ AMI Build-out: 0 db (CSU)/0-133 feet (DSX-1)
SPAN 3: CCS/ AMI Build-out: 0 db (CSU)/0-133 feet (DSX-1)
41 channels to configure.
Setting echocan for channel 1 to none
Setting echocan for channel 2 to none
Setting echocan for channel 3 to none
Setting echocan for channel 4 to none
Setting echocan for channel 5 to none
Setting echocan for channel 6 to none
Setting echocan for channel 7 to none
Setting echocan for channel 8 to none
Setting echocan for channel 9 to none
Setting echocan for channel 10 to none
Setting echocan for channel 11 to none
Setting echocan for channel 12 to none
……
……
Setting echocan for channel 32 to none
Setting echocan for channel 33 to none
Setting echocan for channel 34 to none
Setting echocan for channel 35 to none
Setting echocan for channel 36 to none
Setting echocan for channel 37 to none
Setting echocan for channel 38 to none
Setting echocan for channel 39 to none
Setting echocan for channel 40 to none
Setting echocan for channel 41 to none
Figure 6 Channel map
Asterisk initiation
# asterisk –vvvvvvvgc
If Asterisk is already activate, run "asterisk –r" instead. In the CLI,
please run the following command:
localhost*CLI> dahdi show channels
1 from-pstn default In Service 2 from-pstn default In Service 3 from-pstn default In Service
4 from-pstn default In Service
5 from-pstn default In Service
6 from-pstn default In Service
7 from-pstn default In Service
8 from-pstn defaul In Service
9 from-pstn default In Service
10 from-pstn default In Service
11 from-pstn default In Service
12 from-pstn default In Service
13 from-pstn default In Service
14 from-pstn default In Service
15 from-pstn default In Service
17 from-pstn default In Service
1 from-pstn default In Service
19 from-pstn default In Service
20 from-pstn default In Service
21 from-pstn default In Service 22 from-pstn default In Service
23 from-pstn default In Service
24 from-pstn default In Service
25 from-pstn default In Service
26 from-pstn default In Service
27 from-pstn default In Service
36 from-pstn default In Service
38 from-internal default In Service
39 from-internal default In Service
40 from-pstn default In Service
41 from-pstn defaul In Service
Figure 7 channels show
If DAHDI channels are found, it means they have been loaded into Asterisk successfully. You are going to edit dialplan by your
requirements
4. Dialplan edit
Users must make sure that the context "from-pstn" and "from-internal" are in extensions.conf, here a E1 simple example is given:
# vim /etc/asterisk/extensions.conf
[from-pstn] exten => s,1,Answer() // answer the inbound call
exten =>s,n,Playback(cc_welcome)
exten => s,n,Hangup()
[from-internal] exten => _X.,1,Dial(dahdi/g0/${EXTEN})
exten => _X.,n,Hangup()
Chapter 5 FXO, FXS, BRI and E1 Explained
Identification
There are multiple configurations in which an X204 series card may be purchased. Each configuration consists of a number of FXS, FXO, BRI and/or E1 modules. These modules are identified by their color.
n FXS-Foreign Exchange Station (Green Modules)
n FXO-Foreign Exchange Office (Red Modules)
n BRI- Basic Rate ISDN (Green Modules)
n E1-Basic Rate ISDN PRI(Green Modules)
This chapter provides a review of the four module types and their uses within your Asterisk server.
Note: Only qualified service personnel should be install the card. User should not attempt to perform this function themselves.
FXS Module
The FXS module allows an X204 series card to initiate and send ringing voltage to an FXO device such as an analog telephone. Because of the module design, you can activate additional ports at any time with more FXS daughter cards.
FXO Module
The FXO module allows an X204 series card to determinate analog telephone line (POTS). The FXO module passes all the call features any standard analog telephone line will support. The phone receiving the call is the last FXO device in the chain. When it receives voltage from an FXS device, the phone rings. Because of the modular design, you can activate additional ports at any time with more FXO daughter cards.
BRI Module
You are able to set a port to NT or TE mode, please refer to figure 3 for visualized information.
- If a port works on NT mode, you should set jumper to CONNECT (ON).
- If a port works on TE mode, theoretically it should be set to OPEN (OFF), but it might connect to some non-standard ISDN terminal equipments that do not have terminal resistors, for such equipments, you should set it to CONNECT(ON).
These jumpers control whether supply power to the external ISDN terminals. You should adjust accordingly as follows:
- If the port works on TE mode, you MUST set the jumper to OPEN(OFF)
- There are two aspects when ports work on NT mode. If the ISDN terminal has the function of power supply, you should set the jumper to OPEN (OFF); If ISDN terminal isn’t self- powered, you should set the jumper to CONNECT (ON).
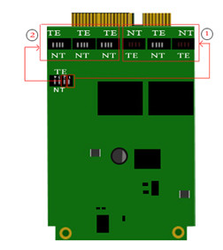
Channel ①/②: when channe1turn to
Power feeding to feed S/T interface
enable. When channel turn to NT,
power feeding to feed S/T interface
disable.
Figure 8 BRI Module Jumper Settings
E1 module
The default module is E1 module, if you change to T1 module, when adding parameters you need to load drivers.
T1 module : modmodprobe d100m t1e1override=0
E1 module : modprobe d100m t1e1override=1
Two configuration files need to be modified: /etc/dahdi/system.conf
span=1,1,0,esf,b8zs
bchan=1-24
dchan=25
/etc/asterisk/dahdi-channels.conf
; Span 1: D100M1/0 "OpenVox D100M (E1|T1) Card 0/0" CCS/HDB3/CRC4 RED
group=0,11
context=from-pstn
switchtype = euroisdn
signalling = pri_cpe
channel => 1-31
context = default
group = 63
Clock sources
BRI module and E1 module both have a clock source , without connecting to any clock source interface, just need to change the master clock and the slave clock in the profile.
/etc/dahdi/system.conf
An example shown as below:
# Span 1: D100M1/0 "OpenVox D100M (E1|T1) Card 0/0" CCS/HDB3/CRC4 RED
span=1,1,0,ccs,hdb3,crc4 #the middle digital“1”stand for master clock
# termtype: te
bchan=1-15,17-31
dchan=16
# Span 2: B200M/1 "OpenVox B200M (NT|TE) Card 1 Span 1" AMI/CCS RED
span=2,0,0,ccs,ami # the middle digital “0”stand for slave clock.
# termtype: te
bchan=32-33
hardhdlc=34
Appendix A Specifications
l Weight and size
Weight: 144g
Size: 200mm*78mm
l Interface
PCI Bus: Be compatible with PCI-E ×1, ×2, ×4, ×8, ×16
Local Loop Access: Four industry standard RJ-11 ports
l Environment
Temperature: 0 ~ 50°C (Operation), -40 ~ 125°C (Storage)
Humidity: 10 ~ 90% NON-CONDENSING
l Power consumption
Voltage: 3.3V, 5V, 12V
Power Dissipation: 18.25W Maximum
l Hardware and software requirements
RAM 128 + MB
Linux kernel 2.4.X or 2.6.X
CPU 800+ MHZ
Appendix B PIN Assignments
Table B-1 RJ11 Telco Port Connector for FXO/FXS
| PIN | Assignments |
1 | Not used | |
2 | Not used | |
3 | TIP2 | |
4 | TIP1 | |
5 | RING1 | |
6 | RING2 | |
7 | Not used | |
8 | Not used |
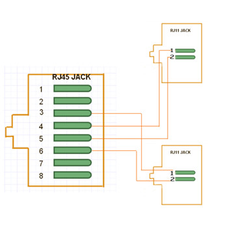
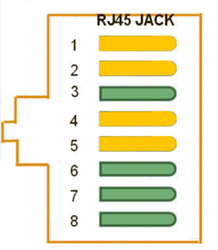
Table B-2 RJ45 ISDN BRI S/T Port Connector
| PIN | TE | NT |
1 | T2+ | R2+ | |
2 | R2+ | T2+ | |
3 | T1+ | R1+ | |
4 | R1+ | T1+ | |
5 | R1- | T1- | |
6 | T1- | R1- | |
7 | R2- | T2- | |
8 | T2- | R2- |
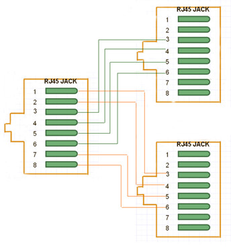
Table B-3 RJ11 Telco Port Connector for E1
| PIN | Assignments |
1 | RL1 | |
2 | RL2 | |
3 | Not used | |
4 | XL1 | |
5 | XL2 | |
6 | Not used | |
7 | Not used | |
8 | Not used |
Thank You for Choosing OpenVox Products!