...
Asterisk is a complete PBX in software. It runs on Linux, BSD, Windows (emulated) and provides all of the features you would expect from a PBX and more. Asterisk does voice over IP in four protocols, and can interoperate with almost all standard-based telephony equipments using relatively cost-effective hardware. Asterisk provides Voicemail services with Directory, Call Conferencing, Interactive Voice Response, and Call Queuing. It supports three-way calling, caller ID services, ADSI, IAX, SIP, H323 (as both client and gateway), MGCP (call manager only) and SCCP/Skinny (voip-info.org).

Figure 1 Topology
1.2 What is B200M
OpenVox B200M is a Mini PCI type III BRI card which supports 2 BRI S/T interface. All 2 BRI ports can be configured for TE or NT mode individually by jumpers. This port configuration is detected by the driver automatically.
...
B200M is compatible with 32-bit 3.3V Mini PCI type III slot.
...

Figure 2 124 pin Mini-PCI Type III (Amp 1318228-1) connector
The Mini PCI specification uses a subset of the PCI signal set. Mini-PCI is a small form factor version of a PCI card. The Mini-PCI bus only uses 3.3 volts and the 32-bit PCI bus. Mini PCI type III slot is a 124-pin connector used with Type III Mini-PCI cards. The 124-Pin connector accepts a card edge and a board with fingers.
...
- The ID of the first card must be set to 0, and the second should be set to 1, and so forth.
- The first Card is a card that will be initialized (i.e. installing driver) firstly when the system boot up. At most cases, Linux will initialize PCI devices according to their slot order. The slot nearest to the CPU will be initialized firstly and the far end slot will be initialized at last. That is to say, the card which is nearest to the CPU ID should be set to 0 if there are more than one B200M on your machine.
...

Figure 3 Card ID Settings
2.4 Adjusting Termination of S/T Interface (100 ohm)
...
- If a port works on NT mode, you should set jumper to CONNECT (ON).
- If a port works on TE mode, theoretically it should be set to OPEN (OFF), but it might connect to some non-standard ISDN terminal equipments that do not have terminal resistors, for such equipments, you should set it to CONNECT(ON).
- Use the connection cable to connect B400MM and B200MS. On the B200MM, there are two slots for RJ45 expansion board; the two slots are used to connect the slots on B200MS. The connection should be:

Figure 4 Cable connector
2.5 Power Feeding Connector
...
While ISDN terminal does not require ISDN power supply, users should set the jumper to OPEN (OFF).

Figure 5 Jumper Setting
2.6 Hardware setup procedure
...
Check the outcome and confirm your system has recognized B200M. If it has been recognized, "ISDN controller" will be displayed in the output information like that:

Figure 6 Hardware detection
If B200M is not recognized by the system, you have to cut the server power off, take out the card to clean the slot and insert it into the mini PCI slot again.
...
OpenVox B200M has great adaptive ability that it can be set as TE/NT mode automatically without any parameters. When the driver module "wcb4xxp" loaded, B200M card will be set as specific mode just depending on the hardware jumper settings. You can see the messages when execute a command below:
# dmesg|grep wcb4xxp

Figure 7 dmesg information
After running "modprobe dahdi" or "modprobe wcb4xxp", there is not any information displayed if loaded normally and successfully. "wcb4xxp" is the driver module name of B200M.
...
A part of system.conf which is one of the basic configuration files is displayed as follows:

Figure 8 A part of system.conf
2. Country mode modification
...
A part of file /etc/asterisk/dahdi-channels.conf is showed as below. (Modification, if it is not agree with the hardware setup. Here is an example that assumes port 1 is set to TE mode, port 2 are set to NT mode.)

Figure 9 A part of dahdi-channels.conf
3. Asterisk initiation
Execute a command to start Asterisk:
...
"dahdi show channels"and "pri show spans":
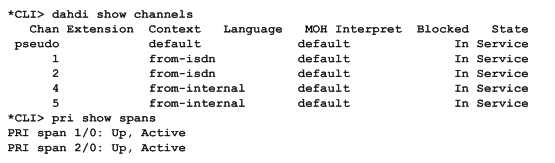
Figure 10 channels and spans show
If you can see the span is up, active and not "In Alarm”, it means successful installation. Otherwise, please check the setting files and physical connections.
...
# vim /etc/asterisk/extensions.conf
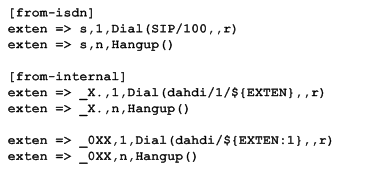
Figure 11 dialplan
After saving your dialplan, please run "asterisk –r", then execute "reload" in the CLI. Now you are able to make calls. The above dialplan achieves that:
...