...
Click “New Configuration File” to create a new configuration file. After editing or creating, please reload Asterisk.
...
Auto Provisioning
Auto provisioning or auto-configuration is an easy, flexible and time-saving way to upgrade firmware and configurations for E1 gateways in mass deployment. With auto provisioning, all user information can be entered via the central ACS (Auto Configuration Server). ACS can be DHCP server or TFTP, HTTP and FTP server. It will not take effects immediately but in the next time system is power on. It could be postponed the execution of restart system also.
Note that system will not be upgrade the firmware and update configurations if the connection between ACS and gateway is disconnect.
...
Preparation
The following should be prepared before anto provisioning being applied.
...
l The network between gateway and ACS is connected
...
Configuring gateway
Usually, the feature is disabled before being on sale. To activate the auto provisioning function, please follow the procedures as below.
...
Figure 7-4-1 Auto Provision interface
...
Configuring ACS
The Auto Configuration Server can be the one of TFTP, FTP and HTTP server. The ACS is used to store the firmware release and configurations files of the devices under management.
...
Figure 7-4-2 the overview of defconfig.tar.gz
...
Provisioning example
After auto provisioning is enabled, the gateway will visit the Auto Configuration Server and download the updated files periodically based on the timer Check Interval (LOGS->System notice). By default, the timer is set as every hour. System will receive a message from ACS, like figure 7-4-3, and the message will be display in the system notice (LOGS->System Notice).
...
Figure 7-4-10 Auto provision upgrade notification
2.Restart the system. It will take about 3 minutes almost to download, upgrade Firmware and update configurations.
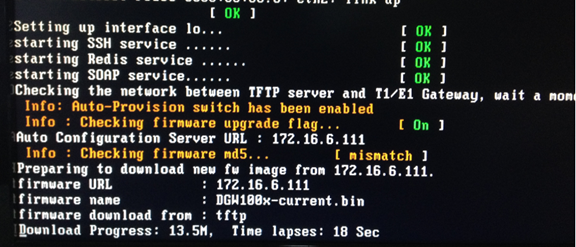
Figure 7-4-11Downloading the firmware and configs
...
Figure 7-4-12Applying the firmware and configs
...
SNMP
Simple Network Management Protocol (SNMP) is an application–layer protocol, which is used to manage and monitor network elements and exchange management information between network devices. By default SNMP uses port 161 for communication.
Since the inception SNMP, it embraces three versions: v1, v2c and v3. V1 and v2c are the most implemented version of SNMP; v3 is target at the high security when compare to its older versions. The gateway support private SNMP MIBs (private enterprise number) to access.
...
Parameters in SNMP setting
Table 7-5-1Definition of SNMP setting
Options | Definition |
SNMP Enable | Whether to enable SNMP |
System Contact | System contact information(optional) |
System Location | The locale of system contact(optional) |
Private Enterprise Number | The number is used for defining private SNMP MIBs which is assigned by Internet Assigned Numbers Authority (IANA). For more information, please access: |
SNMP Version | Select version of SNMP |
Community Configuration | Define a community name to security name |
Group Configuration | Define the security name to a group |
View Configuration | Set a view to let the group have rights to do |
Access Configuration | Grant the group can access to the view(read/write/notify) |
User Configuration | Only exist in v3. Add a v3 account to SNMP. Notice that the length of auth password and privacy password are more than 8. |
...
Activating SNMP
Usually, the feature is disabled by default. To activate the SNMP feature, please follow the Figure 7-5-1.
...
Note: Do not forget to click ‘Save’ to take effect. After configuration, The SNMP feature is activated immediately.
...
Verify SNMP
A powerful, indispensable and easy-to-use MIB browser is convenient for engineer/manager to manage SNMP enabled network devices and applications. In this session, Manage Engine MIB browser is selected. It allows user to issue SNMP requests to retrieve agent's data, or make changes to the agent. It is free tool for Windows, Mac and Linux.
...
(2). Set SNMP parameters via SNMP MIB browser. For example, set the system name. system name is “dgw100x” by default, then set it as “VoIP gateway”. See figure 7-5-4.l
- Click Operations->GET to attain the current system name.
...
- Fill the field of Set Value with “VoIP gateway”.
...
- Click Operations->SET to set the system name.
...
- Click Operations->GET to attain the modified system name.
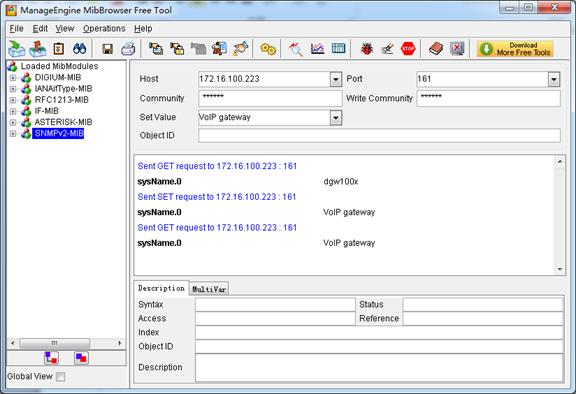
Figure 7-5-4 Set system name
...
TR069
TR069 is a remote management solution which offers a single interface to manage the ACS and automate the deployment and support of data, voice and video services, thereby reducing operation and support costs, while enhancing customer satisfaction. Its user-friendly interface covers the entire service lifecycle, from centralized remote provisioning of services, to inventory management, group updates, monitoring, event triggering, and support automation. Figure 7-6-1 is TR-069 configuration interface and table 7-6-1 is its definition.
...
Figure 7-6-1 TR069 configuration interface
...
Network Capture
The gateway have been supplied a network packets capture in the web for ease of user to analysis, capture and monitor the gateway’s network status, RTP flows, protocol analysis and so on.
...
Options | Definition | |
Auto clean: (System Logs) | switch on : when the size of log file reaches the max size, the system will cut a half of the file. New logs will be retained. switch off : logs will remain, and the file size will increase gradually. default on, default size=1MB | |
Verbose: | Asterisk console verbose message switch. | |
Notice: | Asterisk console notice message switch. | |
Warning: | Asterisk console warning message switch. | |
Debug: | Asterisk console debug message switch. | |
Error: | Asterisk console error message switch. | |
DTMF: | Asterisk console DTMF info switch. | |
Auto clean: (asterisk logs) | switch on : when the size of log file reaches the max size, the system will cut a half of the file. New logs will be retained. Switch off: logs will remain, and the file size will increase gradually. default on, default size=2MB | |
SIP Logs: | Whether enable or disable SIP log. | |
Auto clean: (SIP logs) | switch on : when the size of log file reaches the max size, the system will cut a half of the file. New logs will be retained. Switch off: logs will remain, and the file size will increase gradually. default on, default size=2MB | |
IAX2 Logs | Whether enable or disable IAX log | |
Auto clean | switch on : when the size of log file reaches the max size, the system will cut a half of the file. New logs will be retained. Switch off: logs will remain, and the file size will increase gradually. default on, default size=2MB | |
MFC/ R2 Logs | Whether enable or disable MFC/ R2 Logs log. | |
Auto clean | switch on : when the size of log file reaches the max size, the system will cut a half of the file. New logs will be retained. Switch off: logs will remain, and the file size will increase gradually. default on, default size=2MB | |
PRI Logs | PRI port logs. You can choose one or more ports. If you choose "All", the "PRI" page will show you the logs about all the ports. | |
Auto clean (PRI logs) | switch on : when the size of log file reaches the max size, the system will cut a half of the file. New logs will be retained. Switch off: logs will remain, and the file size will increase gradually. default on,default size= On the “Log Settings” page, you should set the related logs on to scan the responding logs page. For example, set “SIP Logs” on like the following, then you can turn to “SIP” page for sip logs, otherwise, sip logs is unavailable. And the same with other log pages. | |
.SS7 Logs | Whether enable or disable SS7 log | |
Auto clean | switch on : when the size of log file reaches the max size, the system will cut a half of the file. New logs will be retained. Switch off: logs will remain, and the file size will increase gradually. default on, default size=2MB | |
Call Statistics | Whether enable or disable Call Statistics. | |
...
System log
System log record every time power on, power off and firmware upgrade information.
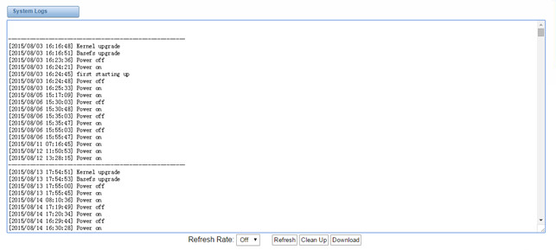
Figure 8-2-1 System Log
...
Asterisk logs
On the pages of “Asterisk”, “SIP”, “IAX2”, “SS7”, “PRI” and “MFC/R2”, there owns the some functions—Displays the log by port, refresh regularly and log download.
...
Figure 8-3-1 Asterisk Log
...
Call Statistics
The figure of call statistics, you’ll find “Answered”, “congestion”, “Call busy”, “Call failed”, “No answer”, “Current calls”, “accumulated calls”, “Calls duration” and “ASR”. “ASR” stands for Answer Seizure Ratio. “Calls duration” will count the whole calls in the gateway. The call statistics will be saved before power off. It will be loaded after power on. It can be refreshed by itself. You can reset the statistics manually.
...
Note: Do not forget to enable call statistics in “Log Setting” if you want to statistics the calls.
...
System Notice
The system notice could be generated by system to inform the network manager of what is going on if it has been enabled. Firmware upgrade messages from official website and auto provisioning messages from ACS are main notice right now. And at first, enable the system notice function like figure 8-5-1.
...