| Anchor | ||||
|---|---|---|---|---|
|
| Anchor | ||||
|---|---|---|---|---|
|

OpenVox Communication Co., Ltd
UC Series User Manual
Version 2.0
OpenVox Communication Co.,Ltd
Address: 10/F, Building 6-A, Baoneng Science and Technology Industrial Park, Longhua New District, Shenzhen, Guangdong,China 518109
Tel: +86-755-66630978, 82535461, 82535362
Business Contact: sales@openvox.cn
Technical Support: support@openvox.cn
Business Hours: 09:00-18:00(GMT+8) from Monday to Friday
URL: www.openvox.cn
Thank You for Choosing OpenVox Products!
| Anchor | ||||
|---|---|---|---|---|
|
| Anchor | ||||
|---|---|---|---|---|
|
| Anchor | ||||
|---|---|---|---|---|
|
| Anchor | ||||
|---|---|---|---|---|
|
...
Copyright
Copyright© 2017 OpenVox Inc. All rights reserved. No part of this document may be reproduced without prior written permission.
Confidentiality
Information contained herein is of a highly sensitive nature and is confidential and proprietary to OpenVox Inc. No part may be distributed, reproduced or disclosed orally or in written form to any party other than the direct recipients without the express written consent of OpenVox Inc.
Disclaimer
OpenVox Inc. reserves the right to modify the design, characteristics, and products at any time without notification or obligation and shall not be held liable for any error or damage of any kind resulting from the use of this document.
OpenVox has made every effort to ensure that the information contained in this document is accurate and complete; however, the contents of this document are subject to revision without notice. Please contact OpenVox to ensure you have the latest version of this document.
Trademarks
All other trademarks mentioned in this document are the property of their respective owners..
Contents
Revision History
1 Overview
1.1 Introduction
1.1.1Features
1.1.2 Model
1.2 Compatible Endpoints
1.3 Log in to the Web GUI
1.4 Web GUI overview
2 Features
2.1 System
2.1.1 Dashboard
2.1.2 Network
2.1.3 Security
2.1.4 User Permission
2.1.5 Storage
2.1.6 Maintenance
2.1.7 Tool Kit
2.1.8 Preference
2.2 PBX
2.2.1 Extensions
2.2.2 Trunks
2.2.3 Call Control
2.2.4 Call Features
2.2.5 Voice Prompts
2.2.6 Settings
2.2.7 Recording
2.2.8 Tools
2.3 Email
2.3.1 Domains
2.3.2 Accounts
2.3.3 Relay
2.3.4 Webmail
2.3.5 Antispam
2.3.6 Remote SMTP
2.3.7 Email list
2.3.8 Email stats
2.3.9 Vacations
2.4 Fax
2.4.1 Virtual Fax
2.4.2 Fax Master
2.4.3 Fax Clients
2.4.4 Fax Viewer
2.4.5 Email Template
2.5 Reports
2.5.1 CDR Report
2.5.2 Channels Usage
2.5.3 Billing
2.5.4 Graphic Report
2.5.5 Summary
2.5.6 Missed Calls
2.6 Logs
2.6.1 Logs Settings
2.6.2 System Logs
2.6.3 Asterisk Logs
2.6.4 SIP Logs
2.6.5 IAX Logs
2.6.6 DAHDI Logs
2.6.7 FXO Monitor Logs
2.6.8 VPN Logs
| Anchor | ||||
|---|---|---|---|---|
|
| Anchor | ||||
|---|---|---|---|---|
|
...
Item | Description | |
Basic Settings | ||
Host | Server Name, for example: pbx.subdomain.com | |
Work Mode | Optional work modes: Single/Double | |
Gateway | IP Address of the Port of Connection (Default Gateway) | |
Primary DNS | IP Address of the Primary Domain Name Server (DNS) | |
Secondary DNS | IP Address of the Secondary or Alternative Domain Name Server (DNS) | |
IP Configuration |
| |
Type | The type of IP address that the Interface has, which could be STATIC when the IP address is fixed or DHCP when the IP address is obtained automatically from a DHCP server. | |
IP Address | IP Address assigned to the Interface | |
Mask | The Network Mask assigned to the Interface | |
MAC | Physical Address of the network Interface | |
Status | Shows the physical status of the Interface, if it's connected or not |
...
Menu | Administrator | Operator | Extension | |||||
System |
|
|
| |||||
System Info | Yes | Yes | No | |||||
PBX Configuration | Yes | No | No | |||||
Network | Yes | No | No | |||||
User Management | Yes | No | No | |||||
Shutdown | Yes | No | No | |||||
Operator Panel |
|
|
|
| ||||
Flash Operator Panel | Yes | Yes | No | |||||
Voicemails |
|
|
|
| ||||
Asterisk Recording Interface | Yes | Yes | No | |||||
Fax |
|
|
|
| ||||
Virtual Fax List | Yes | Yes | No | |||||
New Virtual Fax | Yes | No | No | |||||
Reports |
|
|
|
| ||||
CDR Report | Yes | Yes | No | |||||
Channels Usage | Yes | Yes | No | |||||
Billing |
|
|
|
| ||||
Rates | Yes | No | No | |||||
Billing Report | Yes | No | No | |||||
Destination Distribution | Yes | No | No | |||||
Trunk Configuration | Yes | No | No | |||||
Extras |
|
|
| |||||
SugarCRM | Yes | Yes | Yes | |||||
Calling Cards | Yes | Yes | Yes | |||||
Downloads |
|
|
|
| ||||
Softphones | Yes | Yes | Yes | |||||
Fax Utilities | Yes | Yes | Yes |
...
The Extensions Module is used to set up each extension on your system. In the Extensions module, you will set up the extension number, the name of the extension, the password, voicemail settings for the extension, and other options.
Normally, each physical phone will be assigned to one extension. If you have a phone that has more than one "line" button, you would normally make each line button register to the same extension number, and then use the line buttons to manage multiple calls to and from the same line. However, you could also create two or more extensions and assign each extension to a different line button.
Figure 2-2-1 Add an Extension interface
Click one of extensions number and edit it:
Figure 2-2-2 Extension parameter interface
Table 2-2-1 Definition of Extension parameter
Item | Description | ||||||||||||||||||||||||||||||||||||
Basic |
|
| |||||||||||||||||||||||||||||||||||
| The extension number to dial to reach this user. | ||||||||||||||||||||||||||||||||||||
Display Name | The CallerID name for calls from this user will be set to this name. only enter the name , NOT the number. | ||||||||||||||||||||||||||||||||||||
Secret | Password (secret) configured for the device. Should be alphanumeric with at least 2 letters and numbers to keep secure. | ||||||||||||||||||||||||||||||||||||
|
| ||||||||||||||||||||||||||||||||||||
Dtmfmode | The DTMF signaling mode used by this device, usually rfc2833 for most phone. | ||||||||||||||||||||||||||||||||||||
Canreinvite | Re-Invite policy for this device, see Asterisk documentation for details. | ||||||||||||||||||||||||||||||||||||
Context | Asterisk context this device will send calls to. Only change this is you know what you are doing. | ||||||||||||||||||||||||||||||||||||
Host | Host settings for this device, almost always dynamic for endpoint. | ||||||||||||||||||||||||||||||||||||
Trustrpid | Whether Asterisk should trust the RPID settings from this device. Usually should be yes for CONNECTEDLINE( ) functionality to work if supported by the endpoint. | ||||||||||||||||||||||||||||||||||||
Sendrpid | Whether Asterisk should send RPID (or PAI) info to the device. Usually should be enabled to the settings used by your device for CONNECTEDLINE( ) functionality to work if supported by the endpoint. | ||||||||||||||||||||||||||||||||||||
| The PRACK request plays the same role as ACK, but for provisional responses. | ||||||||||||||||||||||||||||||||||||
Type | Asterisk connection type, usually friend for endpoint. | ||||||||||||||||||||||||||||||||||||
NAT | NAT seting, see Asterisk documentation for details. Yes usually works for both internal and external devices. Set to No if the device will always be internal. | ||||||||||||||||||||||||||||||||||||
Port | Endpoint port number to use, usually 5060. Some 2 ports devices such as ATA may used 5061 for the second port. | ||||||||||||||||||||||||||||||||||||
Qualify | Setting to yes (equivalent to 2000 msec) will send an OPTIONS packet to the endpoint periodically (default every minute). Used to monitor the health of the endpoint. If delays are longer then the quality time, the endpoint will be taken offline and considered unreachable. Can be set to a value which is the msec threshold. Setting to no will turn this off. Can also be helpful to keep NAT pinholes open. | ||||||||||||||||||||||||||||||||||||
Qualifyfreq | Frequency in seconds to send qualify messages to the endpoint. | ||||||||||||||||||||||||||||||||||||
Transport | This sets the allowed transport settings for this device and the default (Primary) transport for outgoing. The default transport is only used for outbound message until a registration takes place. During the peer registration the transport type may change to another supported type if the peer requests so. In most common cases, this does not have to be changed as most devices register in conjunction with the host=dynamic setting. If you are using TCP and/or TLS you need to make sure the general SIP Settings are configured for the system to operate in those modes and for TLS, proper certificates have been generated and configured. If you are using websockets (such as WebRTC) then you must select an option that includes WS. | ||||||||||||||||||||||||||||||||||||
Avpf | Whether to Enable AVPF. Defaults to no. the WebRTC standard has selected AVPF as the audio video profile to use for media streams. This is not the default profile in use by Asterisk. As a result the following must enabled to use WebRTC. | ||||||||||||||||||||||||||||||||||||
Icesupport | Whether to enable ICE support. Defaults to no. ICE ( Interactive Connectivity Establishment) is a protocol for network address Translator (NAT) traversal for UDP-based multimedia sessions established with the offer/answer model. This option is commonly enabled in WebRTC setups. | ||||||||||||||||||||||||||||||||||||
Dtlsenable | Whether to enable DTLS for this peer. Defaults to no. | ||||||||||||||||||||||||||||||||||||
Dtlsverify | Whether to verify that the provided peer certificate is valid. Defaults to no. | ||||||||||||||||||||||||||||||||||||
Dtlssetup | Behavior on DTLS incoming and outgoing connections, defaults to actpass. | ||||||||||||||||||||||||||||||||||||
Dtlscertfile | Path to certificate file to present. | ||||||||||||||||||||||||||||||||||||
Dtlscafile | Path to cafile file to present | ||||||||||||||||||||||||||||||||||||
Dtlsprivatekey | Path to private key for certificate file. | ||||||||||||||||||||||||||||||||||||
Encryption | Whether to offer SPTR encrypted media (and only SRTP encrypted media) on outgoing calls to a peer. Calls will fail with HANGUPCAUSE=58 if the peer does not support SRTP. Defaults to no. | ||||||||||||||||||||||||||||||||||||
Callgroup | Callgroup(s) that this device is part of, can be or more callgroups, e.g. '1,3-5' would be in groups 1,3,4,5. | ||||||||||||||||||||||||||||||||||||
Pickupgroup | Pickupgroup(s) that this device can pickup calls from, can be one or more groups, e.g. '1.3-5' would be in groups 1,3,4,5. Device does not have to be in a group to be able to pickup calls from that group. | ||||||||||||||||||||||||||||||||||||
Allow |
| ||||||||||||||||||||||||||||||||||||
Dial | How to dial device, this should not be changed unless you know what you are doing. | ||||||||||||||||||||||||||||||||||||
Accountcode | Accountcode for this device. | ||||||||||||||||||||||||||||||||||||
Mailbox | Mailbox for this device. This should not be changed unless you know what you are doing. | ||||||||||||||||||||||||||||||||||||
Vmexten | Asterisk dialplan extension to reach voicemail for this device. Some devices use this to auto-program the voicemail button on the endpoint. If left blank, the default vmexten setting is automatically configured by the voicemail module. Only changed this on devices that may have special needs. | ||||||||||||||||||||||||||||||||||||
Deny | IP Address range to deny access to, in the form of network/netmask. | ||||||||||||||||||||||||||||||||||||
Permit | IP Address range to allow access to, in the form of network/netmask. This can be a very useful security option when dealing with remote extensions that are at a known location (such as a branch office) or with a known ISP range for some home office situations. | ||||||||||||||||||||||||||||||||||||
Email Address | The email address that completed dictations are sent to. | ||||||||||||||||||||||||||||||||||||
Language Code | This will cause all messages and voice prompts to use the selected language if installed. | ||||||||||||||||||||||||||||||||||||
CID Num Alias | The CID Number to use for internal calls, if different from the extension number. This is used to masquerade as a different user. A common example is a team of support people who would like their internal CallerID to display the general support number(a ringgroup or queue). There will be no effect on external calls. | ||||||||||||||||||||||||||||||||||||
SIP Alias | If you want to support direct sip dialing of users internally or through anonymous sip calls, you can supply a friendly name that can be used in a addition to the users extension to call them. | ||||||||||||||||||||||||||||||||||||
Features |
| ||||||||||||||||||||||||||||||||||||
Outbound CID | Override the callerid when dialing out a trunk. Any setting here will override the common outbound callerid set in the trunk admin. | ||||||||||||||||||||||||||||||||||||
Asterisk Dial Options | Cryptic Asterisk Dial Options, check to customize for this extension or un-check to use system defaults set in Advanced Options. These will not apply to trunk options which are configured with the trunk. | ||||||||||||||||||||||||||||||||||||
Ring Time | Number of seconds to ring prior to going to voicemail. Default will use the value set in Advanced Settings. If no voicemail is configured this will be ignored. | ||||||||||||||||||||||||||||||||||||
Call Forward Ring Time | Number of seconds to ring during a Call Forward Busy or Call Forward Unavailable call prior to continuing to voicemail or specified destination. Setting to Always will not return, it will just continue to ring. Default will use the current Ring Time. If voicemail is disabled and there is not destination specified, it will be forced into Always mode. | ||||||||||||||||||||||||||||||||||||
Outbound Concurrency Limit | Maximum number of outbound simultaneous calls that an extension can make. This is also very useful as a Security Protection against a system that has been compromised. It will limit the number of simultaneous calls that can be made on the compromised extension. | ||||||||||||||||||||||||||||||||||||
Call Waiting | Set the initial/current Call Waiting state for this user's extension | ||||||||||||||||||||||||||||||||||||
Internal Auto Answer | When set to Intercom, calls to this extension/user from other internal users act as if they were intercom calls meaning they will be auto-answered if the endpoint supports this feature and the system is configured to operate in this mode. All the normal white list and black list settings will be honored if they are set. External calls will still ring as normal, as will certain other circumstances such as blind transfers and when a Follow Me is configured and enabled. If Disabled, the phone rings as a normal phone. | ||||||||||||||||||||||||||||||||||||
Call Screening | Call Screening requires external callers to say their name, which will be played back to the user and allow the user to accept or reject the call. Screening with memory only verifies a caller for their callerid once. Screening without memory always required a caller to say their name. Either mode will always announce the caller based on the last introduction saved with that callerID. If any user on the system uses the memory option, when that user is called, the caller will be required to re-introduce themselves and all users on the system will have that new introduction associated with the caller's CallerID. | ||||||||||||||||||||||||||||||||||||
Pinless Dialing | Enabling Pinless Dialing will allow this extension to bypass any pin codes normally required on outbound calls. | ||||||||||||||||||||||||||||||||||||
Emergency CID | This callerid will always be set when dialing out an Outbound Route flagged ad Emergency. The Emergency CID overrides all other CallerID settings. | ||||||||||||||||||||||||||||||||||||
Queue State Detection | If this extension is part of a Queue will attempt to use the user's extension state or device state information when determining if this queue member should be called. In some uncommon situations such as a Follow-Me with no physical device, or some virtual extension scenarios, the state information will indicate that this member is not available when they are. Setting this to 'Ignore-State' will make the Queue ignore all state information thus always trying to contact this member. Certain side affects can occur when this route is taken due to the nature of how Queues handle Local channels, such as subsequent transfers will continue to show the member as busy until the original call is terminated. In most cases, this SHOULD BE set to 'Use State'. | ||||||||||||||||||||||||||||||||||||
DID Description | A description for this DID, such as "Fax". | ||||||||||||||||||||||||||||||||||||
Add Inbound DID | A direct DID that is associated with this extension. The DID should be in the same format as provider (e.g. full number, 4digits for 10x4, etc). | ||||||||||||||||||||||||||||||||||||
Add Inbound CID | Add a CID for more specific DID+CID routing. A DID must be specified in the above Add DID box. In addition to standard dial sequences, you can also put Private, Blocked, Unknown, Restricted, Anonymous and Unavailable in order to catch these special cases if the Telco transmits them. | ||||||||||||||||||||||||||||||||||||
Recording |
|
| |||||||||||||||||||||||||||||||||||
Inbound External Calls | Recording of inbound calls from external sources. | ||||||||||||||||||||||||||||||||||||
Outbound External Calls | Recording of outbound calls from external sources. | ||||||||||||||||||||||||||||||||||||
Inbound Internal Calls | Recording of calls received from other extensions on the system. | ||||||||||||||||||||||||||||||||||||
Outbound Internal Calls | Recording of calls made to other extensions on the system. | ||||||||||||||||||||||||||||||||||||
On Demand Recording | Enable or disable the ability to do on demand (one-touch) recording. The overall calling policy rules still apply and if calls are already being recorded they can not be paused. | ||||||||||||||||||||||||||||||||||||
Record Priority Policy | Call recording policy priority relative to other extensions when there is a conflict between an extension wanting recording and the other not wanting it.
| ||||||||||||||||||||||||||||||||||||
Voicemail |
|
| |||||||||||||||||||||||||||||||||||
Status | Enable or disable the voicemail function. | ||||||||||||||||||||||||||||||||||||
Voicemail Password | This is the password used to access the Voicemail system. | ||||||||||||||||||||||||||||||||||||
Email Address | The email address that Voicemails are sent to. | ||||||||||||||||||||||||||||||||||||
Pager Email Address | Page/mobile email address that short Voicemail notifications are sent to. | ||||||||||||||||||||||||||||||||||||
Email Attachment | Option to attach Voicemail to email. | ||||||||||||||||||||||||||||||||||||
Play CID | Read back caller's telephone number prior to playing the incoming message, and just after announcing the date and time the message was left. | ||||||||||||||||||||||||||||||||||||
Play Envelope | Envelope controls whether or not the Voicemail system will play the message envelope (date/time) before playing the voicemail message. This setting does not affect the operation of the envelope option in the advanced voicemail menu. | ||||||||||||||||||||||||||||||||||||
Delete Voicemail | If set to "yes" the message will be delete from the voicemailbox (after having been emailed). Provides functionality that allows a user to receive their voicemail via email alone, rather than extension handset. CAUTION: must have attach voicemail to email set to yes otherwise your messages will be lost forever. | ||||||||||||||||||||||||||||||||||||
VM Options | Separate options with pipe( | ) | maxmessage=60 | ||||||||||||||||||||||||||||||||||
VM Context | This is the voicemail context which is normally set to default. Do not change unless you understand the implications. | ||||||||||||||||||||||||||||||||||||
Routing |
|
| |||||||||||||||||||||||||||||||||||
| Enable/ disable the VmX locater feature for this user. When enabled all settings are controlled by the user in the user portal (ARI). Disabling will not delete any existing user settings but will disable access to the feature. | ||||||||||||||||||||||||||||||||||||
Use When | Menu options below are available during your personal voicemail greeting playback. | ||||||||||||||||||||||||||||||||||||
Voicemail Instructions | Uncheck to play a deep after your personal voicemail greeting. | ||||||||||||||||||||||||||||||||||||
Press 0 | Pressing 0 during your personal voicemail greeting goes to the operator. Uncheck to enter another destination here. This feature can be used while still disabling VmX to allow an alternative operator extension without requiring the VmX feature for the user. | ||||||||||||||||||||||||||||||||||||
Press 1 | The remaining options can have internal extensions, ringgroups, queues and external numbers that may be rung. It is often used to include your cell phone. You should run a test to make sure that the number is functional any time a change is made so you don't leave a caller stranded or receiving invalid number messages. | ||||||||||||||||||||||||||||||||||||
Press 2 | Use any extensions, ringgroups, queues or external numbers. | ||||||||||||||||||||||||||||||||||||
No Answer | Optional destination call is routed to when the call is not answered on an otherwise idle phone. If the phone is use and the call is simply ignored, then the busy destination will be used. | ||||||||||||||||||||||||||||||||||||
CID Prefix | Optional CID prefix to add before sending to this no answer destination. | ||||||||||||||||||||||||||||||||||||
Busy | Optional destination the call is route to when the phone is busy or the call is rejected the user. This destination is also used on an unanswered call if the phone is in use and the user choose not pickup the second call. | ||||||||||||||||||||||||||||||||||||
CID Prefix | Optional CID prefix to add before sending to this busy destination. | ||||||||||||||||||||||||||||||||||||
Not Reachable | Optional destination the call is routed when the phone is office, such as a softphone currently off or a phone unplugged. | ||||||||||||||||||||||||||||||||||||
CID Prefix | Optional CID prefix to add before sending to this not reachable destination. |
...
| Anchor | ||||
|---|---|---|---|---|
|
| Anchor | ||||
|---|---|---|---|---|
|
You may not want a ring group – it's entirely up to you. If you don't require a ring group, you may ignore this section.
When there is an incoming call to the ring group, the phones
| Anchor | ||||
|---|---|---|---|---|
|
| Anchor | ||||
|---|---|---|---|---|
|
The ring group screen is illustrated below:
| Anchor | ||||
|---|---|---|---|---|
|
| Anchor | ||||
|---|---|---|---|---|
|
Table 2-2-2 Definition of add Ring groups interface
Item | Definition | ||||||||||||
Basic | |||||||||||||
Ring-Group Number | The number users will dial to ring extensions in this ring group | ||||||||||||
Group Description | Provide a descriptive title for this Ring Group. | ||||||||||||
Ring Strategy | Ringall : Ring all available channels until one answers (default) | ||||||||||||
Ring Time (max 300 sec) | Time in seconds that the phones will ring. For all hunt style ring strategies, this is the time for each iteration of phone(s) that are rung. | ||||||||||||
Extension List | List extensions to ring, one per line, or use the Extension Quick Pick below to insert them here. | ||||||||||||
Advanced |
| ||||||||||||
Announcement | Message to be played to the caller before dialing this group. | ||||||||||||
Play Music On Hold | If you select a music on hold class to play, instead of 'Ring', they will hear that instead of Ringing while they waiting for someone to pick up. | ||||||||||||
CID Name Prefix | You can optionally prefix the callerid name when ringing extensions in this group, ie: If you prefix with "Sales:", a call from John Doe would display as "Sales: John Doe" on the extensions that ring. | ||||||||||||
Alert Info | ALERT_INFO can be used for distinctive ring with SIP devices. | ||||||||||||
Ignore CF Settings | When checked, agents who attempt to Call Forward will be ignored, this applies to CF, CFU and CFB. Extensions entered with '#' at the end, for example to access the extension's Follow-Me, might not honor this setting. | ||||||||||||
Enable Call Pickup | Checking this will allow calls to the ring group to be picked up with the directed call pickup feature using the group number. When not checked, individual extensions that are part of the group can still be picked up by doing a directed call picked to the ringing extension, which works whether or not this is checked. | ||||||||||||
Skip Busy Agent | When checked, agents who are on an occupied phone will skipped as if the line were returning busy. This means that call waiting or multi-line phones will not be presented with the call and in the various hunt style ring strategies, the next agent will be attempted. | ||||||||||||
Confirm Calls | Enable this if you're calling external numbers that need confirmation-eg, a mobile phone may go to voicemail which will pick up the call. Enabling this requires the remote side push 1 on their phone before the call is put through. This feature only works with the ringall ring strategy. | ||||||||||||
Remote Announce | Message to be played to the person RECEIVING the call, if 'Confirm Calls' is enabled. | ||||||||||||
Too-Late Announce | Message to be played to the person RECEIVING the call, if the call has already been accepted before they push 1. | ||||||||||||
Mode | Default: Transmits the Callers CID if allowed by the trunk.
Outside Calls Fixed CID Value: Transmit the Fixed CID Value below on calls will continue to operate in default mode. Use Dialed Number: Transmit the number that was dialed as the CID for calls coming from outside. Internal extension to extension calls will continue to operate in default mode. There must be a DID on the inbound route for this. This will be BLOCKED on trunks that block foreign Caller ID Force Dialed Number: Transmit the number that was dialed as the CID for calls coming from outside. Internal extension to extension calls will be continue to operate in default mode. There must be a DID on the inbound route for this. This WILL be transmitted on trunks that block foreign CallerID | ||||||||||||
| Fixed value to replace the CID with used with some of the modes above. Should be in a format of digits only with an option of E164 format using a leading "+". | ||||||||||||
Record Calls | You can always record calls that come into ring group, never record them, or allow the extension that answers to do on-demand recording. If recording is denied then one-touch on demand recording will be blocked. |
...
Follow Me (also known as Find Me / Follow Me or FMFM) allows you to redirect a call that is placed to one of your extensions to another location. You can program the system to ring the extension alone for a certain period of time, then ring some other destination(s), such as a mobile phone or a related extension, and then go to the original extension's voicemail if the call is not answered. Follow Me can also be used to divert calls to another extension without ringing the primary extension.
Select the PBX -> PBX Configuration -> Follow Me.
You will be presented with the following screen:
Figure 2-2-4 Follow Me interface
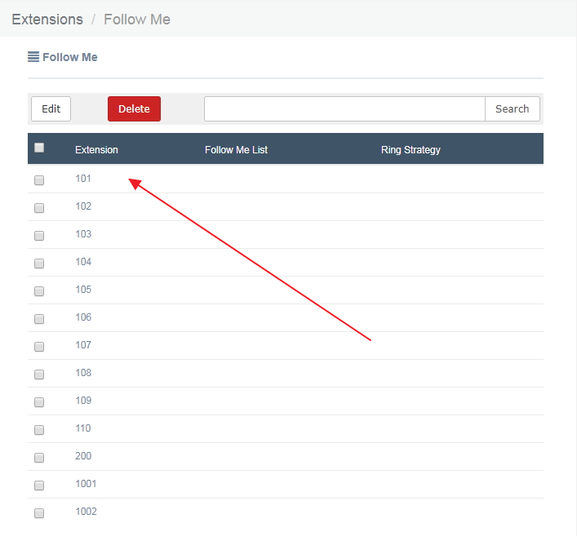
Select the extensions that you want to define.
Figure 2-2-5 Follow Me User interface
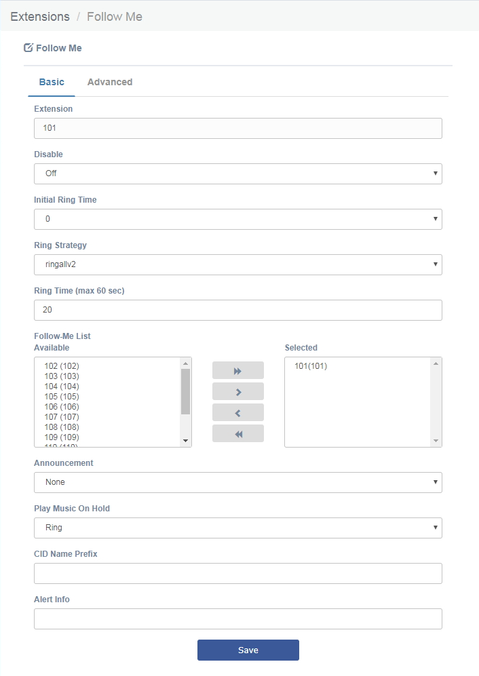
Table 2-2-3 Definition of Follow Me
Item | Definition | ||||||
Basic |
| ||||||
Disable | By default (not checked) any call to this extension will go to this Follow-Me instead, including directory calls by name from IVRs. If checked, calls will go only to the extension. | ||||||
Initial Ring Time | This is the number of seconds to ring the primary extension prior to proceeding to the follow-me list. The extension can also be included in the follow-me list. A 0 setting will bypass this | ||||||
Ring Strategy | Ringallv2: ring Extension for duration set in Initial Ring Time, and then, while continuing call to extension, ring Follow-Me List for duration set in Ring Time. | ||||||
Ring Time (max 60 sec) | Time in second that the phones will ring. For all hunt style ring strategies, this is the time for each iteration of phone(s) that are rung | ||||||
Follow-Me List | List extensions to ring, one per line, or use the Extension Quick Pick below. | ||||||
Announcement | Message to be played to the caller before dialing this group. | ||||||
Play Music On Hold | If you select a Music on Hold class to play, instead of 'Ring', they will hear that instead of Ringing while they are waiting for someone to pick up. | ||||||
CID Name Prefix | You can optionally prefix the Caller ID name when ringing extensions in this group. Ie: if you prefix with "Sales:", a call from John Doe would display as "Sales: John Doe" on the extensions that ring | ||||||
Alert Info | You can optionally include an Alert Info which can create distinctive ring on SIP phones. | ||||||
Advanced |
| ||||||
Confirm Calls | Enable this if you're calling external numbers that need confirmation, eg, a mobile phone may go to voicemail which pick up the call. Enabling this require the remote side push 1 on their phone before the calls is put through. This feature only works with the ringall/ringall-prim ring strategy. | ||||||
Remote Announce | Message to be played to the person RECEIVING the call, if 'Confirm Calls" is enabled. | ||||||
Too-Late Announce | Message to be played to the person RECEIVING the call, if the call has already been accepted before they push 1. | ||||||
Mode | Default: Transmits the Caller CID if allowed by the trunk. | ||||||
Fixed CID Value |
|
...
The "Endpoint Configurator" module enables automatic remote configuration of supported endpoints. With this module, the UC series administrator can point supported endpoints to the UC series as their telephony server.
Figure 2-2-6 Endpoint Configurator interface 

Interface description
Main listing
This is the listing of all endpoints that have been detected or entered. Unlike the old implementation, any endpoints detected or uploaded in past sessions will be kept and displayed until they are explicitly erased. The main listing contains the following columns:
Table2-2-4 Description of Interface description
...
Item | Description |
Status | This displays the status of the endpoint as one or more icons. The available flags are as follows: |
MAC Address | This is the main identifier for the endpoint. Configurations in the database and uploaded files are considered to refer to the same endpoint if they reference the same MAC address. |
Current IP | If the endpoint was detected through a scan, this field will show the IP at which the endpoint was found. This field is a link to the HTTP configuration interface (if supported) of the phone. |
Manufacturer | This displays the detected manufacturer of the endpoint. |
Model | This displays the detected model of the endpoint. Since automatic model detection is not (yet) implemented for some manufacturers, this field allows the user to correct the model via a drop-down list. Accurate model detection is required for many other features (such as account assignment) to work. |
Options | This link displays a modal dialog on which common options for the endpoint can be manually configured. |
![]()
 Endpoint scan toolbar button
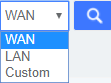
This widget contains a textbox with a network/netmask definition, an option box and a magnifying glass icon. By default, the network definition will be filled with the network definition of the first ethernet interface of the Elastix serverthe option box will be “WAN” which is set as the network definition of the first Ethernet interface of the UC device. If you choose custom, there will appear a textbox that you can fill in the network/netmask definition. The user may correct this definition to restrict the scan, and then click on the icon to start the scan. When scanning, the toolbar will change to a spinning icon and a Cancel button. As endpoints are detected, they will be added to the main listing, along with their detected manufacturer and model. The toolbar will revert to its default state when the scan is done, or if the scan is aborted with the Cancel button.
![]()
 Endpoint configuration toolbar button
Clicking on this button will start applying the configuration for all selected endpoints (all endpoints for which the checkbox is set). When applying the configuration, the toolbar will change to a progress barloading icon. As endpoints are configured, the progress bar loading icon will updatecircle, and the toolbar will revert to the default state when the configuration is done. During configuration, a log is generated, and can be viewed by clicking on the Configuration Log toolbar button.
![]()
 Configuration Log toolbar button
Clicking on this button will open a modal dialog in which a log of the last configuration run will be shown. This is useful for diagnosing issues with the module failing to configure an endpoint.
![]()
 Remove configuration toolbar button
Clicking on this button will (after a confirmation dialog) remove the database records for the selected endpoints, as well as any generated configuration files for these endpoints. It will NOT, however, contact the endpoints themselves in any way.

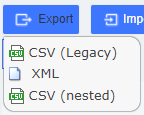 Download toolbar button
Clicking on this button will display a list of links to download the list of endpoints stored on the database, in three different formats. The supported formats are:
...
- CSV (Legacy). This is the format used by the old Endpoint Configurator.
- XML. This format allows the definition of endpoints with multiple accounts and properties, as an XML document.
- CSV (Nested). This format can be generated by careful editing in a spreadsheet, and uses indentation to group multiple accounts and properties per endpoint.

 Upload toolbar button
Clicking on this icon will display a small dialog in which the user may specify an endpoint list file to upload to the server. The file format is automatically detected.
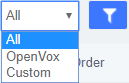 Filter toolbar button
This widget contains an option box and a filter icon. You can filter specified manufacturer endpoint in the list. If you choose OpenVox and filter, this list will only retain OpenVox IP phone and emerge a “Randomly Assigned” button. Quickly auto provision endpoints as long as clicking the “Randomly Assigned” feature.

| Anchor | ||||
|---|---|---|---|---|
|
The "Trunks Module" is used to connect your FreePBX/Asterisk system to another VOIP system or VOIP device so that you can send calls out to and receive calls in from that system/device. You can create connections with Internet Telephone Service Providers ("ITSPs"), with other FreePBX/ Asterisk systems, with commercial VOIP phone systems, with FXO Gateways (a device that connects an ordinary telephone line with a VOIP phone system using a network connection), and with FXO cards (cards that are installed in your computer and allow you to connect a standard telephone line).
If you don't have a Trunk set-up, you can still make calls, but only to other extensions on your same phone system.
Figure 2-2-7 Add trunk interface
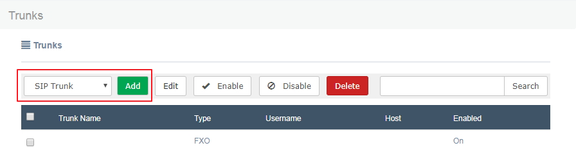
Figure 2-2-8 Add SIP Trunk

Table2-2-5 Definition of add a SIP trunk
...
| Definition | ||||||||||||
Basic |
|
| |||||||||||
Enable Trunk | Check this to disable this trunk in all routes where it is used. | ||||||||||||
Trunk Mode | Authentication mode of this trunk. | ||||||||||||
Trunk Name | Descriptive Name for this trunk. | ||||||||||||
Outbound Proxy Server | Example: proxy.provider.domain:port | ||||||||||||
Host | Host settings for this device, almost always dynamic for endpoint. | ||||||||||||
Username |
| ||||||||||||
Secret | Password (secret) configured for the device. Should be alphanumeric with at least 2 letters and numbers to keep secure. | ||||||||||||
Port | Endpoint port number to use, usually 5060. Some 2 ports devices such as ATA may used 5061 for the second port. | ||||||||||||
Register String | Most VoIP providers require your system to REGISTER with theirs. Enter the registration line here. | ||||||||||||
Codec | Allow specified codecs, the available codecs are on the left options bar and the selected on the right. | ||||||||||||
Advanced |
|
| |||||||||||
Outbound CallerID | CallerID for calls placed out on this trunk | ||||||||||||
CID Options | Determines what CIDs will be allowed out this trunk. IMPORTANT: EMERGENCY | ||||||||||||
Maximum Channels | Controls the maximum number of outbound channels (simultaneous calls) that can be used on this trunk. To count inbound calls against this maximum, use the auto-generated context: as the inbound trunk's context. (see extensions_additional.conf) Leave blank to specify no maximum. | ||||||||||||
Type |
| ||||||||||||
Outbound Dial Prefix | The outbound dialing prefix is used to prefix a dialing string to all outbound calls placed on this trunk. For example, if this trunk is behind another PBX or is a Centrex line, then you would put 9 here to access an outbound line. Another common use is to prefix calls with 'w' on a POTS line that need time to obtain dial tone to avoid eating digits. | ||||||||||||
Qualify | Setting to yes (equivalent to 2000 msec) will send an OPTIONS packet to the endpoint periodically (default every minute). Used to monitor the health of the endpoint. If delays are longer then the quality time, the endpoint will be taken offline and considered unreachable. Can be set to a value which is the msec threshold. Setting to no will turn this off. Can also be helpful to keep NAT pinholes open. | ||||||||||||
Qualifyfreq | Frequency in seconds to send qualify messages to the endpoint. | ||||||||||||
Nat | NAT seting, see Asterisk documentation for details. Yes usually works for both internal and external devices. Set to No if the device will always be internal. | ||||||||||||
Insecure | Specifies how to handle connections with peers. Default no (authenticate all connections). | ||||||||||||
Dtmfmode | The DTMF signaling mode used by this device, usually rfc2833 for most phone. | ||||||||||||
Trustrpid | Whether Asterisk should trust the RPID settings from this device. Usually should be yes for CONNECTEDLINE( ) functionality to work if supported by the endpoint. | ||||||||||||
Sendrpid | Whether Asterisk should send RPID (or PAI) info to the device. Usually should be enabled to the settings used by your device for CONNECTEDLINE( ) functionality to work if supported by the endpoint. | ||||||||||||
Prack | The PRACK request plays the same role as ACK, but for provisional responses. | ||||||||||||
Transport | This sets the allowed transport settings for this device and the default (Primary) transport for outgoing. The default transport is only used for outbound messages until a registration takes place. During the peer registration the transport type may change to another supported type if the peer requests so. In most common cases, this does not have to be changed as most devices register in conjunction with the host=dynamic setting. If you are using TCP and/or TLS you need to make sure the general SIP Settings are configured for the system to operate in those modes and for TLS, proper certificates have been generated and configured. If you are using websockets (such as WebRTC) then you must select an option that includes WS | ||||||||||||
Avpf | Whether to Enable AVPF. Defaults to no. the WebRTC standard has selected AVPF as the audio video profile to use for media streams. This is not the default profile in use by Asterisk. As a result the
| ||||||||||||
Icesupport | Whether to Enable ICE Support. Defaults to no. ICE (Interactive Connectivity Establishment) is a protocol for Network Address Translator(NAT) traversal for UDP-based multimedia sessions established with the offer/answer model. This option is commonly enabled in WebRTC setups | ||||||||||||
Dtlsenable | Whether to Enable DTLS for this peer. Defaults to no. | ||||||||||||
Dtlsverify | Whether to verify that the provided peer cerificate is valid. Defaults to no. | ||||||||||||
Dtlssetup | Behavior on DTLS incoming and outgoing connections. Defaults to actpass. | ||||||||||||
Dtlscertfile | Path to certificate file to present | ||||||||||||
Dtlscafile | Path to cafile file to present | ||||||||||||
Dtlsprivatekey | Path to private key for certificate file. | ||||||||||||
Encryption | Whether to offer SRTP encrypted media (and only SRTP encrypted media) on outgoing calls to a peer. Calls will fail with HANGUPCAUSE=58 if the peer does not support SRTP. Defaults to no. | ||||||||||||
Asterisk Trunk Dial Options | Asterisk Dial command options to be used when calling out this trunk. To override the Advanced Settings default, check the box and then provide the required options for this trunk | ||||||||||||
Continue if Busy | Normally the next trunk is only tried upon a trunk being 'Congested' in some form, or unavailable. Checking this box will force a failed call to always continue to the next configured trunk or destination even when the channel reports BUSY or INVALID NUMBER. |
...
Figure 2-2-9 Add FXO Trunk
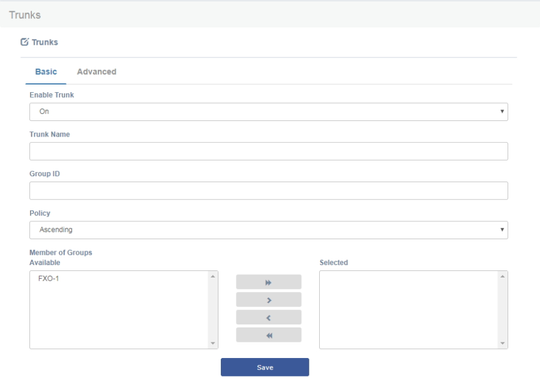
Table2-2-6 Definition Add FXO Trunk
Item | Definition | ||||||||||||||||||||||||
Basic |
| ||||||||||||||||||||||||
Enable Trunk | Check this to disable this trunk in all routes where it is used. | ||||||||||||||||||||||||
Trunk Name | Descriptive Name for this trunk. | ||||||||||||||||||||||||
Group ID |
| ||||||||||||||||||||||||
Policy | Used to make FXO trunks decisions, help determine the ringing order among multiple members of group | ||||||||||||||||||||||||
Member of Groups | Adding FXO ports into trunk groups allow automatic selection of the selected idle port for outgoing calls. | ||||||||||||||||||||||||
Advanced |
| ||||||||||||||||||||||||
Outbound CallerID | CallerID for calls placed out on this trunk | ||||||||||||||||||||||||
CID Options | Determines what CIDs will be allowed out this trunk. IMPORTANT: EMERGENCY | ||||||||||||||||||||||||
Maximum Channels | Controls the maximum number of outbound channels (simultaneous calls) that can be used on this trunk. Inbound calls are not counted against the maximum. Leave blank to specify no maximum. | ||||||||||||||||||||||||
Asterisk Trunk Dial Options | Asterisk Dial command options to be used when calling out this trunk. To override the Advanced Settings default, check the box and then provide the required options for this trunk | ||||||||||||||||||||||||
Continue if Busy | Normally the next trunk is only tried upon a trunk being 'Congested' in some form, or unavailable. Checking this box will force a failed call to always continue to the next configured trunk or destination even when the channel reports BUSY or INVALID NUMBER. |
...
Figure 2-2-10 Add IAX2 Trunk
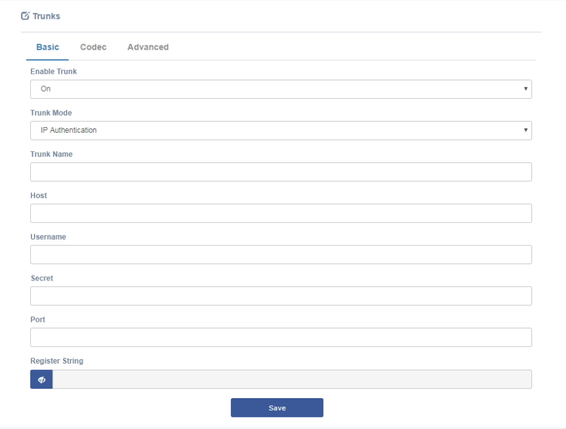
Table 2-2-7 Definition of Add IAX2 Trunk
Item | Definition | ||||||||||||
Basic |
|
| |||||||||||
Enable Trunk | Check this to disable this trunk in all routes where it is used. | ||||||||||||
Trunk Mode | Authentication mode of this trunk. | ||||||||||||
Trunk Name | Descriptive Name for this trunk | ||||||||||||
Host | Host settings for this device, almost always dynamic for endpoint. | ||||||||||||
| Username configured for this trunk. | ||||||||||||
Secret | Password (secret) configured for the device. Should be alphanumeric with at least 2 letters and numbers to keep secure. | ||||||||||||
Port | Endpoint port number to use, usually 5060. Some 2 ports devices such as ATA may used 5061 for the second port. | ||||||||||||
Register String | Most VoIP providers require your system to REGISTER with theirs. Enter the registration line here. | ||||||||||||
Codec | Allow specified codecs, the available codecs are on the left options bar and the selected on the right. | ||||||||||||
Advanced |
|
| |||||||||||
Outbound CallerID | CallerID for calls placed out on this trunk | ||||||||||||
CID Options | Determines what CIDs will be allowed out this trunk. IMPORTANT: EMERGENCY | ||||||||||||
Maximum Channels | Controls the maximum number of outbound channels (simultaneous calls) that can be used on this trunk. To count inbound calls against this maximum, use auto-generated context: from-trunk-[trunkname] as the inbound trunk's context. (see extesions_additional .conf)Leave blank to specify no maximum. | ||||||||||||
Type | Asterisk connection type, usually friend for endpoint. | ||||||||||||
Outbound Dial Prefix | The outbound dialing prefix is used to prefix a dialing string to all outbound calls placed on this trunk. For example, if this trunk is behind another PBX or is a Centrex line, then you would put 9 here to access an outbound line. Another common use is to prefix calls with 'w' on a POTS line that need time to obtain dial tone to avoid eating digits. | ||||||||||||
Qualify | Setting to yes (equivalent to 2000 msec) will send an OPTIONS packet to the endpoint periodically (default every minute). Used to monitor the health of the endpoint. If delays are longer then the quality time, the endpoint will be taken offline and considered unreachable. Can be set to a value which is the msec threshold. Setting to no will turn this off. Can also be helpful to keep NAT pinholes open. | ||||||||||||
Qualifyfreq | Frequency in seconds to send qualify messages to the endpoint. | ||||||||||||
Nat | NAT seting, see Asterisk documentation for details. Yes usually works for both internal and external devices. Set to No if the device will always be internal. | ||||||||||||
Insecure | Specifies how to handle connections with peers. Default no (authenticate all connections). | ||||||||||||
Dtmfmode | The DTMF signaling mode used by this device, usually rfc2833 for most phone. | ||||||||||||
Trustrpid | Whether Asterisk should trust the RPID settings from this device. Usually should be yes for CONNECTEDLINE( ) functionality to work if supported by the endpoint. | ||||||||||||
Sendrpid | Whether Asterisk should send RPID (or PAI) info to the device. Usually should be enabled to the settings used by your device for CONNECTEDLINE( ) functionality to work if supported by the endpoint. | ||||||||||||
Prack | The PRACK request plays the same role as ACK, but for provisional responses. | ||||||||||||
Transport | This sets the allowed transport settings for this device and the default (Primary) transport for outgoing. The default transport is only used for outbound messages until a registration takes place. During the peer registration the transport type may change to another supported type if the peer requests so. In most common cases, this does not have to be changed as most devices register in conjunction with the host=dynamic setting. If you are using TCP and/or TLS you need to make sure the general SIP Settings are configured for the system to operate in those modes and for TLS, proper certificates have been generated and configured. If you are using websockets (such as WebRTC) then you must select an option that includes WS | ||||||||||||
Avpf | Whether to Enable AVPF. Defaults to no. the WebRTC standard has selected AVPF as the audio video profile to use for media streams. This is not the default profile in use by Asterisk. As a result the following must enabled to use WebRTC. | ||||||||||||
Icesupport | Whether to Enable ICE Support. Defaults to no. ICE (Interactive Connectivity Establishment) is a protocol for Network Address Translator(NAT) traversal for UDP-based multimedia sessions established with the offer/answer model. This option is commonly enabled in WebRTC setups | ||||||||||||
Dtlsenable | Whether to Enable DTLS for this peer. Defaults to no. | ||||||||||||
Dtlsverify | Whether to verify that the provided peer cerificate is valid. Defaults to no. | ||||||||||||
Dtlssetup | Behavior on DTLS incoming and outgoing connections. Defaults to actpass. | ||||||||||||
Dtlscertfile | Path to certificate file to present | ||||||||||||
Dtlscafile | Path to cafile file to present | ||||||||||||
Dtlsprivatekey | Path to private key for certificate file. | ||||||||||||
Encryption | Whether to offer SRTP encrypted media (and only SRTP encrypted media) on outgoing calls to a peer. Calls will fail with HANGUPCAUSE=58 if the peer does not support SRTP. Defaults to no. | ||||||||||||
Asterisk Trunk Dial Options | Asterisk Dial command options to be used when calling out this trunk. To override the Advanced Settings default, check the box and then provide the required options for this trunk. | ||||||||||||
Continue if Busy | Normally the next trunk is only tried upon a trunk being 'Congested' in some form, or unavailable. Checking this box will force a failed call to always continue to the next configured trunk or destination even when the channel reports BUSY or INVALID NUMBER. |
...
Figure 2-2-11 Add CUSTOM Trunk interface
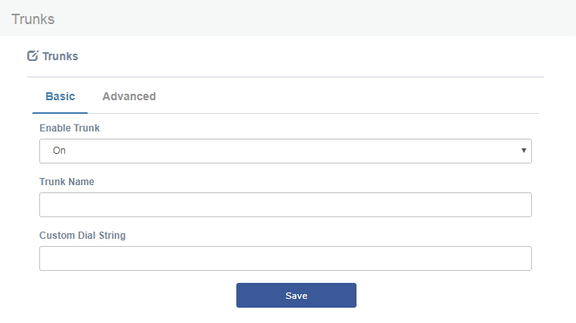
Table 2-2-8 Definition of Add CUSTOM Trunk
Item | Definition | |
Basic |
| |
Enable Trunk | Check this to disable this trunk in all routes where it is used. | |
Trunk Name | Descriptive Name for this trunk | |
Custom Dial String | Define the custom Dial String. Include the token $OUTNUM$ wherever the number to dial should go. | |
Advanced |
| |
Outbound CallerID | CallerID for calls placed out on this trunk | |
CID Options | Determines what CIDs will be allowed out this trunk. IMPORTANT: EMERGENCY | |
Maximum Channels | Controls the maximum number of outbound channels (simultaneous calls) that can be used on this trunk. Inbound calls are not counted against the maximum. Leave blank to specify no maximum. | |
Asterisk Trunk Dial Options | Asterisk Dial command options to be used when calling out this trunk. To override the Advanced Settings default, check the box and then provide the required options for this trunk | |
Continue if Busy | Normally the next trunk is only tried upon a trunk being 'Congested' in some form, or unavailable. Checking this box will force a failed call to always continue to the next configured trunk or destination even when the channel reports BUSY or INVALID NUMBER. |
...
| Anchor | ||||
|---|---|---|---|---|
|
2.2.3.1 Inbound Routes
When a call comes into your system from the outside, it will usually arrive along with information about the telephone number that was dialed (also known as the "DID") and the Caller ID of the person who called.
The Inbound Routes module is used to tell your system what to do with calls that come into your system on any trunk that has the "context=from-trunk" parameter in the PEER details.
Figure 2-2-12 Add incoming Route interface
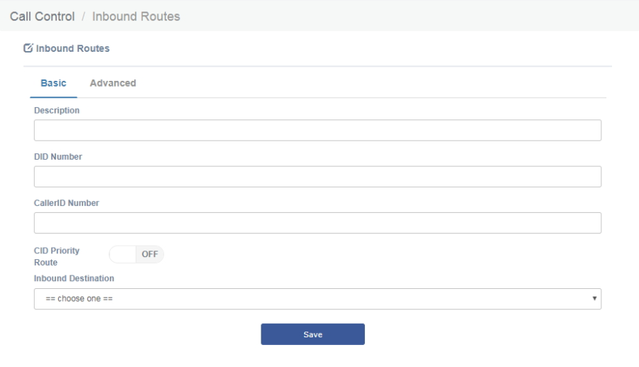
Table 2-2-9 Definition of Add incoming Route
Item | Definition | |
Basic |
| |
Description | Provide a meaningful description of what this incoming route is | |
DID Number | Define the expected DID Number if your trunk passes DID on incoming calls. | |
CallerID Number | Define the CallerID Number to be matched on incoming calls. | |
CID Priority Route | This effects CID ONLY routes where no DID is specified. If checked, calls with this CID will routed to this route, even if there is a route to the DID that was called. Normal behavior is for the DID route to take the calls. If there is a specific DID/CID route for this CID, that route will still take the call when that DID is called. | |
Inbound Destination | Indicates extension, Ring Group, Voicemail or other destination to which the call is suppoesd to be directed when the outside callers have called specified DID Number | |
Advanced | ||
Alert Info | ALERT_INFO can be used for distinctive ring with SIP devices. | |
CID name prefix | You can optionally prefix the CallerID name. ie: If you prefix with "Sales:", a call from john Doe would display as "Sales: John Doe" on the extension that ring | |
Music On Hold | Set the MoH class that will be used for calls that come in on this route. For example, choose a type appropriate for routes coming in from a country which may have announcements in their language. | |
Signal RINGING | Some devices or providers require RINGING to be sent before ANSWER. You'll notice this happening if you can send calls directly to a phone, but if you send it to an IVR, it won't connect the call. | |
Pause Before Answer | An optional delay to wait before processing this route. Setting this value will delay the channel from answering the call. This may be handy if external fax equipment or security systems are installed in parallel and you would like them to be able to seize the line. | |
Privacy Manager | If no CallerID has been received, Privacy Manager will ask the caller to enter their phone number. If an user/extension has Call Screening enabled, the incoming caller will be prompted to say their name when the call reaches the user/extension. | |
Call Recording | Controls or overrides the call recording behavior for calls coming into this DID. Allow will honor the normal downstream call recording settings. Record on Answer starts recording when the call would otherwise be recorded ignoring any settings that say otherwise. Record Immediately will start recording right away capturing ringing, announcements, MoH, etc. never will disallow recording regardless of downstream settings. | |
Source | Source can be added in Caller Name Lookup Sources section. | |
Language | Allows you to set the language for this DID. | |
Fax Detect | Attempt to detect faxes on this DID.
|
2.2.3.2 Outbound Routes
The Outbound Routes Module is used to tell your FreePBX/Asterisk system which numbers your phones are permitted to call and which Trunk to send the calls to.
Generally, a FreePBX/Asterisk system will have a Restricted route which designates certain numbers that can never be dialed (such as 900 and 976 numbers), an Emergency route to use for routing110 calls, and a route for ordinary calls. A phone system might also have special routes for interoffice calls, international calls, and other special circumstances
Figure 2-2-13 Outbound Routes interface

Table2-2-10 Definition of Outbound Routes
Item | Definition |
Basic | |
Route Name | Name of this route. Should be used to describe what type of calls this route matches (for example, 'local' or 'longdistance'). |
Route CID | Optional Route CID to be used for this route. If set, this will override all CIDS specified except:
|
Route Password | Optional: A route can prompt users for a password before allowing calls to progress. This is useful for restricting calls to international destinations or 1-900 numbers. |
Dial Patterns that will use this Route | A Dial Pattern is a unique set of digits that will select this route and send the call to the designated trunks. If a dialed pattern matches this route, no subsequent routes will be tried. If Time Groups are enabled, subsequent routes will be checked for matches outside of the designated time(s). |
Dial patterns wizards | These options provide a quick way to add outbound dialing rules. Follow the prompts for each. |
Add Trunks | Trunks used by this outbound route, the available trunks are on the left options bar and the selected on the right. |
Advanced | |
Route Type | Optional: Selecting Emergency will enforce the use of a device |
Music On Hold | You can choose which music category to use. For example, choose a type appropriate for a destination country which may have announcements in the appropriate language. |
Time Group | If this route should only be available during certain times then Select a Time Group created under Time Groups. The route will be ignored outside of times specified in that Time Group. If left as default of Permanent Route then it will always be available. |
Route Position | Where to insert this route or relocate it relative to the other routes. |
Call Recording | Controls or overrides the call recording behavior for calls coming into this DID. Allow will honor the normal downstream call recording settings. Record on Answer starts recording when the call would otherwise be recorded ignoring any settings that say otherwise. Record Immediately will start recording right away capturing ringing announcements, MoH, etc. Never will disallow recording regardless of downstream settings. |
PIN Set | Optional: Select a PIN set to use. If using this option, leave the Route Password field blank. |
Optional Destination on Congestion | If all the trunks fail because of Asterisk 'CONGESTION' dial status you can optionally go to a destination such as a unique recorded message or anywhere else. This destination will NOT be engaged if the trunk is reporting busy, invalid numbers or anything else that would imply the trunk was able to make an 'intelligent' choice about the number that was dialed. The 'Normal Congestion' behavior is to play the 'ALL Circuits Busy' recording or other options configured in the route Congestion Messages module when installed. |
2.2.3.3 Blacklist
The Blacklist Module is used to add phone numbers to the blacklist or remove phone numbers from the blacklist.
You can also choose to blacklist any blocked or unknown calls.
When a number is blacklisted, any calls that are received by the system with that number in the Caller ID field will be routed to a disconnect recording.
Figure 2-2-14 Blacklist interface
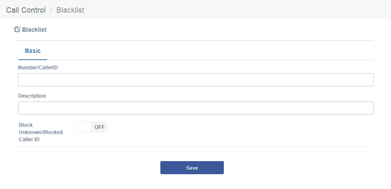
Table 2-2-11 Definition of Blacklist
...
2.2.3.4 Call Flow Control
The Call Flow Control module is used to create a single destination that can act as a switch that can be toggled by anyone who has access to a local phone. It is commonly used to allow phone system users to manually switch between "Daytime Mode" and "Nighttime Mode."
Call Flow Control should not be confused with Time Conditions. While both of these modules relate to call flow, Call Flow Control is designed to be a manual switch, while a Time Condition is designed to be a scheduled, automatic switch.
Figure 2-2-15 Call flow control interface
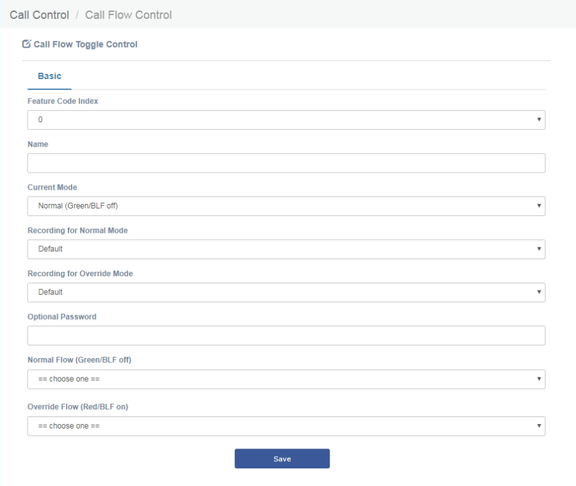
Table 2-2-12 Definition of Call flow control
...
Item | Definition |
Time Condition name | Give this Time Condition a brief name to help you identify it. |
Time Group | Select a time group created under Time Groups. Matching times will be sent to matching destination. If no group is selected, call will always go to no-match destination. |
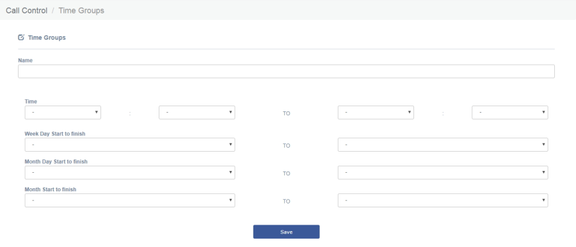
2.2.3.6 Time Groups
The Time Groups Module is used to define periods of time that can then be selected in the Time Conditions module or Outbound Routes module.
For example, you might create a Time Group called "Lunch" that might start at 12:00 p.m and end at 1:00 p.m. You could then create a Time Condition that would use the Lunch Time Group to send calls to voicemail during lunch, and to a ring group at other times.
Figure 2-2-17 Time Groups interface
2.2.3.7 PIN Sets
FreePBX allows you to require callers to dial a password before an outbound call will go through. You can require a password on all calls, or only on calls to certain numbers.
The PIN Sets Module allows you to create define groups and then assign a list of passwords to each group. You can then restrict certain calls to certain groups by going to the Outbound Routes Module and limiting the route to a certain PIN Set group. Each Outbound Route can be limited to just one PIN Set group. So, if you want to allow more than one PIN Set group to make a certain type of call, just create a duplicate Outbound Route and assign the second Outbound Route to a different PIN Set Group.
Figure 2-2-18 PIN Sets Interface
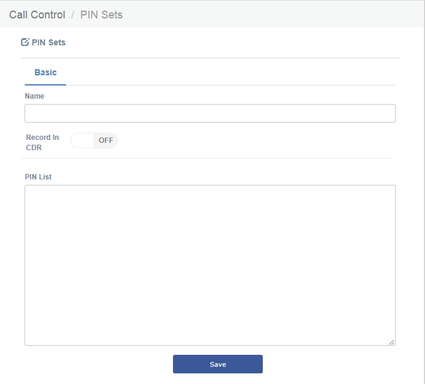
Table 2-2-14 Definition of add PIN Set
...
2.2.3.8 FXO Channels DIDs
The FXO Channel DIDs module allows you to assign a DID or phone number to specific analog channels.
Unlike SIP or PRI trunks, analog lines do not send a DID or dialed number to the PBX. Since the PBX routes all inbound calls based on the DID or number dialed, we need to map each analog port or channel to a fake number so we can match that number to an Inbound Route number and route your calls.
Each channel can be mapped to the same phone number if you want all calls on the analog lines to go to the same destination. This would be a common scenario if you have multiple POTS lines that are on a hunt group from your provider.
Figure 2-2-19 Add FXO Channel interface
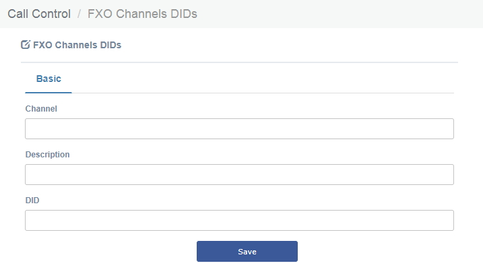
Table 2-2-15 Definition of Add FXO Channel
...
| Anchor | ||||
|---|---|---|---|---|
|
2.2.4.1 IVR
The IVR module allows you to create one or more IVRs ("Interactive Voice Response" systems or Auto Attendants). You can then route calls to the IVR and play a recording prompting callers what options to enter, such as "press 1 for sales and press 2 for the company directory." An IVR can also route calls to another IVR, or in other words, a sub-menu. As a general rule, you never want more than five or six options in a single IVR, or it will become too confusing to navigate. It is better to only include a few options at a single menu level, and route callers to a sub-menu for more choices.
Figure 2-2-20 IVR interface
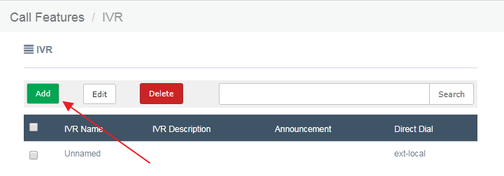
Table 2-2-16 Definition of add IVR
Item | Definition | ||||||||||||
Basic |
| ||||||||||||
IVR Name | Name of this IVR | ||||||||||||
IVR Description | Description of this ivr | ||||||||||||
Announcement |
| ||||||||||||
Direct Dial | Provides options for callers to direct dial an extension. Direct dialing can be:
| ||||||||||||
Timeout | Amount of time to be considered a timeout | ||||||||||||
Invalid Retries | Number of time to retry when receiving an invalid/unmatched response from the caller | ||||||||||||
Invalid Retry Recording | Prompt to be played when an invalid/unmatched response is received, before prompt the caller to try again | ||||||||||||
Append Announcement on Invalid | After playing Invalid Retry Recording the system will replay mail IVR Announcement | ||||||||||||
Return on Invalid | Check this box to have this option return to a parent IVR if it was called from a parent IVR. If not, it will go to the chosen destination. | ||||||||||||
Invalid Recording | Prompt to be played before sending the caller to an alternate destination due to the caller pressing 0 or receiving the maximum amount of invalid/unmatched responses (as determined by Invalid Retries) | ||||||||||||
Invalid Destination | Destination to send the call to after Invalid recording is played. | ||||||||||||
Timeout Retries | Number of times to retry when no DTMF is heard and the IVR choice time out. | ||||||||||||
Timeout Retry Recording | Prompt to be played when a timeout occurs, before prompting the caller to try again | ||||||||||||
Append Announcement on Timeout | After playing the Timeout Retry Recording the system will replay the main IVR Announcement. | ||||||||||||
Return on Timeout | Check this box to have this option return to a parent IVR if it was called from a parent IVR. If not, it will go to the chosen destination. | ||||||||||||
Timeout Recording | Prompt to be played before sending the caller to an alternate destination due to the caller pressing 0 or receiving the maximum amount of invalid/unmatched responses(as determined by Invalid Retries) | ||||||||||||
Timeout Destination | Destination to send the call to after Timeout Recording is played. | ||||||||||||
Return to IVR after VM | If checked, upon exiting voicemail a caller will be returned to this IVR if they got a user voicemail | ||||||||||||
Return | Return to IVR | ||||||||||||
Delete | Check this box to have this option return to a parent IVR if it was called from a parent IVR. If not, it will go to the chosen destination. |
2.2.4.2 Queues
Queues
The Queues module is a more advanced version of the Ring Groups module. Like the Ring Groups module, the Queues module is used to create an extension number that your users can dial in order to ring multiple extensions at the same time. It also creates a destination to which you can send calls that will ring those multiple extensions.
Figure 2-2-21 Queues interface
Table 2-2-17 Definition of add Queues
Item | Definition | ||||||||||||
Basic |
|
| |||||||||||
Queue Number | Use this number to dial into the queue, or transfer callers to this number to put them into the queue. | ||||||||||||
Queue Name | Give the queue a brief name to help you identify it. | ||||||||||||
Queue Password | You can require agents to enter a password before they can log in to this queue. | ||||||||||||
Generate Device Hints | If checked, individual hints and dialplan will be generated for each SIP and IAX2 device that could be part of this queue. These are used in conjunction with programmable BLF status as to the current state, the format of this hints is | ||||||||||||
Call Confirm | If checked, any queue member that is actually an outside telephone number, or any extension Follow-Me or call forwarding that are pursued and leave the PBX will be forced into Call Confirmation mode where the member must acknowledge the call before it is answered and delivered. | ||||||||||||
Call Confirm Announce | Announcement played to the Queue Member announcing the Queue call and requesting confirmation prior to answering. If set to default, the standard call confirmation default message will be played unless the number is reached through a Follow-Me and this is an alternate message provided in the Follow-Me. This message will override any other message specified. | ||||||||||||
CID Name Prefix | You can optionally prefix the CallerID name of callers to the queue. ie: If you prefix with "Sales:", a call from John Doe would display as "Sales: John Doe" on the extensions that ring. | ||||||||||||
Wait Time Prefix | When set to Yes, the CID Name will be prefix with the total wait time in the queue so the answering agent is aware how long they have waited. It will be rounded to the nearest minute, in the form of Mnn: where nn is the number of minutes. | ||||||||||||
Alert Info | ALERT_INFO can be used for distinctive ring with SIP device. | ||||||||||||
Static Agents | Static agents are extensions that are assumed to always be on the queue. Static agents do not need to 'log in' to the queue, and cannot 'log out' of the queue. | ||||||||||||
Dynamic Members | Dynamic Members are extensions or callback numbers that can log in and out of the queue. When a member logs in to a queue, their penalty in the queue will be as specified here. Extensions included here will NOT automatically be logged in to the queue. | ||||||||||||
Restrict Dynamic Agents | Restrict dynamic queue member logins to only those listed in the Dynamic Members list above. When set to Yes, members not listed will be DENIED ACCESS to the queue. | ||||||||||||
Agent Restrictions | When set to 'Call as Dialed' the queue will call an extension just as if the queue were another user. Any Follow-Me or Call Forward states active on the extension will result in the queue call following these call paths. This behavior has been the standard queue behavior on past FreePBX versions. | ||||||||||||
General Queue Options |
| ||||||||||||
Ring Strategy | Ringall: ring all available agents until one answers (default) | ||||||||||||
Autofill | Starting with Asterisk 1.4, if this is checked, and multiple agents are available, Asterisk will send one call to each waiting agent(depending on the ring strategy). Otherwise, it will hold all calls while it tries to find an agent for the top call in the queue making other calls wait. This was the behavior in Asterisk 1.2 and has no effect in 1.2. See Asterisk documentation for more details of this feature. | ||||||||||||
Skip Busy Agents | When set to 'Yes' agents who are on an occupied phone will be skipped as if the line were returning busy. This means that Call Waiting or multi-line phones will not be presented with the call and in the various hunt style ring strategies, the next agent will be attempted. | ||||||||||||
Queue Weight | Gives queue a 'weight' option, to ensure calls waiting in a higher priority queue will deliver its calls first if there are agents common to both queues. | ||||||||||||
Music on Hold Class | Music (MoH) played to the caller while they wait in line for an available agent. Choose "inherit" if you want the MoH class to be what is currently selected, such as by the inbound route. MoH Only will play music until the agent answers. Agent Ringing will play MoH until an agent's phone is presented with the call and is ringing. If they don't answer MoH will return. Ring only makes callers hear a ringing tone instead of MoH ignoring any MoH class selected as well as any configured periodic announcements. This music is defined in the "Music on Hold" Menu. | ||||||||||||
Join Announcement | Announcement played to callers prior to joining the queue. This can be skipped if there are agents ready to answer a call (meaning they still may be wrapping up from a previous call) or when they are free to answer the call right now. To add additional recordings please use the "System Recordings" MENU. | ||||||||||||
Call Recording | Incoming calls to agents can be recorded. (saved to /var/spool/asterisk/monitor) | ||||||||||||
Recording Mode | Choose to 'Include Hold Time' in the recording so it starts as soon as they enter the queue, or to defer recording until 'After Answered' and the call is bridged with a queue member. | ||||||||||||
Caller Volume Adjustment | Adjust the recording volume of the caller. | ||||||||||||
Agent Volume Adjustment | Adjust the recording volume of the queue member (Agent). | ||||||||||||
Mark calls answered elsewhere | Enabling this option, all calls are marked as 'answered elsewhere' when cancelled. The effect is that missed queue calls are not shown on the phone(if the phone support it) | ||||||||||||
Timing & Agent Options |
| ||||||||||||
Max Wait Time | The maximum number of seconds a caller can wait in a queue before being pulled out.(0 for unlimited). | ||||||||||||
Max Wait Time Mode | Asterisk timeoutpriority. In 'Strict' mode, when the 'Max Wait Time' of a caller is hit, they will be pulled out of the queue immediately. In 'Loose' mode, if a queue stops ringing with this call, then we will wait until the queue stops ringing this queue number or otherwise the call is rejected by the queue member before taking the caller out of the queue. This means that the 'Max Wait Time' could be as long as 'Max Wait Time'+'Agent Timeout' combined. | ||||||||||||
Agent Timeout | The number of seconds an agent's phone can ring before we consider it a timeout. Unlimited or other timeout values may still be limited by system ringtime or individual extension defaults. | ||||||||||||
Agent Timeout Restart | If timeout restart is set to yes, then the time out for an agent to answer is reset if a BUSY or CONGESTION is received. This can be useful if agents are able to cancel a call with reject or similar | ||||||||||||
Retry | The number of seconds we wait before trying all the phones again. Choosing "No Retry" will exit the queue and go to the fail-over destination as soon as the first attempted agent time-out, additional agents will not be attempted. | ||||||||||||
Wrap-Up-Time | After a successful call, how many seconds to wait before sending a potentially free agent another call (default is 0, or no delay) If using Asterisk 1.6+, you can also set the 'Honor Wrapup Time Across Queues setting (Asterisk: shared_lastcall) on the Advanced Settings page so that this is honored across queues for members logged on to multiple queues. | ||||||||||||
Member Delay | If you wish to have a delay before the member is connected to the caller (or before the member hears any announcement messages), set this to the number of seconds to delay. | ||||||||||||
Agent Announcement | Announcement played to the Agent prior to bridging in the caller. | ||||||||||||
Report Hold Time | If you wish to report the caller's hold time to the member before they are connected to the caller, set this to yes. | ||||||||||||
Auto Pause | Auto Pause an agent in this queue (or all queues they are a member of ) if they don't answer a call. Specific behavior can be modified by the Auto Pause Delay as well Auto Pause Busy/Unavailable settings if supported on this version of Asterisk. | ||||||||||||
Auto Pause on Busy |
| ||||||||||||
Auto Pause on Unavailable | When set to Yes agents devices that report congestion upon a call attempt will be considered as a missed call and paused immediately or after that auto pause delay if configured | ||||||||||||
Auto Pause Delay | This setting will delay the auto pause of an agent by auto pause delay seconds from when it last took a call. For example, if this were set to 120 seconds, and a new call is presented to the agent 90 seconds after they last took a call, will not be auto paused if they don't answer the call. If presented with a call 120 seconds or later after answering the last calls, this will have no effect. | ||||||||||||
Capacity Options |
|
| |||||||||||
Max Callers | Maximum number of people waiting in the queue (0 for unlimited ) | ||||||||||||
Join Empty | Determines if new callers will be admitted to the Queue, if not, the failover destination will be immediately pursued. The options include:
| ||||||||||||
Leave Empty | Determines if callers should be exited prematurely from the queue in situations where it appears no one is currently available to take the call. The options include:
| ||||||||||||
Penalty Members Limit | Asterisk: penalty members limit. A limit can be set to disregard penalty settings, allowing all members to be tried, when the queue has too fewer members. No penalty will be
| ||||||||||||
Frequency | How often to announce queue position and estimated holdtime (0 to Dis able Announcements). | ||||||||||||
Announce Position | Announce position of caller in the queue | ||||||||||||
Announce Hold Time | Should we include estimated hold time in position announcements? Either yes, no, or only once; hold time will not be announced if <1 minute. | ||||||||||||
IVR Break Out Menu | You can optionally present an existing IVR as a 'break out' menu. | ||||||||||||
Repeat Frequency | How often to announce a voice menu to the caller (0 disable Announcements) | ||||||||||||
Event When Called | When this option is set to YES, the following manager events will be generated: AgentCalled, AgentDump, AgentConnect and AgentComplete. | ||||||||||||
Member Status Event | When set to YES, the following manager event will be generated: QueueMemberStatus. | ||||||||||||
Service Level | Used for service level statistics (calls answered within service level time frame) | ||||||||||||
Agent Regex Filter | Provides an optional regex expression that will be applied against the agent callback number. If the callback number does not pass the regex filter then it will be treated as invalid. This can be used to restrict agents to extensions within a range, not allow callbacks to include keys like *, or any other use that may be appropriate. An example input might be: | ||||||||||||
Run | Select how often to reset queue stats. The following schedule will be followed for all but custom: | ||||||||||||
Randomize | |||||||||||||
Penalty Members Limit | the phone(s) that are rung |
Queue Priorities
Queues by default will sort callers with a first in, first out order. The Queue Priority module allows you weight some callers differently from others. By giving certain callers a higher priority, they are allowed to bypass all of the other callers with a lower priority to receive faster service. The default setting is for all callers to have a priority of zero. Callers with a higher number will be placed in front of priority zero callers. Queue priorities are often used when providing service level agreements (SLAs).
Figure 2-2-22 Queue Priorities interface

Table 2-2-18 Definition of add Queue Priorities
...
If you want to silence a user, just select the checkbox from the mute column and click on "Mute". If you want to terminate a call, select the checkbox from Kick column and click on "Kick".
If you want to terminate all the calls, just click on "Kick All" button.
To update the list of the current participants of the conference click on "Update" button. If you want to go back to the list of conferences, click on "Cancel" button (This will not cancel the current conference).
External Conference
The External Conference option is used to create a single extension number that your users can dial so that they can talk to each other in a conference call. It also creates a destination to which you can send calls so that they can participate in the conference call.
For example, you could create a Conference that will allow your local phones to dial 800, and then enter into a conference call.
Figure 2-2-27 Conferences interface
Table 2-2-22 Definition of add Conference
Item | Definition | ||||||||||||
Basic | |||||||||||||
Conference Number | Use this number to dial into the conference. | ||||||||||||
Conference Name | Give this conference a brief name to help you identify it. | ||||||||||||
User PIN | You can require callers to enter a password before they can enter this conference. | ||||||||||||
Admin PIN | Enter a PIN number for the admin user. | ||||||||||||
Advanced | |||||||||||||
Join Message | Message to be played to the caller before joining the conference. | ||||||||||||
Leader Wait | Wait until the conference leader (admin user) arrives before starting the conference | ||||||||||||
Talker Optimization | Turn on talker optimization. With talker optimization, Asterisk treats talkers who are not speaking as being muted, meaning that no encoding is done on transmission and that received audio that is not registered as talking is omitted, causing no buildup in background noise. | ||||||||||||
Talker Detection | Sets talker detection. Asterisk will sends events on the Manager Interface identifying the channel that is talking. The talker will also be identified on the output of the meetme list CLT command. | ||||||||||||
Quiet Mode | Quiet mode (do not play enter/leave sounds) | ||||||||||||
User Count | Announce user(s) count on joining conference | ||||||||||||
User join/leave | Announce user join/leave | ||||||||||||
Music on Hold | Enable Music on Hold when the conference has single caller | ||||||||||||
Music on Hold Class | Music (or Commercial) played to the caller while they wait line for the conference to start. Choose "inherit" if you want the MoH class to be what is currently selected, such as by the inbound route. | ||||||||||||
Allow Menu | Present Menu (user or admin) when '*' is received ('send' to menu). | ||||||||||||
Record Conference | Record the conference call | ||||||||||||
Maximum Participants | Maximum Number of users allowed to join this conference. | ||||||||||||
Mute on Join | Mute everyone when they initially join the conference. Please note that if you do not have 'Leader Wait' set to yes you must have '
|
...
2.2.4.8 Voicemail Blasting
Voicemail blasting lets you send a voicemail message to multiple users at the same time. The Voicemail Blasting module is used to create a group of users and assign a number to the group. A user can dial this number to leave a voicemail message for the group. All members of the group will receive the message in their voicemail boxes.
Figure 2-2-31 Voicemail Blasting interface
Table 2-2-25 Definition of add VMBlast Group
...
2.2.4.9 Paging and Intercom
The Paging and Intercom module is used to set up an extension number that your users can dial in order to place an intercom call to multiple phones on your system at the same time.
For example, in a small office, you might set up a page group with extension number "100." When 100 is dialed by a local user, all of the phones in the office would go off-hook, and you could speak to everyone at every extension at the same time. Alternatively, you could set up page groups with different extension numbers for each department in the office, i.e. 100 for sales, 110 for service, and so on.
Figure 2-2-32 Paging and Intercom interface
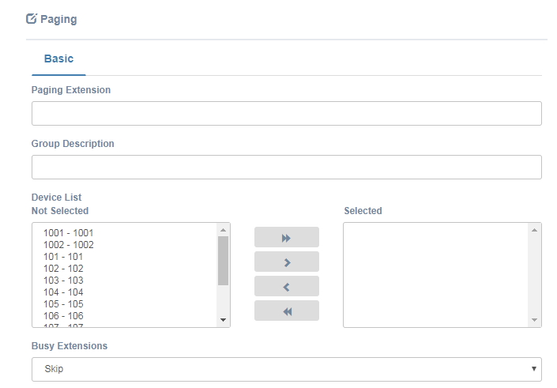
This module is for specific phones that are capable of Paging or Intercom. This section is for configuring group paging, intercom is configured through Feature Codes. Intercom must be enabled on a handset before it will allow incoming calls. It is possible to restrict incoming intercom calls to specific extensions only, or to allow intercom calls from all extensions but explicitly deny from specific extensions.
This module should work with Aastra, Grandstream, Linksys/Sipura, Mitel, Polycom, SNOM , and possibly other SIP phones (not ATAs). Any phone that is always set to auto-answer should also work (such as the console extension if configured).Intercom mode is currently disabled, it can be enabled in the Feature Codes Panel.
| Anchor | ||||
|---|---|---|---|---|
|
2.2.5.1 Languages
The Languages module is used to allow calls to be routed to localized or alternate language recordings.
Figure 2-2-33 Languages interface
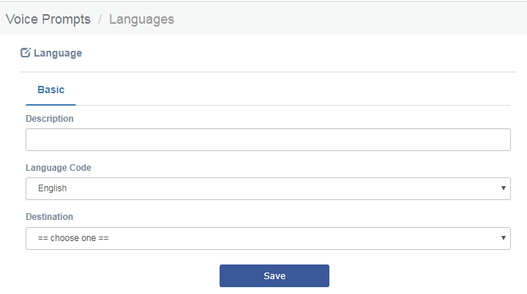
Languages allow you to change the language of the call flow and then continue on to the desired destination. For example, you may have an IVR option that says "For French Press 5 now". You would then create a French language instance and point it's destination at a French IVR. The language of the call's channel will now be in French. This will result in French sounds being chosen if installed.
Table 2-2-26 Definition of add Language
...
2.2.5.2 System Recordings
The System Recordings module is used to record or upload messages that can then be played back to callers in other modules. It can also be used to make pre-installed Asterisk recordings available for use in other modules.
For example, you might create a recording called "Main Menu" and then play that message in an IVR before a caller is asked to make a selection. Or, you might record a recording called "Holiday Message" and then use that message in an Announcement. You would then route incoming calls to the Announcement or IVR using the Inbound Routes Module.
Figure 2-2-34 System Recordings interface
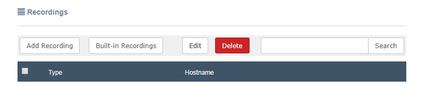
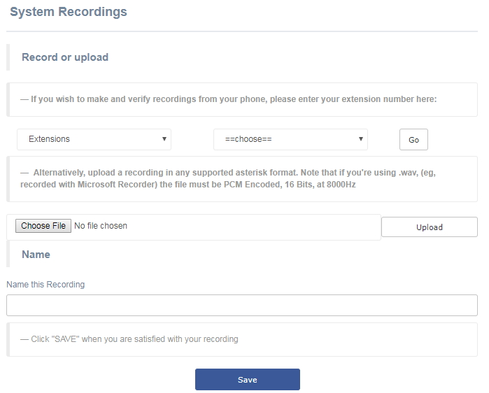
2.2.5.3 Announcement
The Announcements Module is used to create a destination that will play an informational message to a caller. After the message is played, the call will proceed to another destination.
For example, you might create an Announcement that plays the address, fax number, and the web-site of your business. A caller could reach that message by pressing the number 2 from the company's main menu. After hearing the message, the call might be routed back to the company's main menu and allowed to make another selection.
| Anchor | ||||
|---|---|---|---|---|
|
| Anchor | ||||
|---|---|---|---|---|
|
Figure 2-2-35 Announcements interface
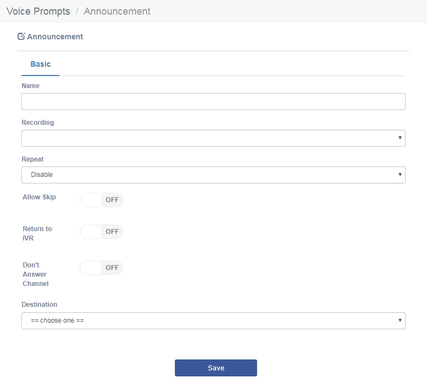
Table 2-2-27
| Anchor | ||||
|---|---|---|---|---|
|
| Anchor | ||||
|---|---|---|---|---|
|
...
Item | Definition | |
No Routes Available | ||
Standard Routes | Message or tone to be played if no trunks are available. | |
Intra-Company Routes | Message or tone to be played if no trunks are available. Used on routes marked as intra-company only. | |
Emergency Routes | Message or tone to be played if no trunks are available. Used on all emergency routes. Consider a message instructing callers to find an alternative means of calling emergency services such as a cell phone or alarm system panel. | |
Trunk Failures |
| |
No Answer | Message or tone to be played if there was no answer. Default message is:"The number is not answering." Hangupcause is 18 or 19 | |
Number or Address Incomplete | Message or tone to be played if trunk reports Number or Address Incomplete. Usually this means that the number you have dialed is to short. Default message is:"The number you have dialed is not in service. Please check the number and try again."Hangupcause is 28 | |
|
| |
|
| |
2.2.5.5 Music On Hold
The volume adjustment is a linear value. Since loudness is logarithmic, the linear lever will be less of an adjustment. You should test out the installed music to assure it is at the correct volume. This feature will convert MP3 files to WAV files. If you do not have mpg123 installed, you can set the parameter: Convert Music Files to WAV to false in Advanced Settings.
Figure 2-2-37 Music on Hold Interface
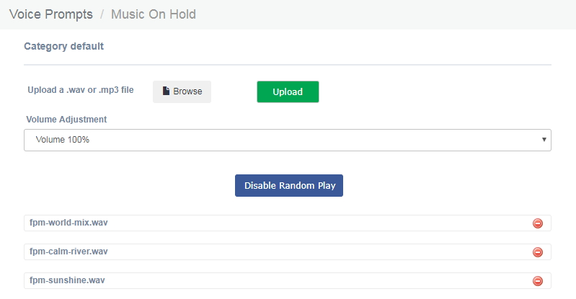
...
Options | Definition |
Country | Configuration for location specific tone indications. |
Dial tone | Set of tones to be played when one picks up the hook. |
Busy tone | Set of tones played when the receiving end is busy. |
Congestion tone | Set of tones played when there is some congestion. |
Record tone | Set of tones played when call recording is in progress. |
Ring cadence | List of durations the physical bell rings. |
Ring tone | Set of tones to be played when the receiving end is ringing. |
Call waiting tone | Set of tones played when there is a call waiting in the background. |
Dial recall tone | Many phone systems play a recall dial tone after hook flash. |
Info tone | Set of tones played with special information messages (e.g., number is out of service.) |
Stutter tone |
Figure 2-2-44 Silence detect
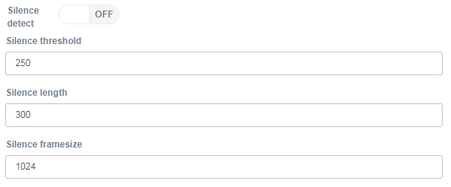
Table 2-2-35 Definition of Silence detect
Options |
| Definition | |
Silence detect |
| Turn on/off silence detect function | |
Silence threshold |
| What we consider silence: the lower, the more sensitive, eg:250 is 250ms. Range: 100 to 500(100 to 500ms), default: 250 | |
Silence length | How many silence threshold of silence before hanging up(eg: 16 is 250ms*16=4s). Range: 2 to 1020 (200ms to 512s), default: 80(20s) | ||
Silence framesize | Rx threshold | Range:-20 dBm0 to -40 dBm0, default: 20(-20 dBm0), all values are understood to be negative. | |
| Tx threshold | Range:-20 dBm0 to -40 dBm0, default: 20(-20 dBm0), all values are understood to be negative. |
...
| Definition | ||||||||||||||||||||||||
Jitter Buffer Settings |
|
| |||||||||||||||||||||||
Jitter Buffer | Asterisk: jbenable. Enables the use of a jitterbuffer on the receiving side of a SIP channel. An enabled jitterbuffer will be used only if the sending side can create and the receiving side can not accept jitter. The SIP channel can accept jitter, thus a jitterbuffer on the receive SIP side will be used only if it is forced and enabled. An example is if receiving from a jittery channel to voicemail, the jitter buffer will be used if enabled. However, it will not be used when sending to a SIP endpoint since they usually have their own jitter buffers. See jbforce to force it | ||||||||||||||||||||||||
Advanced General Settings |
|
| |||||||||||||||||||||||
Language | Default Language for a channel, Asterisk: language | ||||||||||||||||||||||||
Default Context | Asterisk: context. Default context for incoming calls if not specified. FreePBX sets this to from-sip-external which is used in conjunction with the Allow Anonymous SIP calls. If you change this you will effect that behavior. It is recommended to leave this blank. | ||||||||||||||||||||||||
Bind Address | Asterisk: bindaddr. The IP address to bind to and listen for calls on the Bind Port. If set to 0.0.0.0 Asterisk will listen on all addresses. It is recommended to leave this blank. Asterisk 1.8 all supports IPv6. An address of '::' will listen on both ipv4 and ipv6. | ||||||||||||||||||||||||
Bind Port | Asterisk: bindport. Local incoming UDP Port that Asterisk will bind to and listen for SIP messages. The SIP standard is 5060 and in most cases this is what you want. It is recommended to leave this blank. | ||||||||||||||||||||||||
Allow SIP Guests |
| ||||||||||||||||||||||||
Allow Anonymous Inbound SIP Calls |
| ||||||||||||||||||||||||
SRV Lookup | Enable Asterisk srvlookup. See current version of Asterisk for limitations on SRV functionality. | ||||||||||||||||||||||||
Call Events | Generate manager events when sip ua performs events (e.g. hold). | ||||||||||||||||||||||||
Other SIP Settings | You may set any other SIP settings not present here that are allowed to be configured in the General section of sip.conf. There will be no error checking against these settings so check them carefully. They should be entered as: [setting] = [value]in the boxes below. Click the Add Field box to add additional fields. Blank boxes will be deleted when submitted. |
...
Options | Definition | ||||||||||||
Registration Settings | |||||||||||||
Registration Times | Asterisk: minregexpire, maxregexpire. Minimum and maximum length of time that IAX peers can request as a registration expiration interval (in seconds). | ||||||||||||
Jitter Buffer Settings | |||||||||||||
Jitter Buffer |
|
...
Options | Definition |
Language | Default Language for a channel, Asterisk: language |
Bind Address | Asterisk: bindaddr. The IP address to bind to and listen for calls on the Bind Port. If set to 0.0.0.0 Asterisk will listen on all addresses. To bind to multiple IP addresses or ports, use the Other iax settings' fields where you can put settings such as:bindaddr='192.168.10.100:4555.' it is recommended to leave this blank. |
Bind Port | Asterisk: bindport. Local incoming UDP Port that Asterisk will bind to and listen for IAX messages. The IAX standard is 4569 and in most cases this is what you want. It is recommended to leave this blank. |
Delay Auth Rejects | Asterisk: delayreject. For increased security against brute force password attacks enable this which will delay the sending of authentication reject for REGREQ or AUTHREP if there is a password. |
Other IAX Settings | You may set any other IAX settings not present here that are allowed to be configured in the General section of iax.conf. There will be no error checking against these settings so check them carefully. They should be entered as: [setting] = [value]in the boxes below. Click the Add Field box to add additional fields. Blank boxes will be deleted when submitted. |
2.2.6.4 Functions Code
The Feature Codes Module is used to enable and disable certain features available in your PBX and Asterisk, and to set the codes that local users will dial on their phones to use that particular feature.
For example, the Feature Codes Module can be used to set the code that a user will dial to activate or deactivate Call Forwarding. It can also be used to set a Code that can be used to enter into an Echo Test, to hear your extension number, or to hear the time of day.
Figure 2-2-55 Feature code admin interface
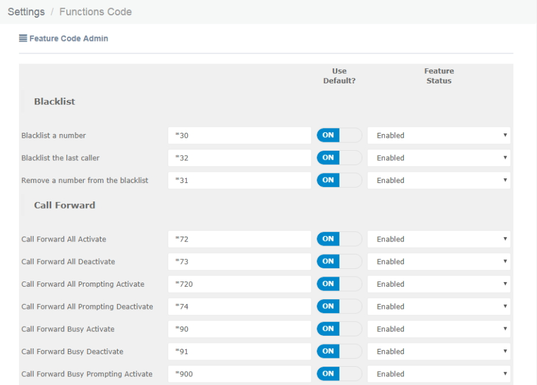
...