A2410P AE2410P on DAHDI User Manual

OpenVox Communication Co.Ltd 
Contents
General Safety Instructions
Test Environments
Chapter 1 Overview
1.1 What is Asterisk
1.2 What is A2410P/AE2410P
Chapter 2 Hardware Setup
2.1 Power supply
2.2 Slot compatibility
2.3 FXO and FXS modules
2.4 Splitter
2.5 Hardware setup procedure
Chapter 3 Software Installation and Configuration
3.1 Download
3.2 Installation
3.3 Configuration
3.4 EC Module
Chapter 4 Reference
Appendix A Specifications
Appendix B Interfaces
General Safety Instructions

CAUTION
- The computers that have A2410P/AE2410P card installed must comply with the country's specific safety regulations.
- Only service personnel should go to install A2410P/AE2410P card.
- Before installing A2410P/AE2410P card, please unplug the power cord and remove the cover from your PC.
- For avoiding personal injuries and damages to your machine and A2410P/AE2410P card, make sure bracket of the card is secured to the PC's chassis ground by fastening the card with a screw.
- Electrical Surges, ESD are very destructive to the equipment. To avoid it, make sure there is a low impedance discharge path from your computer to chassis ground.
- To reduce the risk of damage or injury, please follow all steps or procedures as instructed.
Test Environments
CentOS-5.6
Kernel version: 2.6.18-238.12.1.el5
DAHDI: dahdi-linux-complete-current
Asterisk: 1.8.0
Hardware: OpenVox A2410P/AE2410P
Chapter 1 A(E)2410P Overview
1.1 What is Asterisk
The Definition of Asterisk is described as follows:
Asterisk is a complete PBX in software. It runs on Linux, BSD, Windows (emulated) and provides all of the features you would expect from a PBX and more. Asterisk does voice over IP in four protocols, and can interoperate with almost all standard-based telephony equipment using relatively cost-effective hardware. Asterisk provides Voicemail services with Directory, Call Conferencing, Interactive Voice Response, Call Queuing. It supports three-way calling, caller ID services, ADSI, IAX, SIP, H323 (as both client and gateway), MGCP (call manager only) and SCCP/Skinny (voip-info.org).
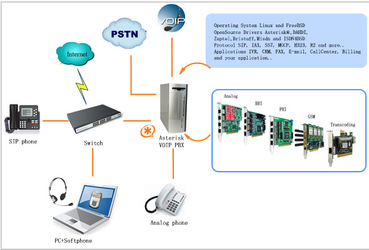
Figure 1 Topology
1.2 What is A2410P/AE2410P
A2410P is a new generation analog card and AE2410P is an A2410P with Octasic® Hardware Echo Cancellation Module on board. With interchangeable quad-FXS and quad-FXO modules they can eliminate the requirements for separate channel banks or access gateways.
The A2410P/AE2410P contains 6 module banks. Each bank supports one RJ-45 interface. The module banks may be filled with up to 6 quad-FXO or quad-FXS modules enabling the creation of any combination of ports. Scaling of an analog card solution is accomplished by simply adding additional cards.
A2410P/AE2410P works well with Asterisk®, Elastix®, FreeSWITCH™, PBX in a Flash, trixbox®, Yate™ and IPPBX/IVR projects as well as other Open Source and proprietary PBX, Switch, IVR, and VoIP gateway applications.
Target applications
- Channel Bank Replacement / Alternative
- Small Office Home Office (SOHO) applications
- Small and Medium Business (SMB) applications
- Gateway Termination to analog telephones/lines
Key benefits
- Takes full advantage of Octasic hardware echo cancellation module to deliver the superior voice quality on both FXO and FXS interfaces in all 24 ports
- Adjustable interrupt routing design, interrupts frequency adjustment
- Up to 24 simultaneous PSTN calls (per PCI slot)
- 3-Month "No Question Asked" return policy
- Lifetime warranty RoHS compliant
- Certificates: CE, FCC, A-Tick
- trixbox TM officially certified
- Elastix® officially certified
Chapter 2 A(E)2410P Hardware Setup
There are some points that should be paid attention to when set up A2410P/AE2410P.
2.1 Power supply
The board should be powered no matter what modules are installed, please connect the power source with A2410P/AE2410P board by a 4-pin power source connector.
2.2 Slot compatibility
A2410P/AE2410P is compatible with any kind of standard PCI 2.2 or above with both 3.3 V and 5 V slot while PCI-E slot is not fit for it; you should confirm your slot type and insert A2410P/AE2410P into any type of PCI slot as previously described.
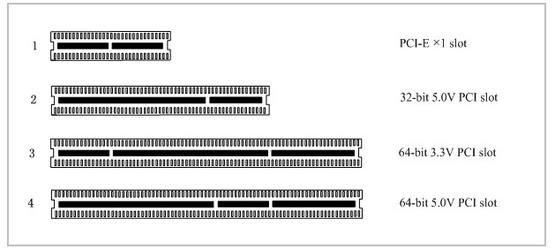
Figure 2 PCI-E and PCI slots
2.3 FXO and FXS modules
FXO (Foreign eXchange Office) is the office end of the line, and FXS (Foreign eXchange Station) is the station end, there is so much difference between them, they can be identified by color, the former ones are red and the latter ones are green. FXO modules use FXS signaling while FXS modules use FXO signaling. A FXO-400 module corresponds to four FXO interfaces which receive power (battery) and ring signals, and a FXS-400 module corresponds to four FXS ports which provides power (battery) and generates ring signals.
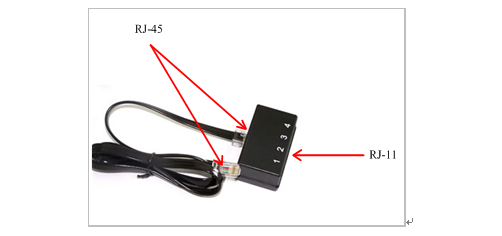
2.4 Splitter
A RJ45 interface of A2410P/AE2410P is divided into four RJ11 ports by a specific splitter as the picture of Appendix B stated. So you should prepare for some splitters when install A2410P/AE2410P.
2.5 Hardware setup procedure
- Power off your PC, remember unplug the AC power cable
- Insert A2410P/AE2410P into a PCI slot
- Put timing cable correctly if necessary, for more details, please refer to HERE
- Fix the board by a screw
- Please plug PSTN lines into FXO ports and extension telephone lines into FXS interfaces before you have detected your PSTN line works well.
- Power on PC
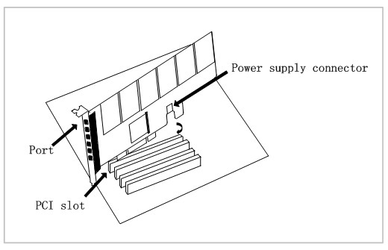
Figure 3 Hardware setup
Caution: During the above processes, an ESD wrist strap is needed. Once power is on, you must not attempt to install or take down the board. Do not forget to connect PSTN lines into analog phones directly to make sure the lines are available before inserting the PSTN lines into FXO ports. After hard ware setup, it is time to install software.
Chapter 3 A(E)2410P Software Installation and Configuration
A2410P/AE2410P supports DAHDI software driver on Linux. To make full use of A2410P/AE2410P, you should download, compile, install and configure DAHDI and Asterisk. Let's make the specific DAHDI and Asterisk version for an example to explain how to install software.
3.1 Download
DAHDI software packages are available on OpenVox official website or Digium. Some patches should be added while the driver sources are from Digium, therefore, it is recommended that downloading the DAHDI driver package from OpenVox official website. Let's make the specific DAHDI and Asterisk versions for an expatiation.
Gain DAHDI source package from OpenVox:
http://downloads.openvox.cn/pub/drivers/dahdi-linux-complete/openvox_dahdi-linux-complete-current.tar.gz
Get Asterisk software package from Digium official website:
http://downloads.asterisk.org/pub/telephony/asterisk/releases/asterisk-1.8.0.tar.gz
Execute the following commands under the directory of /usr/src/ in general, the former two below are used for downloading these two packages and the later two are for unzipping them.
#_wget_http://downloads.openvox.cn/pub/drivers/dahdi-linux-complete/openvox_dahdi-linux-complete-current.tar.gz
#_wget_http://downloads.asterisk.org/pub/telephony/asterisk/releases/asterisk-1.8.0.tar.gz
#_tar_-xvzf_openvox_dahdi-linux-complete-current.tar.gz
# tar -xvzf asterisk-1.8.0.tar.gz
3.2 Installation
1. Hardware detection
#lspci –vvvv
Check the outcome and confirm your system has recognized A2410P/AE2410P. If it has been recognized, "communication controller" will be displayed in the output information like that:

Figure 4 Hardware detection
If A2410P/AE2410P is not recognized by the system, you have to power off and take out the card, then try to insert it into other PCI slot.
2. Software installation
Some dependencies are crucial. If any of them is absent, the software installation process would not go through successfully. Let's run "yum install XX" (XX stands for the dependency's name) to check the availability of dependencies.
#yum install bison
#yum install bison-devel
#yum install ncurses
#yum install ncurses-devel
#yum install zlib
#yum install zlib-devel
#yum install openssl
#yum install openssl-devel
#yum install gnutls-devel
#yum install gcc
#yum install gcc-c++
#yum install libxml2
#yum install libxml2-devel
Notice: If there is no kernel-devel source in the system, users should run the following command to install the kernel-devel to peer current kernel:
#yum install kernel-devel-`uname –r`
While if there is no matched kernel-devel found, you should download matched RPM package to install it, or execute the following command to update to the latest and stable kernel version:
#yum install kernel kernel-devel
After installed, please reboot your machine to apply the new kernel and install the dependencies. If the dependency has been installed, system indicates that nothing to do which means you could go to next one directly. Otherwise, the system will keep on installing it.
After install the dependencies, please change to the directory dahdi-linux-complete-XX (XX represents DAHDI version), then perform the following commands one by one to install DAHDI.
#cd /usr/src/dahdi-linux-complete-XX
#make
#make install
#make config
Caution: If there is something wrong after "make", please refer to HERE. In the url link, the moderator introduces you a method how to patch. After patching, save your changes and exit. Then run "make" again, if successfully, you are going to install Asterisk.
#cd asterisk-1.8.0
#./configure
#make
#make install
#make samples
Notice: " make samples" will install the standard sample configuration file in the directory /etc/asterisk. As a freshman, you should perform make samples, that is to say, it is unnecessary to perform make samples every time. Because once performed, it will cover the old sample configuration files you have installed.
3.3 Configuration
1.Driver loading
After compiling and installing DAHDI and Asterisk, please load the driver by running:
#modprobe dahdi
#modprobe opvxa24xx opermode=CHINA
#dahdi_genconf
Notice: After running "modprobe dahdi" or "modprobe opvxa24xx opermode=CHINA", there is not any indication information displayed if loaded normally and successfully. "opvxa24xx" is the driver module name of A2410P/AE2410P. "opermode" applies to FXO port and is invalid for FXS port, and you are allowed to take place of "CHINA" to other mode name which is available in the file:
../dahdi-linux-XX/linux/drivers/dahdi/fxo_modules.h
If there is any error, please trace the cause. Until all errors are clear up, you could execute "dahdi_genconf" again, and then go to the next step. By running "dahdi_genconf", it will generate /etc/dahdi/system.conf and etc/asterisk/dahdi-channels.conf automatically. Checking whether the generated files information agrees with your hardware setup, if not, you should modify to your specific requirements. Do not forget to confirm dahdi-channels.conf is included in chan_dahdi.conf, if not, run command:
# echo "#include dahdi-channels.conf" >> /etc/asterisk/chan_dahdi.conf
FXO ports use FXS signaling, while FXS ports adopt FXO signaling. A part of system.conf which is one of the basic channel configuration files is displayed. 
Figure 5 A part of system.conf
2. Country mode modification
In order to match your country pattern, you need to change parameters loadzone and defaultzone to your country. For example, your system is in CHINA, you would like them change to:
loadzone = cn
defaultzone = cn
Notice: Some zonedata is available in the file ".. /dahdi-XX/tools/zonedata.c", you can refer to it to match your country mode. Meanwhile, you also need to modify another parameter which is in file /etc/asterisk/indications.conf.
country=cn
A part of file /etc/asterisk/dahdi-channels.conf is showed as below. (Modification, if it is not agree with the hardware setup)
Figure 6 A part of dahdi-channels.conf
After modifying the country mode, please execute the following command:
#dahdi_cfg –vvvvvv
The command is used for reading and loading parameters in the configuration file system.conf and writing to the hardware. A part of outputs are showed in the following figure.

Figure 7 Channel map
3. Asterisk initiation
#asterisk –vvvvvvvgc
If Asterisk is already activate, run "asterisk –r" instead. In the CLI, please run the following command:
localhost*CLI> dahdi show channels

Figure 8 channels show
If DAHDI channels are found, it means they have been loaded into Asterisk. You are going to edit dialplan by your requirements.
4. Dialplan edit
Users must make sure that the context "from-pstn" and "from-internal" are in extensions.conf, here a simple example is given:
#vim /etc/asterisk/extensions.conf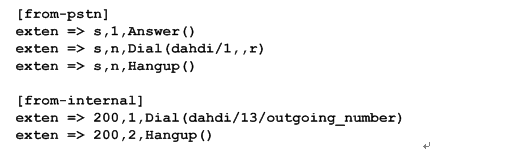
Figure 9 dialplan show
Notice: You should write the destination number instead of the outgoing_number in the above dial plan. The dial plan achieves that when an extension telephone dials 200, Asterisk will transfer through channel 13 to the destination. While a call comes from PSTN line, Asterisk answers firstly, and then gets through to the extension set which connects to channel 1.
After saving your dialplan, please run "asterisk –r", then execute "reload" in the CLI. Next you are able to make calls.
Additional function
Users should run command "cat /proc/interrupts" to check A2410P/AE2410P has independent interrupt. If A2410P/AE2410P shares interrupt with other devices, it may cause some problems even cannot work normally. While A2410P/AE2410P allows users to modify interrupt pin during firmware upgrade for avoiding interrupt conflict.
3.4 EC Module
You can run the command "dmesg | grep VPM" to see if you have EC Module.
[root@localhost ~]# dmesg | grep VPM
OpenVox VPM: echo cancellation supports 32 channels
OpenVox VPM: echo cancellation for 32 channels
OpenVox VPM: hardware DTMF disabled.
OpenVox VPM: Present and operational servicing 1 span(s)
To enable the EC Module, you need to follow the steps below:
step 1: set the echocanceller=hwec like below.
#vim /etc/dahdi/system.conf
# Span 1: OPVXA24XX/24 "OpenVox A1610 Board 25" (MASTER)
fxoks=1
echocanceller=hwec,1
fxoks=2
echocanceller=hwec,2
fxoks=3
echocanceller=hwec,3
fxoks=4
echocanceller=hwec,4
fxsks=5
echocanceller=hwec,5
fxsks=6
echocanceller=hwec,6
fxsks=7
echocanceller=hwec,7
fxsks=8
echocanceller=hwec,8
# Global data
loadzone = cn
defaultzone = cn
step 2: Edit the file /etc/asterisk/chan_dahdi.conf and set echocancel=yes.
step 3: run the command "dahdi_cfg -vvv".
when there is active calls, run the command "lsdahdi", you will see the EC module has been used.
[root@localhost ~]# lsdahdi
### Span 1: OPVXA24XX/24 "OpenVox A1610 Board 25" (MASTER)
1 FXS FXOKS (In use) (EC: HWEC - INACTIVE)
2 FXS FXOKS (In use) (EC: HWEC - INACTIVE)
3 FXS FXOKS (In use) (EC: HWEC - INACTIVE)
4 FXS FXOKS (In use) (EC: HWEC - INACTIVE)
5 FXO FXSKS (In use) (EC: HWEC - ACTIVE)
6 FXO FXSKS (In use) (EC: HWEC - INACTIVE) RED
7 FXO FXSKS (In use) (EC: HWEC - INACTIVE) RED
8 FXO FXSKS (In use) (EC: HWEC - INACTIVE) RED
... .... .... .... ... ... ... ...
"EC: HWEC" means the EC module has been in use. And the "ACTIVE" means there is active calls on port 5.
Chapter 4 A(E)2410P Reference
www.openvox.cn
www.digium.com
www.asterisk.org
www.voip-info.org
www.asteriskguru.com
Tips
Any questions during installation please consult in our forum or look up for answers from the following websites:
Forum
wiki
Appendix A Specifications
•Weight and size
Weight: 165g (A2410P) (5.82oz)
10 g (EC module) (0.35oz)
Size: 312×106.7×18mm3
• Interfaces
PCI Bus: Be compatible with standard PCI 2.2 or above with both 3.3 V and 5 V slot
Power Supply Connect: 12V 4-pin connector
Local Loop Access: Six RJ-45 interfaces, a RJ-45 port is divided into four RJ-11 ports by the specific splitter
• Environment
Temperature: 0 ~50°C (Operation) 40 ~125°C (Storage)
Humidity: 10 ~90% NON-CONDENSING
• Power consumption
Voltage: 12V
Power: 8.21W Minimum, 88.24W Maximum at 3.3 V or 5 V
• Hardware and software requirements
RAM 128 + MB
Linux kernel 2.4.X or 2.6.X
CPU 800+ MHZ
Appendix B Interfaces
There are up to 6 FXS-400/FXO-400 modules on every A2410P/AE2410P, a module corresponds to a RJ45 port which A2410P/AE2410P takes 2 of 8 pins for a pair connector to your 4-pin or 6-pin telephone line, so each RJ45 socket is divided into 4 telephone lines by a splitter. Either 4-pin or 6-pin RJ11 port is compatible with the splitter, let's illustrate pin assignments of RJ11and RJ45 port by the following tables and figures.
4-pin RJ11 port
4-pin RJ11 port | PIN | Description |
| 1 | Not used |
| 2 | Tip |
| 3 | Ring |
| 4 | Not used |

6-pin RJ11 port
6-pin RJ11 port | PIN | Description |
| 1 | Not used |
| 2 | Not used |
| 3 | Tip |
| 4 | Ring |
| 5 | Not used |
| 6 | Not used |

RJ-45 interface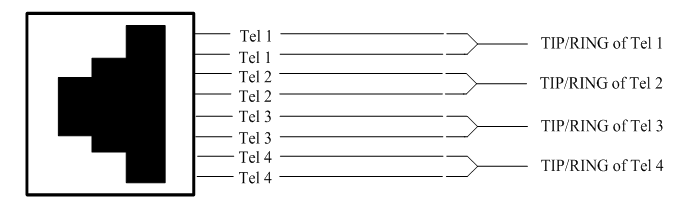
Splitter